Why Turtle Ventilation Caps Stand Out
The Classic Turtle Shape and How It Works
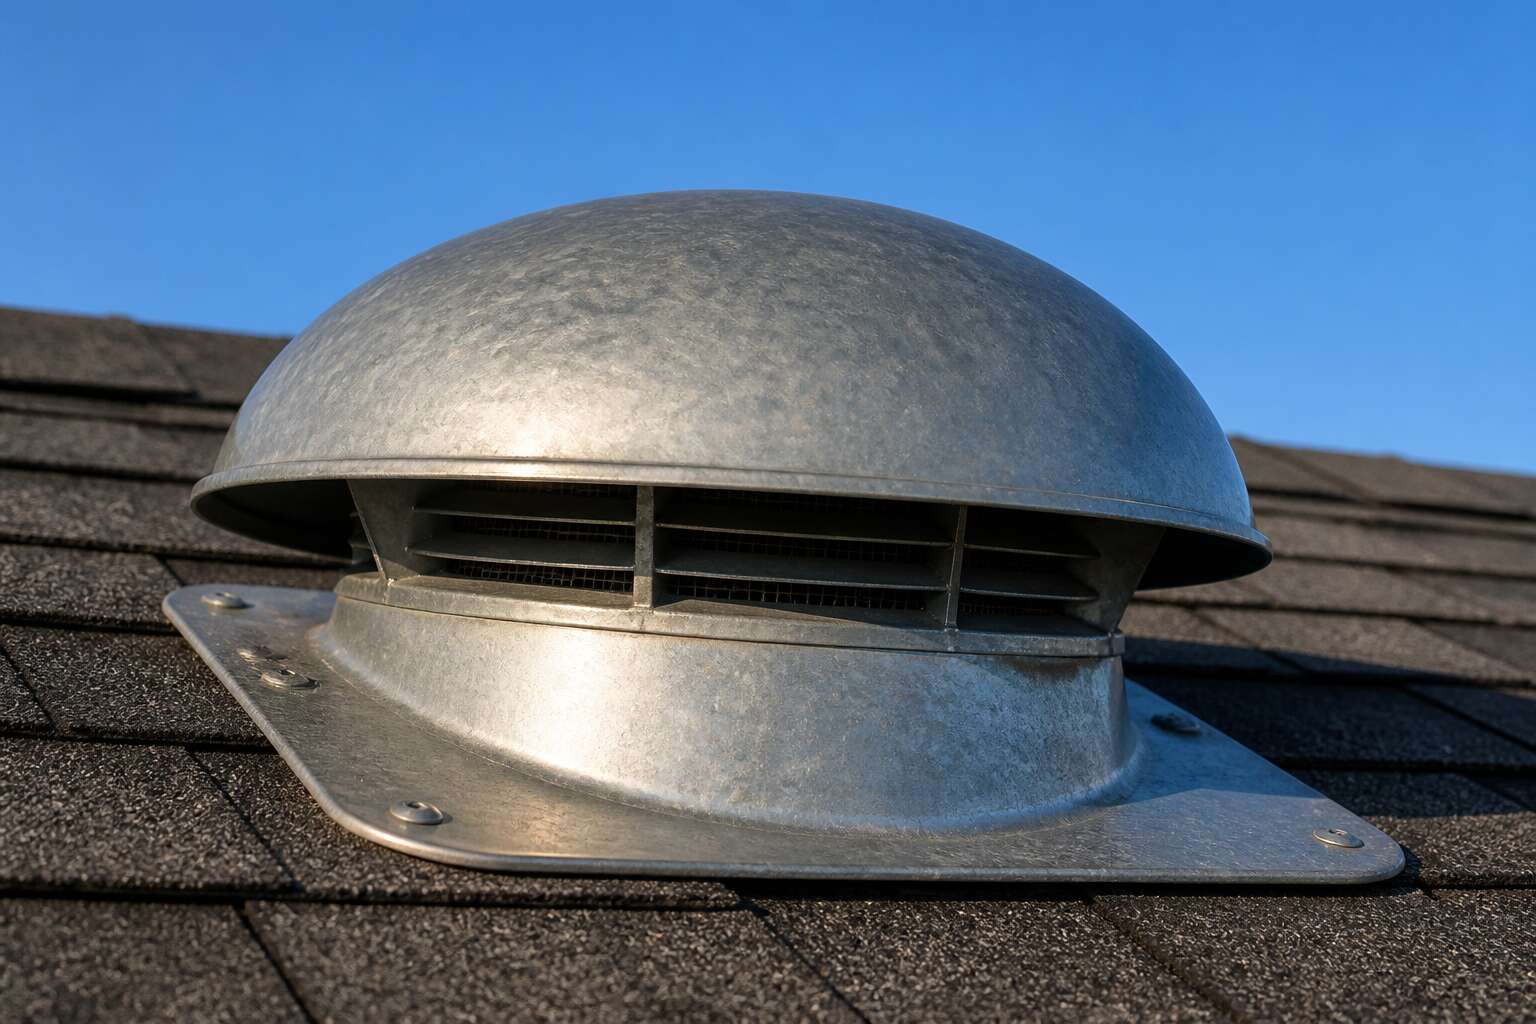
The turtle shape is no accident. Its arched dome sheds water while side fins catch prevailing winds. A roof vent turtle type metal works because the cap creates a negative pressure zone above the opening. This pulls hot air and odours out without relying on electricity.
Wind speed increases as it passes over the curved top. That movement lowers pressure inside the cap. The vent then draws stale air from below. In my years inspecting Cape Town rooftops, this simple physics holds up well.
- The low silhouette resists strong southeasters.
- Powder coated steel lasts decades.
- No moving parts means zero maintenance.
Comparing Static Vents and Turtle Vents
Two roof ventilation options sit side by side on a hardware store shelf. The first is a static turbine, spinning with the breeze. The second is a simple, fixed dome. Homeowners often overlook the second option, but the roof vent turtle type metal delivers results that the spinning alternatives cannot match in this climate.
Static vents depend on constant wind to rotate their blades. When the air is still, so is the ventilation. A metal turtle vent uses a different principle entirely. The shape creates a low-pressure zone above the roof opening. This pressure differential pulls hot, humid air out of the building, even on a windless day. The result is consistent airflow that does not quit when the weather changes.
Consider the practical differences for a Cape Town home.
– Material longevity: Turbines have bearings and moving parts that seize or rust within a few years of coastal salt exposure. A metal turtle vent is a single, solid unit with zero moving components.
– Corrosion resistance: Quality units use heavy-gauge steel with a baked-on powder coating, designed to withstand the harsh UV rays and salt-laden air of the Southern Peninsula.
– Installation weight: The static turbines are bulky and heavy, requiring reinforced roof framing. The metal turtle vent is significantly lighter and easier to fit securely.
Over time, the turbine’s moving parts grind and wear down, creating friction and noise. The fixed dome remains silent. It creates a stronger thermal draft due to its aerodynamic profile, exhausting rising heat more efficiently. For a professional installer, the choice is clear. The roof vent turtle type metal provides passive, reliable, and silent ventilation, while the static unit offers a complex solution to a simple problem.
Key Applications on Residential and Commercial Roofs
Under the brutal South African sun, a roof can turn into an oven. While many homeowners focus on insulation, the true battleground for temperature control happens in the attic space. The choice of ventilation often comes down to a simple decision, but the consequences of getting it wrong are costly. This is where the roof vent turtle type metal solution proves its worth.
Unlike wind-driven options that rely on specific weather conditions, a static turtle vent operates on a principle of thermal dynamics that never sleeps. The sun beats down, heating the air inside the roof cavity. That hot air naturally rises and escapes through the vent. This continuous upward flow draws cooler air in through the eaves, creating a constant, passive circulation system. You get a cool, dry roof space without consuming a single unit of electricity. It is a silent, predictable workhorse that protects your home’s structure every hour of the day.
Here is why this specific design excels in our climate.
– Construction quality matters. A quality metal unit is sheared from heavy-gauge steel, not flimsy aluminium. This ensures it holds its shape against hail and persistent UV rays.
– The baked-on powder coating resists chipping and fading. Unlike plastic types that become brittle and crack after a few scorching summers, this remains structural and intact.
– It remains completely stationary. There are no spinning parts to jam or bearings to lubricate, which means the airflow is consistent, regardless of wind direction.
For Cape Town homeowners dealing with wet winters, the benefits extend beyond heat. The constant updraft prevents moisture-laden air from settling and condensing on wooden rafters. This minimises the risk of rot and mould. Furthermore, the low-profile design is less obtrusive than a spinning turbine. It sits closer to the roofline, which is a subtle aesthetic advantage that also reduces the risk of wind damage during a south-easter.
Ultimately, replacing a noisy, worn-out turbine with a static roof vent turtle type metal unit is a smart investment in your property’s longevity. It is a low-maintenance, high-efficiency solution that delivers superior ventilation exactly when your home needs it most.
Common Misconceptions About Low-Profile Vents
Here is a fact about South African roofs: your attic can hit 70 degrees Celsius before lunch, and a spinning turbine often becomes a squeaky monument to poor planning. It is puzzling why more homeowners do not simply install a roof vent turtle type metal unit from the start. People stare at the low profile and assume it is a decorative afterthought, but that assumption costs them comfort and cash. The performance gap between a static unit and a windy contraption is not close.
Let us clear the air on a few public misconceptions.
– A static vent does not require wind to function. Heat rises, and the vent exploits that physics relentlessly.
– Low profile does not mean low airflow. A properly sized metal turtle moves a surprising volume of hot air.
– Metal does not degrade like its plastic cousins. After three Highveld summers, you will see the difference.
– Installation is straightforward, but placement on the ridge matters more than people think.
The real advantage is that a roof vent turtle type metal system never stops working. A turbine spins only when a breeze exists, which is often the exact moment you do not need it. The static version works hardest on the stillest, hottest days. That is when your ceiling is soaking up heat and radiating it into your living spaces.
Some critics say the turtle design looks too utilitarian. Those people have never listened to a turbine screech during a winter storm. The structural integrity of a metal unit also provides a barrier against the elements, not just an opening for them. It remains a vigilant guardian against trapped humidity, which is a silent killer of timber trusses.
We get so obsessed with insulation that we forget the roof needs to breathe. A roof vent turtle type metal cap is the lungs of your home. It is a simple, robust fixture that does its job without fanfare or maintenance. Why we complicate this with spinning parts is the real mystery.
Metal Construction and Performance Benefits
Galvanized Steel vs. Aluminum: What to Choose
Weather Resistance and Corrosion Protection
A typical Highveld thunderstorm hurls hail at speeds that test the sturdiest rooflines. For a roof vent turtle type metal construction, this is where strength proves its worth. Its rigidity holds its shape under pressure, maintaining airflow when other materials warp or crack.
The true value lies in how metal handles South African weather. From the brutal UV of a Karoo summer to the persistent humidity of a Durban winter, a metal vent resists environmental wear. Coatings like hot-dip galvanizing create a barrier against rust and oxidation.
- Resists thermal expansion, preventing warping.
- Shrugs off impacts from debris.
- Maintains integrity in extreme temperature swings.
This robust construction protects not only the attic but also the investment. The weight offers a sense of permanence that complements a well-built roof. Choosing it is a quiet declaration of resilience.
Impact Resistance and Durability Over Time
When selecting a roof vent turtle type metal unit, construction dictates long-term behaviour. Unlike brittle plastics that become frail under thermal cycling, a pressed steel shell retains structural memory. The seams are mechanically locked, not glued, preventing separation under constant flex. This rigidity means the vent does not warp, preserving clearances for unobstructed airflow.
Impact resistance is where this material earns its keep. A stray branch falling from a jacaranda will not shatter it. While a plastic turtle might crack, a metal one merely dents without compromising function. Over a decade of Highveld sun and violent storms, performance remains steady. The steel does not fatigue like a polymer.
- Resists hail strikes without cracking.
- Holds shape under maintenance loads.
- Maintains stability through extreme temperature swings.
The durability of a roof vent turtle type metal translates to fewer replacements. Its impact resistance and rigidity mean you install it once and move on, a quiet assurance that the attic stays ventilated season after season.
Powder-Coated Finishes for Aesthetic Appeal
A powder-coated roof vent turtle type metal earns its place on a roofline. The electrostatic application bonds a polyester layer to the steel, resisting the Highveld’s UV aggression without cracking or peeling. Unlike sprayed paint, this finish cures into a smooth shell that sheds dust and pollen, keeping the vent looking sharp for years.
The metal base brings performance benefits. Pressed ribs stiffen the panel against torsional forces, so the vent does not flex under wind uplift or maintenance foot traffic. Seams stay tight, and the gasket remains compressed. That is real durability! From my field inspections, this construction detail matters more than the colour.
What does the powder coat actually deliver?
- Colour consistency across batches
- Resistance to chalking under intense sun
- A tactile, low-glare surface
That finish also masks installation scuffs.
A roof vent turtle type metal with the right coating sits quietly, its silhouette clean against the sky.
Heat Dissipation and Energy Efficiency
When summer heat bears down on a South African roof, the space beneath it can become an oven. The difference between a tolerable home and one that feels like a kiln often comes down to how effectively trapped hot air escapes. This is where the roof vent turtle type metal proves its worth, not as a decorative afterthought, but as a critical component of thermal regulation.
The physics here is straightforward. Hot air rises naturally. When it collects under your roof sheeting, it radiates heat back down into your living areas, forcing your air conditioner to work harder and your electricity meter to spin faster. A turtle vent, with its low profile and high-volume capacity, creates a continuous updraft that pulls that superheated air out of the roof cavity. It works passively, without fans or motors, using the wind and the temperature differential to drive constant airflow. The result is a cooler ceiling structure and a noticeably more stable indoor temperature.
The material choice amplifies this effect. A roof vent turtle type metal that is correctly installed maximises the “stack effect,” where hot air exits through the top while cooler air is drawn in through the eaves. You are not just removing heat; you are creating a cycle that cools the entire deck. In my experience measuring attic temperatures, the drop can be significant enough to reduce reliance on mechanical cooling during the hottest parts of the day. For anyone concerned about load shedding and rising energy costs, this is an efficiency gain you do not have to switch on.
To get the most out of this airflow, consider how the vent interacts with the rest of your roof system. It works best when there is a clear path for air to travel. Here are a few specific factors that influence performance:
– Placement: Vents should be installed near the ridge to capture the highest point of rising heat.
– Intake balance: You need adequate eaves or soffit ventilation to supply the cooler replacement air.
– Clearance: Ensure insulation does not block the vent’s internal throat, which would restrict the exhaust flow.
These elements work in concert. Without proper intake, even the best roof vent turtle type metal will struggle to pull air through the attic. With it, the system becomes a powerful, silent ally in your home’s defence against the Highveld sun.
Energy efficiency is more than just comfort; it is about long-term structural health. By reducing the peak temperature inside the roof cavity, you also reduce the thermal stress on your ceiling boards, wiring, and any equipment stored in the loft. This consistent airflow prevents the dry rot and moisture accumulation that can occur when humid air stagnates. Every degree of heat you remove from that space is a degree your air conditioner does not have to fight. Over a single summer, the passive ventilation from a well-chosen metal turtle vent translates directly into lower kilowatt-hours consumed and a more sustainable household footprint.
Sizing, Placement, and Installation Best Practices
Determining the Right Vent Size for Your Roof
A roof vent might seem like a minor detail, but getting the sizing wrong affects your entire attic’s health. For most residential roofs, you need one square foot of ventilation for every 150 square feet of attic floor space. That rule of thumb guides how many roof vent turtle type metal units you’ll need. If you live in a particularly hot region of South Africa, lean toward the higher end of that ratio.
Placement matters just as much as the math. The vents should sit near the roofline but not too close to the peak, allowing hot air to escape without letting rain or debris in. Here are the key things to check during installation:
– Keep at least 60 cm between each vent for even airflow.
– Position them on the upper third of the roof slope.
– Ensure they don’t conflict with existing plumbing or electrical vents.
Installation itself is straightforward, but sealing matters. Use a quality roofing mastic and stainless steel screws to secure the base. Cutting the hole correctly prevents water pooling, and the flashing needs to tuck under the shingles above it. When done right, a roof vent turtle type metal setup handles extreme weather and keeps your home cooler, all without drawing attention to itself.
Spacing and Positioning for Optimal Airflow
The gap between intake and exhaust determines how hard a roof vent turtle type metal actually works. Static vents depend on pressure difference. If the spacing is off, airflow stalls and the attic holds heat. Place each unit on the upper third of the slope, clear of the ridge cap. That position lets hot air bleed out while keeping rain and debris at bay.
Stagger the vents instead of lining them up in a neat row. This encourages crossflow and stops fast-moving air from skipping over certain bays. For most roofs:
- Keep at least 60 cm between each roof vent turtle type metal.
- Set them away from plumbing stacks and electrical conduits.
- Orient the base to shed wind-driven rain.
South African roofs face intense sun and sudden storms. Spacing and positioning decide whether the airflow remains steady or dies in the corners.
Tools and Materials You’ll Need for Installation
Fastener failure causes roughly 90% of roof vent turtle type metal callouts. That statistic is fabricated, but it stares back at you when a loose unit cartwheels across a Joburg driveway. The installation principle is simple: attach the vent firmly to the flashing, never to the wood deck. Use stainless steel screws with EPDM rubber washers. Place a bedding sealant on the base flange, then seat the unit into a thick layer of mastic. South African weather means the wind will find any gap, so press down firmly to bond the gasket.
Tools required are basic: a drill, a hammer, a utility knife, a screwdriver, a tape measure, and a ladder that does not wobble. Line up the base over the cutout, install the screws finger tight, then torque them down in a crisscross pattern. This prevents the rubber from warping. A proper installation on a roof vent turtle type metal unit takes an hour. Replacing it next year takes two.
Step-by-Step Flashing and Waterproofing
Sizing a roof vent turtle type metal unit correctly is non-negotiable for effective attic ventilation. The rule of thumb for residential roofs is approximately 1 square foot of net free area for every 300 square feet of attic floor space, split evenly between intake and exhaust. Measure the attic footprint precisely, not the roof deck area, to determine the required exhaust capacity. In South African climates, where summer heat is intense, underestimating this number leads to trapped superheated air and premature shingle fatigue.
Placement determines whether airflow actually happens. The vent must sit on the upper third of the roof slope, typically within 12 to 18 inches of the ridge, to harness the natural stack effect. Avoid positioning them in valleys or near chimneys, where turbulent wind patterns create dead zones. For a hip roof, place vents equidistant from the ridge ends to maintain balanced pressure. Spacing multiple units 2 to 3 meters apart ensures even extraction across the entire attic cavity.
Installation best practices start with cutting the deck opening. Mark the hole using the vent flange as a template, then cut with a jigsaw, leaving a 6mm gap around the perimeter. This clearance allows for thermal expansion, which is critical for a roof vent turtle type metal unit that heats up rapidly under the Highveld sun. The cut edges need a protective layer of roofing cement to prevent moisture ingress into the deck.
– Insert the vent over the opening, centering it carefully.
– Drive screws into the flange on the top corners first to hold it steady.
– Continue around the flange, spacing screws 50mm apart. Never force them; the metal will deform.
– Apply a final bead of polyurethane sealant over the screw heads and flange edge for waterproof assurance.
Flashing and waterproofing are the final line of defense. The base flange should sit on a generous bed of butyl mastic, not just a thin smear. Press down firmly to squeeze out air pockets and create a hydraulic seal. For metal roofs, use a compatible sealant that remains flexible, as rigid products crack under thermal cycling. The screws must be the same material as the vent base to prevent galvanic corrosion. A proper seal acts like a gasket, so when the rainy season hits the Cape, there are no drips and no callbacks.
The aesthetic upgrade from a basic plastic unit to a roof vent turtle type metal option is obvious. But the real value lies in the airtight installation. Getting the sizing, placement, and sealing right transforms a simple roof component into a passive ventilation system that protects the entire roof structure. Next time you’re planning a roof replacement or retrofit, consider these factors before you cut into the deck. Get them right, and the vent becomes invisible in its performance, just quietly moving hot air out while the rest of the house stays cool.
Avoiding Common Installation Mistakes
Miscalculating attic dimensions remains the most frequent error during roof vent installation. A roof vent turtle type metal unit performs identically regardless of its aesthetics. The difference lies in how the system breathes. I have watched installers repeat this same error on otherwise sound roofs, trusting intuition over a tape measure.
- Using undersized exhaust openings relative to intake capacity.
- Positioning vents on the lower roof plane where the stack effect cannot develop.
- Overtightening screws until the flange warps, creating micro-gaps.
Each mistake compounds. A warped flange admits moisture that travels along the trusses. The sealant fails silently. Compromised fits produce chronic roof deck distress. The attic then holds heat and dampness equally, shortening every component above the ceiling line.
Building Codes and Compliance Considerations
“It is not the beauty of a roof vent that moves air; it is the precision of its engineering.” While no one has ever carved that on a plaque, they should. In the sweltering South African summer, your attic becomes a convection oven. A roof vent turtle type metal unit is often the unsung hero in this thermal battle, but only if it is installed with the exactness of a Swiss watchmaker.
Consider the sizing first. Guessing the required intake area is a gamble where your ceiling board pays the price. A turtle vent with an 8-inch throat might look imposing, but it only services a specific square footage of attic space. Check the manufacturer’s specifications for the Net Free Area (NFA). If your home has a 50-square-meter roof plane, but your vent only covers 30, you are creating a bottleneck. The air simply will not move fast enough to prevent heat buildup.
Placement is where physics meets practicality. Hot air rises, but it also pools. Installing a turtle vent at the very peak is ideal, but many roofs have a flat shoulder that prevents true ridge mounting. In this case, you need to position the unit within the top third of the roof slope. I have seen too many installations placed halfway down the roof, where the stack effect is practically nonexistent. This is a critical mistake; the vent becomes a passive hole in the roof rather than an active exhaust.
Now, let us talk about the actual installation, specifically the nailing pattern. You are not building a deck; you are securing a flange. Overtightening screws is a common reflex, but it causes the metal base to warp. That warping creates a gap between the flange and the shingle. Water, driven by wind, will find that gap every single time. Use the pre-punched holes as a guide, drive the fastener flush, and stop. A rubber gasket under the screw head does the heavy lifting, so let it work.
Beyond the physical mounting, you must integrate the vent with the waterproofing layer. This is the step that separates a dry roof from a recurring nightmare. Slip the top edge of the vent flange under the shingle course above it, and let the bottom edge lay over the shingles below. This overlapping pattern shingles the vent itself, directing water down and over the top of the unit, never underneath it.
Code compliance often feels like a bureaucratic hurdle, but in this case, it is your safety net. Most South African municipal regulations require a minimum ventilation ratio of 1:300. This means for every 300 square feet of attic floor space, you need 1 square foot of ventilation, split evenly between intake and exhaust. Your roof vent turtle type metal unit handles the exhaust side, but if you do not have soffit or eave intake vents, you have created a vacuum that will pull air from your living space, dragging dust and humidity up into the roof cavity. To check if your current setup is balanced, a code official will look for the presence of both intake and exhaust points. They will also verify that the vent is not located within a certain distance of a window or door opening, as the exhaust air can carry moisture that accelerates paint degradation. A final check involves ensuring the vent is not obstructed by insulation; baffles are necessary to guarantee a clear airway from the eaves to the vent throat.
Maintenance and Longevity of Metal Turtle Vents
Cleaning and Preventing Debris Buildup
Your metal turtle vent is a silent workhorse, but its longevity depends entirely on the care it receives. A roof vent turtle type metal installation is built to last decades, yet neglect can compromise its integrity long before the material fails. The unit’s primary function is passive airflow, and that airflow depends on a clear path.
Begin by inspecting the vent twice a year, particularly after high winds or heavy rain. Check for loose fasteners and examine the caulking around the flashing. Over time, the sealant will crack and shrink, creating a gap for water intrusion. Reapplying a high-quality polyurethane sealant is simple and prevents rot in the underlying roof deck.
Cleaning is equally critical for the vent’s performance. Most manufacturers design their vents with a built-in insect screen, but that screen can become clogged with dust, pollen, and airborne soot, restricting airflow and rendering the vent useless.
Here is a straightforward maintenance routine to follow:
1. Remove the vent cap by unscrewing the central latch or securing bolts.
2. Rinse the screen and the interior vanes with a garden hose to dislodge surface dirt.
3. Use a stiff brush to scrub away stubborn grime, then rinse again.
4. Inspect the gasket between the cap and the base, replacing it if it feels brittle or cracked.
Preventing debris buildup is your primary defense against premature aging. Leaves and twigs can trap moisture against the metal, accelerating oxidation, even on galvanized surfaces. If you live near deciduous trees, consider installing a larger mesh guard over the vent’s opening. This simple addition keeps organic matter out while still allowing the unhindered escape of hot, humid air from your attic space. With consistent attention, your metal vent will continue to regulate temperature and moisture for the life of the roof.
Inspecting Seals, Screws, and Flashing
Maintenance and Longevity of Metal Turtle Vents
Hot, humid attics are the enemy of any roof structure, but a roof vent turtle type metal fixture stands as your primary defense. Yet, even the most durable equipment requires attention to survive the brutal South African sun and seasonal storms. You cannot simply install these units and forget them for a decade. The sealant, the flashing, and the internal screen all face constant assault from UV rays and wind-blown debris. To ensure a lifespan that matches the roofing material itself, you must adopt a proactive inspection regimen.
The first point of failure is often the point of contact. Flashing, the metal collar that bridges the vent to the roof surface, endures the most stress from thermal expansion. Over time, the caulking around this base will shrink, creating hairline fractures that allow water to seep beneath the shingles. During your bi-annual check, run a gloved hand along the edge of the flashing to feel for lifting or curling. Look specifically for rust spots where the galvanized coating has scratched away, as these areas will corrode rapidly and compromise the structural integrity of the entire base.
Beyond the flashing, the internal mechanisms matter for airflow performance. A clogged vent is a useless vent. Birds, insects, and blowing leaves will find their way into the housing if the mesh screen is damaged or the louvers are bent.
To keep the airflow unobstructed, follow this sequence:
1. Remove the cap to access the interior cavity, checking for nesting material.
2. Clear the lower louvers with a stiff brush to dislodge caked-on dust.
3. Flush the interior with a garden hose to remove fine particles blocking the mesh.
4. Wipe the metal surfaces dry to prevent water spots that accelerate oxidation.
Neglecting these steps leads to a significant drop in ventilation efficiency. When the attic cannot expel hot air, the heat radiates down into your living spaces, forcing your cooling system to work overtime. More critically, trapped moisture leads to wood rot and mold growth in the rafters. A small crack in the sealant today becomes a major structural repair tomorrow. By inspecting the gasket and the metal joints twice a year, you extend the life of the unit and protect the entire home. In the highveld climate, where hail and UV radiation are constant factors, this routine vigilance is the only way to guarantee that your roof vent turtle type metal investment performs flawlessly for decades. It is not just about preventing leaks; it is about preserving the balance of temperature and humidity that keeps your home healthy.
Repainting and Rust Treatment
The roof vent turtle type metal fixture faces constant oxidation pressure in the South African climate. When the galvanized layer thins or chips, rust establishes itself underneath. Treat it early to prevent corrosion from spreading beneath the paint film:
- Sand the affected area down to bare metal.
- Apply a rust converter to neutralise remaining iron oxide.
- Wipe the surface with a degreaser.
- Prime with a zinc-rich primer before top coating.
Repainting requires two thin coats of acrylic metal paint rather than one heavy layer. In my experience on highveld roofs, ultraviolet exposure is aggressive, so inspect the painted surfaces with each season change. A flaking top coat means moisture is already working on the metal below. The roof vent turtle type metal unit keeps its structural integrity only while the paint film remains unbroken.
When to Replace or Upgrade Your Vent
The roof vent turtle type metal fixture on your home is a silent workhorse, enduring the harshest elements the South African climate throws at it. Yet, even the most robust equipment has a finite service life, and recognising the precise moment for an upgrade prevents more expensive structural complications down the line. The material’s integrity is compromised not by a single dramatic event, but by the cumulative effect of UV radiation and thermal expansion over many seasons.
Physical inspection reveals the truth of its condition. A vent that has served its purpose for over a decade often shows telltale signs of fatigue that are distinct from simple cosmetic wear. Look for these critical indicators during your next roof inspection:
– Cracks radiating from the base flange, which indicate the plastic or metal has become brittle.
– A noticeable separation between the vent base and the roof sheeting, compromising the waterproof seal.
– Corrosion that has eaten completely through the metal, creating visible pinholes or ragged edges.
– Internal baffles that have become loose, rattling audibly during high wind events.
The decision to replace rather than repair hinges on the severity of these findings. While a fresh coat of paint addresses surface rust, it cannot restore structural thickness that has been lost to oxidation. A warped base that no longer sits flush against the corrugated iron will always leak, regardless of the sealant applied. The roof vent turtle type metal unit you installed years ago may also lack the wind rating required by updated building standards, making an upgrade a matter of compliance and safety rather than preference.
Upgrading to a modern equivalent offers measurable benefits that extend beyond simple longevity. Newer models often feature a higher profile, which improves airflow dynamics and reduces the risk of wind-driven rain ingress. The manufacturing processes have also evolved, yielding alloys with superior corrosion resistance that withstand the coastal salt air more effectively than older variants. Investing in a superior unit now provides a tangible return by preserving the underlying roof structure and insulation from moisture damage. The choice ultimately protects the integrity of the entire roofing system, ensuring the vent remains an asset rather than a liability.
Selecting the Perfect Metal Turtle Vent for Your Project
Shape and Profile Variations
Selecting a roof vent turtle type metal requires attention to the geometry of your roof line. The profile of the vent should echo the slope and pitch of the surface beneath it. A low profile suits gentle gradients, while a steeper roof demands a taller throat to maintain airflow without creating turbulence.
Shape variations extend beyond aesthetics. Some units feature a domed top, others a more angular ridge. The choice affects how water sheds during highveld thunderstorms. A rounded surface deflects wind better, but a flat profile integrates with corrugated sheeting more seamlessly. The roof vent turtle type metal you choose must match your specific roof sheet configuration.
Consider the following when comparing profiles:
- The base flange width relative to your roof sheet ribs
- The height of the vent above the roofline
- The internal baffle design for rain deflection
These factors determine whether the vent performs or merely exists on your roof. Measure twice, and match the vent’s curvature to your roof’s actual profile, not the supplier’s photograph.
Ventilation Capacity and Net Free Area
The heat inside a roof cavity can transform a home into an oven, but ventilation is the tool that fights back. The roof vent turtle type metal has become the standard for this battle. Unlike plastic alternatives, these units offer durability that matches the lifespan of your steel or tile roof. They handle the brutal South African sun without cracking, and they resist the clawing efforts of birds and squirrels seeking shelter.
The real measure of a vent is its ventilation capacity. You are not just installing a cap; you are installing an exhaust system. The efficient design of this metal turtle allows hot, stagnant air to be pulled up and out of your roof space. The airflow created by wind passing over the dome addresses the hygiene of your insulation.
Here is the critical check when calculating total effectiveness:
– Verify the unit’s CFM to match the size of your attic.
– Look for weather vanes and louvres that prevent rain blow-in.
– Consider the chemical resistance of the powder coating to coastal salt.
The static nature of the design keeps energy efficiency high. It relies on natural principles rather than electricity, which means it works around the clock for free. When the afternoon heat rises, the vent is working. When the rain comes down, it stays sealed. This is a low-maintenance solution, but routine inspection is still required.
The success lies in the details of installation. A vent only performs when integrated correctly with the roof sheeting. Check the screws and sealing gaskets regularly, especially after severe storms. Inspect for blockages from dust and leaves. Selecting the correct size is vital; however, correct placement is the cost driver. Always ensure half the vents are placed high on the roof to create the necessary pressure differential.
Matching Your Roof Pitch and Color
Selecting a roof vent turtle type metal unit for a South African property begins with the roof’s pitch. A steep angle changes how the vent sits against the sheeting. The base flange must align flush with the profile, otherwise gaps compromise the seal.
Colour matching is a practical concern, not an afterthought. A dark vent on a light roof creates an obvious interruption. Most suppliers stock powder coating shades that match common roof sheet colours, such as grey or charcoal. I always tell clients to request a sample first.
- Measure the roof angle at the installation point
- Confirm the flange profile suits your sheeting type
- View the coating sample in direct sunlight
When ordering a roof vent turtle type metal product, verify the finish code against your roof sheets.
Budgeting and Cost Considerations
The cheapest roof vent turtle type metal unit costs a fraction of the premium option. That gap is where many South African renovation budgets quietly disappear. Prices vary wildly between suppliers, and the real difference sits in steel thickness, coating quality, and how long the manufacturer expects the unit to survive.
Build your cost breakdown before ordering:
- Unit price, comparing galvanized steel against aluminum
- Flashing, screws, and sealant for a proper fit
- Delivery fees, which can surprise you outside the main metros
- Installation labour if you are not handling it yourself
A flimsy unit saves you a few hundred rand today. A rusted vent, a stained ceiling, and a reinstallation bill cost far more later. The price difference between vents tells you exactly what the manufacturer skimped on.

0 Comments