
Understanding Roof Vents and Their Importance
What Are Roof Vents?
In the quiet rhythm of rural life, a sturdy roof isn’t just about shelter—it’s about safeguarding the warmth and memories inside. Roof vents play a silent yet vital role in this sanctuary, quietly working to regulate airflow and prevent moisture build-up. When these vents falter, the entire home’s comfort and integrity can be compromised, leading to costly roof vent repairs that might have been avoided with timely attention.
Understanding what roof vents are is essential. They are small yet crucial openings placed on the roof, designed to allow excess heat and moisture to escape from the attic space. Proper ventilation not only prolongs the lifespan of the roof but also helps maintain a healthy indoor environment. Without effective roof vent repairs when needed, homeowners risk increased energy bills and structural issues that can turn a peaceful dwelling into a source of ongoing worry.
- Attic ventilation
- Moisture control
- Energy efficiency
- Prolonged roof lifespan
Types of Roof Vents
Understanding roof vents isn’t just about knowing where they are; it’s about recognising their silent superhero role in maintaining a home’s health. These unassuming openings act as the attic’s personal air traffic controllers, ensuring a steady flow of fresh air while banishing excess heat and moisture. Without proper ventilation, your roof becomes a battleground of condensation and thermal chaos, accelerating wear and tear. And let’s face it — ignoring roof vent repairs is like letting a sneaky leak turn into a full-blown flood.
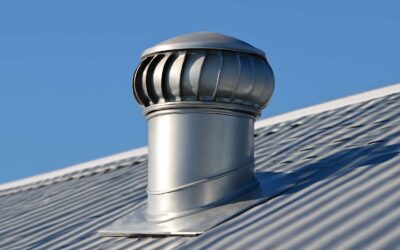
There are several types of roof vents, each with its own personality and purpose. Some popular options include ridge vents, soffit vents, and turbine vents, all working together as a well-oiled ventilation system. The right choice depends on your roof’s design and climate. When these vents malfunction or become blocked, it’s not just an inconvenience — it’s a recipe for moisture buildup, mould, and skyrocketing energy bills. Recognising the importance of roof vent repairs can save you from a costly overhaul later on.
Why Roof Vent Maintenance Matters
In the symphony of a well-maintained home, roof vents serve as the quiet conductors, orchestrating the delicate balance of air flow within your attic. When these vents falter, the entire harmony risks dissonance — moisture accumulates, and thermal chaos ensues. The importance of understanding roof vents lies not just in recognising their presence, but in appreciating their vital role in preserving your roof’s integrity.
Neglecting roof vent repairs can turn a seemingly minor issue into a costly ordeal. Over time, blocked or damaged vents can lead to mould growth, wood rot, and even structural weakening. Regular inspection and timely repairs ensure these silent guardians continue to function flawlessly, safeguarding your home against the relentless assault of moisture and heat. Remember, a well-ventilated roof isn’t just about comfort — it’s about longevity and resilience.
Maintaining your roof vents is a proactive step — think of it as tending to the roots of your home’s health. When problems arise, swift roof vent repairs become essential. Whether it’s clearing debris from soffit vents or sealing leaks in ridge vents, addressing issues early keeps your home protected and your energy bills in check. Because in the grand dance of home maintenance, every component, especially roof vents, plays a starring role.
Common Signs of Roof Vent Problems
Poor Ventilation and Its Effects
Sometimes, the silent whispers of a roof vent’s distress echo louder than one might expect. A roof with compromised ventilation often reveals itself through a series of subtle but telling signs. Warmth accumulating in the attic during winter or persistent dampness can be the first clues that your roof vent requires attention. Over time, these issues can spiral into mould growth, wood rot, or even structural damage—transforming a seemingly minor problem into a costly ordeal.
Poor ventilation doesn’t just affect the attic; it has far-reaching consequences on your entire home. Excess moisture trapped beneath the roof can lead to increased energy bills, as your heating and cooling systems work overtime to combat the unrelenting heat or cold. Furthermore, inadequate airflow fosters a haven for mould and mildew, which can compromise indoor air quality and threaten your family’s health.
Recognising these signs early can save you from extensive roof vent repairs later on. Keep an eye out for:
- Unusual odours or mould growth in the attic
- Peeling paint or wallpaper below the roofline
- Persistent condensation or frost on the roof deck
- Increased energy bills despite no change in usage
Addressing these issues promptly ensures your home remains a sanctuary of comfort, not chaos, and keeps your roof vents functioning optimally—preparing you to face the seasons ahead with confidence.
Water Leaks and Mold Growth
In the shadowy realm of roof vent repairs, certain signs serve as the whispers of an unseen disturbance—clues that demand our attention before they evolve into a full-blown catastrophe. Water leaks and mould growth are among the most alarming indicators that your roof’s ventilation system is faltering. When moisture begins to seep through unseen cracks or gaps, it invites mould to take root, creating a sinister tapestry of spores that threaten both the integrity of your home and your health.
These issues often manifest through subtle yet persistent symptoms. Unexplained damp patches on ceilings or walls, coupled with a musty odour that lingers in the air, can be early warnings of compromised roof vent functionality. Over time, this dampness fosters wood rot and structural decay, transforming what once seemed like minor inconveniences into costly roof vent repairs. Recognising the telltale signs early is crucial; it’s a safeguard that preserves the sanctity of your dwelling and avoids the spiralling expense of extensive repairs.
- Persistent water stains on ceilings or walls
- Mould patches, especially in attic spaces
- Frost or condensation forming on the roof deck during colder months
Unusual Noises or Odors
Unusual noises or odours emanating from your roof can be more than just a nuisance; they’re often harbingers of underlying roof vent problems. A persistent rattling, banging, or whistling sound may indicate loose or damaged vent components, while a musty smell could point to moisture accumulation within the system. These subtle signals demand attention, as ignoring them can lead to more significant issues down the line.
In some cases, you might notice an increase in pest activity around your roof or attic space, which can be a symptom of compromised vents. Blockages or gaps in the ventilation system not only affect airflow but also create an inviting habitat for insects and rodents. Recognising these signs early can save homeowners from costly roof vent repairs and prevent further deterioration of the roof’s integrity.
- Unusual noises like rattling or whistling
- Lingering odours such as damp or mouldy scents
- Increased pest activity around the roof area
By staying alert to these signals, you can address roof vent issues promptly, ensuring your home remains well-ventilated and protected. After all, a healthy ventilation system is the backbone of a durable roof and a comfortable living environment.
Visible Damage or Cracks
Visible damage or cracks in your roof vent can be a clear sign that urgent roof vent repairs are needed. Over time, harsh weather conditions, such as heavy rain, snow, or strong winds, can weaken or fracture vent components. Cracks in the vent cap or body not only compromise the system’s efficiency but also leave your roof vulnerable to water intrusion and pest infiltration.
Inspecting your vents regularly can reveal telltale signs of deterioration. Look for warped or broken louvers, rust patches, or loose fittings. These damages often occur gradually, making early detection vital. When damaged, vents may produce unusual noises or allow debris and pests to enter, further emphasising the need for professional roof vent repairs.
In some cases, damage is not immediately visible. You might notice discolouration or mould around the vent area, a sign of moisture ingress from compromised vents. Addressing these issues swiftly can prevent costly repairs later and maintain the integrity of your roofing system.
Diagnosing Roof Vent Issues
Visual Inspection Steps
A thorough visual inspection is essential to diagnose roof vent issues accurately. Nearly 80% of roof vent repairs are caused by overlooked damage or debris. Start by examining the roof surface, checking for dislodged or cracked vents that may compromise ventilation. Look for signs of water intrusion, such as staining or mould near the vent area.
Next, inspect the vent cap and surrounding flashing for corrosion or gaps. These areas are prime spots for leaks and should be carefully scrutinised. It’s also beneficial to clear away any debris, like leaves or twigs, that could block airflow.
If you notice any of these issues, a more detailed assessment, such as checking vent operation or airflow, is needed. Sometimes, damage isn’t visible to the naked eye, but a simple inspection can reveal the warning signs that point to the necessity of roof vent repairs.
Tools Needed for Inspection
Diagnosing roof vent issues requires more than just a cursory glance; it demands the right set of tools to uncover hidden problems. A thorough inspection can reveal damage that’s not immediately visible—cracked vents, corrosion, or debris buildup that obstructs airflow. To get an accurate assessment, having a few essential tools on hand is crucial.
Start with a sturdy ladder, a flashlight, and a mirror to access hard-to-see spots. A moisture meter can detect hidden water intrusion, while an anemometer helps measure airflow around the vent. These tools help pinpoint issues that might otherwise be overlooked, ensuring that roof vent repairs are targeted and effective.
For a systematic approach, consider this list of tools necessary for a comprehensive inspection:
- Sturdy ladder
- Flashlight
- Mirror
- Moisture meter
- Anemometer
Having the right tools not only simplifies the process but also ensures that any damage or blockage is identified early enough to prevent more extensive roof vent repairs in the future. It’s a small investment of time and resources for peace of mind and a properly functioning ventilation system.
When to Seek Professional Help
Sometimes, the signs of a faulty roof vent are subtle—an unexplained rise in energy bills, lingering musty smells, or sporadic temperature fluctuations inside your home. These clues can be elusive, making diagnosing roof vent issues a challenge that requires a keen eye and a touch of intuition. When symptoms persist despite visual inspections, it’s time to consider whether professional assessment is necessary. After all, some damage hides beneath the surface, lurking within the ventilation system, waiting to cause more serious problems.
While DIY inspections can reveal obvious cracks or blockages, certain issues demand the expertise of a seasoned specialist. An experienced roofer can perform a comprehensive evaluation, including advanced diagnostic techniques such as thermal imaging or pressure testing, to uncover hidden damage. If your inspection uncovers persistent problems like corrosion, warped vents, or persistent moisture, seeking professional help for roof vent repairs is the logical next step. This approach ensures that repairs are targeted, effective, and prevent costly future damage—because sometimes, only a trained eye can truly see what’s going wrong behind the scenes.
Roof Vent Repair Techniques
Replacing Damaged Vents
Damaged or worn roof vents can compromise your entire roofing system. Replacing damaged vents is a straightforward yet crucial step in roof vent repairs. First, identify the faulty vent—look for cracks, rust, or signs of water ingress. Once located, carefully remove the old vent, ensuring you don’t damage surrounding shingles or flashing.
When installing a new vent, proper sealing is essential. Use high-quality roofing sealant to prevent leaks. If replacing multiple vents, consider the following steps:
- Remove old vent components thoroughly
- Ensure the opening is clean and free of debris
- Position the new vent accurately over the opening
- Secure it with appropriate fasteners, following manufacturer instructions
This process ensures that your roof vent repairs are durable and effective, restoring proper ventilation and preventing future issues. Proper replacement not only enhances roof performance but also extends the lifespan of your entire roofing system.
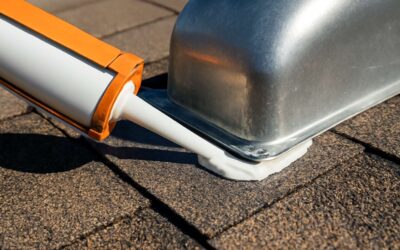
Sealing Leaks and Cracks
In the realm of roof vent repairs, sealing leaks and cracks is where the magic truly happens—transforming a compromised ventilation system into a fortress of durability. When gaps or fissures emerge, moisture infiltrates, risking the formation of mould and the deterioration of your roofing sanctuary. A meticulous approach to sealing can prolong the life of your roof and maintain optimal airflow.
To ensure a flawless seal, it’s essential to use high-quality roofing sealant designed to withstand the elements. Carefully inspect all vulnerable points—cracks, seams, and around the vent base—before applying the sealant. For larger gaps, an ordered approach can be beneficial:
- Identify all leaks or cracks clearly.
- Clean the area thoroughly to remove debris or old sealant.
- Apply the sealant evenly, ensuring it penetrates all crevices.
- Allow sufficient curing time before exposing the roof to weather.
Through attentive sealing, roof vent repairs become more than mere fixes—they evolve into guardians of your home’s integrity, shielding it from the relentless march of time and weather.
Fixing Loose or Broken Mounts
Loose or broken mounts can turn a reliable roof vent into a ticking time bomb. Over time, exposure to the elements and relentless weather patterns weaken these crucial components, risking the entire ventilation system. When mounts fail, vibrations and wind can cause unsettling noises, or worse, the vent might shift out of position, compromising your roof’s integrity. Addressing these issues swiftly through effective roof vent repairs is essential to prevent further damage.
Start by inspecting the mounts thoroughly. If you notice movement or visible damage, secure or replace the faulty components immediately. For broken mounts, using durable, weather-resistant fasteners and ensuring proper alignment is vital. Sometimes, applying a high-quality sealant around the base can reinforce the fix and prevent future loosening. In more severe cases, re-anchoring the vent with new mounts may be necessary — a process best handled with precision and care to avoid future problems.
In some instances, it’s wise to consider an ordered approach:
- Remove the broken or loose mounts carefully.
- Clean the surrounding area to ensure a strong bond.
- Secure the vent with new mounts, ensuring they are tightly fastened.
- Seal around the base to prevent water infiltration.
By taking these steps, roof vent repairs not only restore their functionality but also shield your roof from further deterioration. When mounts are stable and secure, your roof’s airflow remains optimal, and the risk of costly replacements diminishes — a small effort for long-term peace of mind.
Addressing Blockages and Debris
In the shadowed corridors of your roof, debris and blockages lurk like silent spectres, threatening the very breath of your home’s ventilation system. These obstructions can silently suffocate your roof’s airflow, leading to a cascade of issues from mould to structural decay. Addressing blockages and debris during roof vent repairs isn’t merely maintenance—it’s an act of preservation against the relentless march of decay.
Darkened leaves, twigs, and dust can settle within the vent’s labyrinthine passages, cloaking the system in a suffocating shroud. To combat this, carefully remove any visible debris, inspecting the vent’s interior for obstructions that hinder airflow. In some cases, a gentle brush or a high-pressure blast of air can dislodge stubborn debris, restoring the vent’s natural vigour.
- Remove the vent cover carefully, ensuring not to damage fragile components.
- Clear out any accumulated debris with a soft brush or compressed air.
- Inspect for signs of nesting materials or blockages lodged deep within.
- Replace or repair the vent cover, sealing it securely to prevent future intrusions.
Performing these vital steps during roof vent repairs ensures the system remains unobstructed, facilitating optimal airflow. This vigilant maintenance not only safeguards your home from insidious moisture but also prolongs the life of your roof’s ventilation—a crucial bastion against the dark forces of decay and ruin.
DIY vs. Professional Roof Vent Repairs
Benefits of DIY Repairs
Roof vent repairs can be a cost-effective way to extend the lifespan of your roof, but they require a careful balance of skill and knowledge. Opting for DIY roof vent repairs offers several advantages, especially for those with basic handyman skills. First, undertaking these repairs yourself can save a significant amount on labour costs. It also provides immediate satisfaction—there’s no waiting for a contractor’s schedule to open up.
However, it’s important to recognise the benefits of professional roof vent repairs as well. Experienced contractors can identify underlying issues that might go unnoticed during a casual inspection. For complex repairs involving intricate parts or potential structural damage, professional intervention ensures safety and durability.
For simple fixes, such as resealing or replacing small parts, a well-prepared DIY approach can be effective. Here’s a quick overview of the benefits of DIY roof vent repairs:
- Cost savings on labour and service fees
- Immediate action to prevent further damage
- Enhanced understanding of your roof’s condition
While DIY roof vent repairs are tempting, knowing when to call in a professional guarantees your roof remains secure and functional in the long run.
Risks and Limitations
While tackling roof vent repairs can seem straightforward, there are inherent risks that often go unnoticed by those without specialised training. Attempting DIY roof vent repairs without proper knowledge can lead to more extensive damage, particularly if structural components are compromised or if the vent system is intricately linked to your roof’s overall ventilation. The danger isn’t just to the roof, but also to personal safety—falls, mishandling tools, or improper sealing can create hazards that outweigh the initial savings.
Professional roof vent repairs carry the advantage of expertise and experience. Certified contractors can accurately diagnose underlying issues and perform repairs that last. Moreover, they have access to specialised tools and materials, reducing the likelihood of future problems. For those considering DIY roof vent repairs, it’s crucial to recognise limitations—such as working at height or dealing with complex vent systems—that could jeopardise the integrity of your home’s roof. Knowing when to call in a professional ensures your roof remains resilient against the elements and prolongs the lifespan of your investment.
When to Hire a Roofer
In the shadowed realm of roof vent repairs, the line between DIY bravado and professional mastery can be perilously thin. While the allure of saving a few pounds tempts many homeowners, the intricate dance of diagnosing and fixing roof vents demands a keen eye and steady hand. Attempting DIY roof vent repairs without the necessary expertise risks unleashing more chaos—structural damage, compromised ventilation, and future leaks lurking like unseen spectres.
When the stakes are high, the wisdom of enlisting a seasoned roofing contractor becomes clear. They possess the specialised tools and knowledge to perform enduring repairs that withstand the capricious elements. For those contemplating a DIY approach, consider the complexity of your vent system and the peril of working at height—these are hazards that could turn a simple fix into a gothic catastrophe. Sometimes, the most prudent choice is to summon the professionals, ensuring your roof remains resilient against time’s relentless assault and the dark whisper of decay.
Preventative Maintenance for Roof Vents
Regular Inspection Schedules
In the realm of safeguarding your sanctuary, preventative maintenance for roof vents emerges as an enchanted shield against the relentless march of time and weather. Regular inspection schedules act as vigilant sentinels, unearthing hidden vulnerabilities before they evolve into costly dilemmas. By establishing a routine, homeowners can detect early signs of wear, such as minor cracks or debris accumulation, which often escape casual observation.
A meticulous inspection might include checking for loose mounts, blockages, or water ingress—each a potential gateway to more severe roof vent repairs if neglected. An unbroken cycle of maintenance not only prolongs the lifespan of your roof vents but also preserves the harmony of your home’s ventilation system. Embracing a scheduled approach ensures that minor issues are addressed swiftly, transforming what could be costly repairs into manageable, routine upkeep. After all, in the grand tapestry of home preservation, preventative measures weave resilience and peace of mind, warding off the chaos of unexpected roof vent repairs.
Cleaning Tips
Preventative maintenance for roof vents isn’t just a chore — it’s the secret sauce that keeps your home’s ventilation system humming smoothly. Regular cleaning can prevent the buildup of dirt, leaves, and debris that often sneaks into vents, causing blockages that lead to inefficient airflow and, ultimately, costly roof vent repairs.
To stay ahead of trouble, consider implementing a simple yet effective cleaning routine. Start by removing any visible debris and inspecting the vent openings for obstructions. For stubborn grime, a gentle scrub with a soft brush and soapy water usually does the trick. Remember, a clean vent isn’t just about aesthetics; it’s about keeping moisture out, preventing mould growth, and avoiding unnecessary roof vent repairs in the future.
Incorporating these tips into your maintenance schedule can make a significant difference. For example, using a garden hose with a gentle spray can clear out dirt and leaves lodged deep within the vents. Regular inspections combined with routine cleaning form a formidable defence against the chaos that neglected roof vents can unleash on your home’s integrity.
Keeping your roof vents pristine also means paying attention to potential blockages caused by bird nests or accumulated snow. Addressing these issues early on can save you from the headaches of emergency roof vent repairs down the line. Remember, a little effort now can prevent a lot of hassle later — after all, prevention is better than repair, especially when it comes to your roof vent system!
Installing Vent Caps and Guards
Installing vent caps and guards is a masterstroke in preventative maintenance for roof vents. These simple yet elegant devices act as guardians, shielding your vents from the relentless assault of debris, leaves, and animal intrusion. With a well-chosen vent cap, you create a formidable barrier that preserves the integrity of your ventilation system and reduces the need for costly roof vent repairs.
Consider the diversity of options available: from mesh covers that keep out pests to weatherproof caps that withstand the harshest elements. Proper installation ensures these protective barriers stay secure, preventing potential blockages or damage caused by wind or snow. When thoughtfully implemented, vent guards transform routine maintenance into a proactive shield against future complications.
Incorporating vent caps and guards into your home’s ventilation architecture isn’t just about protection; it’s about peace of mind. By preempting issues like moisture accumulation or debris buildup, you extend the lifespan of your roof vent system and safeguard your home’s structural health. After all, a well-defended roof vent is a silent sentinel, quietly working to preserve your sanctuary from the chaos of nature’s unpredictable whims.
Upgrading Inefficient Vents
In the quiet rhythm of rural life, a sturdy roof vent can be the unsung hero, quietly protecting homes from moisture, mould, and structural decay. Yet, over time, even the most resilient vents can become inefficient, leading to the need for roof vent repairs that are often more costly if left unchecked. Upgrading your inefficient vents is a vital step in preventative maintenance, ensuring your home breathes freely and stays resilient against the elements.
Modernising your roof ventilation system might involve replacing old, clogged vents with newer, more effective models. Consider options like turbine vents, solar-powered vents, or ridge vents, each designed to optimise airflow while reducing energy costs. An upgraded vent not only improves ventilation but also reduces the strain on your roof’s structure, preventing long-term damage.
Sometimes, a simple upgrade is enough to transform the performance of your roof’s ventilation. Think of it as giving your home a breath of fresh air—an essential act that can ward off future roof vent repairs and extend the lifespan of the entire roofing system. Properly functioning vents are the silent guardians, working tirelessly to keep your home safe and comfortable through every season.
Choosing the Right Materials and Tools for Repairs
Recommended Repair Materials
Choosing the right materials and tools for roof vent repairs is essential to ensure longevity and efficiency. High-quality repair materials not only withstand harsh weather conditions but also prevent future problems such as leaks or mould growth. When selecting materials, it’s crucial to consider compatibility with your existing roof structure and vent type.
Recommended repair materials include durable sealants, roofing nails, and replacement vent components made from corrosion-resistant materials. The right tools, like a sturdy ladder, roofing hammer, and pry bar, make the process safer and more precise.
For effective roof vent repairs, it’s wise to keep a few key items handy:
- Roofing sealant for waterproofing
- Metal flashing to reinforce the vent area
- Replacement vent caps or louvers if needed
Using quality materials paired with the proper tools can turn a challenging repair job into a manageable task, helping prolong the life of your roof’s ventilation system and preventing costly damage down the line.
Essential Tools
Choosing the right materials and tools for roof vent repairs transforms a daunting task into a manageable craft. High-quality repair materials are the backbone of a durable fix, capable of withstanding the relentless assault of weather and time. When selecting these essentials, consider compatibility with your existing roof structure and the specific type of roof vent, ensuring a seamless integration that preserves the integrity of your home.
To achieve a successful repair, having the appropriate tools at your disposal is equally vital. A sturdy ladder provides safe access, while a roofing hammer and pry bar allow for precise adjustments. Essential materials often include waterproof sealants, corrosion-resistant replacement vent components, and metal flashing to reinforce vulnerable areas. An unordered list of key items might include:
- Roofing sealant for waterproofing
- Metal flashing to reinforce the vent area
- Replacement vent caps or louvers
Combining quality materials with the right tools empowers you to undertake roof vent repairs confidently, safeguarding your home’s ventilation system and preventing costly damage from leaks or mould.
Cost Considerations
When it comes to roof vent repairs, selecting the appropriate materials and tools is akin to choosing the right brush for a masterful painting. The quality of your repair materials directly influences the longevity and effectiveness of your fix, ensuring your home’s ventilation remains resilient against the relentless march of weather and time. Investing in waterproof sealants, corrosion-resistant vent components, and sturdy metal flashing forms the bedrock of a durable repair. These essentials not only safeguard your roof but also preserve the integrity of your attic’s airflow.
Cost considerations for roof vent repairs often hinge on the quality of materials chosen. While premium products may seem more costly initially, they typically reduce the need for frequent repairs, saving money in the long run. To streamline your approach, consider a simple list of vital items:
- Roofing sealant for waterproofing
- Metal flashing to reinforce the vent area
- Replacement vent caps or louvers
Equally important are the tools that turn a DIY repair into a seamless task. A sturdy ladder, a roofing hammer, and a pry bar are indispensable for precise adjustments and safe access. Remember, the right tools paired with high-quality materials transform an intimidating project into an achievable endeavour—empowering you to safeguard your home’s ventilation system effectively.
Cost of Roof Vent Repairs and Budgeting
Average Repair Costs
The cost of roof vent repairs can vary dramatically, making it essential for homeowners to budget wisely. On average, minor fixes such as sealing leaks or replacing broken mounts might set you back around £100 to £300. However, more extensive repairs, like replacing entire vents or addressing structural damage, can climb upwards of £600 or more.
To keep expenses in check, it’s helpful to understand what influences these costs. Factors such as the type of roof vent, the severity of damage, and whether you opt for DIY repairs or hire a professional all play a role.
When planning your budget, consider these common repair scenarios:
- Sealant and flashing replacements
- Mount adjustments or reinstallation
- Addressing water damage or mould growth
Being aware of the average repair costs for roof vent repairs ensures you’re not caught off guard when the bill arrives, turning a potential headache into a manageable DIY project or a straightforward professional fix.
Factors Affecting Pricing
The true cost of roof vent repairs can often feel like a hidden toll—one that sneaks up when least expected. While minor fixes such as sealing leaks or replacing broken mounts might only drain around £100 to £300, the price tag can escalate rapidly for more extensive work. Replacing an entire vent or tackling structural damage may push costs beyond £600, especially if the damage is widespread or complex.
Several factors influence these expenses, including the type of roof vent, the extent of the damage, and whether a homeowner chooses to tackle repairs DIY or enlists a professional. Understanding these elements can help craft a realistic budget. For instance, addressing water damage or mould growth often involves additional materials and labour, which can significantly impact overall costs.
Being prepared means recognising that roof vent repairs are not one-size-fits-all; they are as varied as the homes they protect. Awareness of these variables ensures that homeowners are not caught off guard as repair needs unfold—transforming what could be a costly surprise into a manageable project.
DIY Cost Savings
The true expense of roof vent repairs often surpasses initial expectations, lurking silently like an unseen weight on your shoulders. While minor repairs, such as sealing small leaks or replacing broken mounts, typically cost between £100 and £300, the financial landscape shifts dramatically when the damage is more extensive. Complete vent replacements or repairs involving structural damage can easily exceed £600, especially when the scope of work widens or complications arise.
Budgeting for roof vent repairs demands a nuanced understanding of both the potential costs and the variables at play. Recognising that each repair is unique—shaped by factors like vent type, extent of damage, and whether you opt for DIY or professional services—can help you prepare more effectively. For those inclined to undertake repairs independently, the savings can be substantial, but it’s vital to weigh these against the risks and limitations. Sometimes, a simple sealant application can be done with minimal tools, yet more complex issues—like addressing water damage or mould—may require specialised materials and labour, pushing costs higher.
- Assess the extent of damage thoroughly before deciding on DIY repairs.
- Gather all necessary tools and materials to ensure a smooth process.
- Know when to call in a professional to avoid exacerbating the problem.
In the end, understanding the true cost of roof vent repairs isn’t just about numbers; it’s about recognising the intricate dance between the environment, the materials, and the human hand. Precise budgeting and careful consideration of DIY options can transform what might feel like an insurmountable expense into a manageable act of stewardship over your home’s integrity. The key lies in acknowledging that these repairs, though often underestimated, are critical to maintaining the delicate balance of ventilation and moisture control—fundamental elements that underpin the very soul of your dwelling.
Finding Qualified Roof Vent Repair Services
How to Select a Skilled Roofer
Securing the right professional for roof vent repairs can feel like navigating a labyrinth, but the reward is a safe, efficient, and long-lasting solution for your home. Choosing a skilled roofer isn’t just about finding someone with a shiny license; it’s about identifying a craftsman with experience in delicate roof vent repairs that demand precision and expertise.
Start by seeking recommendations from trusted sources or checking online reviews—these insights often reveal a contractor’s reputation for quality work. When evaluating potential roofers, consider their familiarity with the latest techniques and materials for roof vent repairs, ensuring they can handle both minor fixes and complex replacements.
To streamline your selection, you might ask prospective specialists these questions:
- How many years have you specialised in roof vent repairs?
- Can you provide references from previous clients?
- Are you insured and licensed for roofing work in my area?
Choosing a reliable, experienced professional guarantees your roof’s ventilation system remains robust and resilient, safeguarding your home against future issues.
Questions to Ask During Consultation
Choosing the right professional for roof vent repairs is akin to selecting a bespoke tailor—precision and expertise are non-negotiable. When you sit across from a potential contractor, it’s essential to ask pointed questions that uncover their true capability in this delicate craft. After all, a poorly executed roof vent repair can compromise your home’s ventilation and lead to costly damage down the line.
During your consultation, consider inquiring about their experience specifically related to roof vent repairs. An adept specialist will readily provide references from previous clients, demonstrating a proven track record of successful projects. It’s also prudent to verify their licensing and insurance—these credentials act as a safeguard against shoddy workmanship or unforeseen mishaps.
To streamline your evaluation, here is a handy checklist of questions to ask:
- How many years have you specialised in roof vent repairs?
- Can you walk me through your process for diagnosing and fixing ventilation issues?
- What materials do you typically use, and are they suitable for my roof type?
- Are you familiar with the latest techniques in roof vent repairs?
- How do you ensure the longevity of your repairs?
Engaging in this dialogue not only clarifies their expertise but also reveals their commitment to quality craftsmanship—an essential trait for ensuring your roof’s ventilation system remains robust and resilient against the elements. Remember, a skillful roofer’s insights can save you from future headaches, making the pursuit of quality roof vent repairs a wise investment indeed.
Reading Customer Reviews and Testimonials
In the realm of roof vent repairs, one’s confidence often hinges on the testimonials and experiences of previous clients. Reading customer reviews and testimonials provides invaluable insight into a contractor’s reliability, craftsmanship, and professionalism. A glowing review can turn a tentative enquiry into a confident handshake, while a string of negative feedback serves as an instant red flag.
When evaluating potential service providers, pay particular attention to comments about their punctuality, transparency, and the quality of materials used. To streamline your decision-making process, consider creating a shortlist based on reviews that highlight successful roof vent repairs, especially those that mention longevity and weather resistance. Reliable feedback often reveals whether a roofer truly understands the intricacies of roof vent systems and their importance in home ventilation.
Remember, selecting a qualified roof vent repair service is not a matter to be taken lightly. It’s your home’s breathing apparatus at stake, and a well-reputed contractor can make all the difference in preventing future issues. After all, the right words from satisfied customers can be the most persuasive endorsement of a craftsman’s skill and dedication to quality roof vent repairs.


0 Comments