
Understanding Roof Vent Covers: Types and Functions
Different Types of Roof Vent Covers – Exploring the various styles such as box vents, turbine vents, turtle vents, and box hood vents
Understanding roof vent covers is essential for maintaining proper attic ventilation and preventing costly damage. With a range of styles available, each type serves a specific function and offers unique benefits. For instance, box vents are a common choice, providing passive airflow that helps regulate temperature and moisture levels inside the roof space.
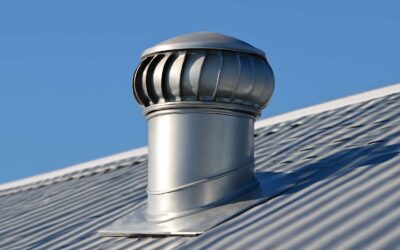
Another popular option is the turbine vent, which utilises wind power to create suction, effectively expelling hot air from the attic. Turtle vents, also known as static vents, allow air to escape while remaining unobtrusive on the roof’s surface. Lastly, box hood vents combine the features of traditional box vents with weather-resistant hoods, offering durability and enhanced protection against the elements.
Choosing the right roof vent cover involves understanding these styles and their roles in overall roof health. When considering roof vent cover replacement, it’s vital to select a style that aligns with your home’s ventilation needs and climate conditions. Proper ventilation not only prolongs the lifespan of your roof but also improves energy efficiency and indoor air quality.
Purpose and Benefits of Roof Vent Covers – How vent covers improve ventilation, protect against weather, and enhance energy efficiency
In the intricate ballet of home maintenance, roof vent cover replacement often plays a surprisingly pivotal role. These unassuming guardians of your roof’s health serve as the frontline in ensuring optimal attic ventilation, which in turn safeguards against costly structural damage. Properly functioning vent covers allow stale, humid air to escape while preventing the ingress of debris, pests, and inclement weather. This delicate balance enhances energy efficiency by reducing the strain on air conditioning systems, ultimately saving homeowners a pretty penny.
The purpose of roof vent covers extends beyond mere aesthetics. They act as weather-resistant shields, shielding vents from rain, snow, and wind—elements that can compromise the integrity of your roofing system. Moreover, a well-chosen vent cover can improve airflow, helping to maintain a consistent temperature within the attic space. Such regulation diminishes the risk of mould, wood rot, and insulation deterioration, thereby prolonging the lifespan of your roof and its underlying structures.
- Enhanced ventilation that prevents heat build-up and moisture accumulation.
- Protection against the unpredictable whims of the weather, ensuring longevity and durability.
- Promotion of energy efficiency by maintaining optimal attic conditions, which can lower cooling costs during scorching summers.
In essence, investing in the right roof vent cover replacement is an act of preventive wisdom. It’s a subtle yet significant step towards preserving your home’s integrity, all while quietly contributing to a more energy-conscious household. Because, after all, good ventilation isn’t just about comfort; it’s about smart, strategic home care.
Signs That Indicate Replacement is Necessary – Indicators like damage, deterioration, or inefficiency signaling the need for new vent covers
Roof vent covers are vital components that often go unnoticed until a problem arises. They serve as the barrier between your attic and the elements, ensuring proper airflow while shielding against debris and pests. Recognising the signs that indicate a need for roof vent cover replacement can save you from costly damage down the line.
Visible damage like cracks, rust, or warping is an obvious signal that your vent cover isn’t doing its job. Deterioration from exposure to harsh weather can weaken the material, making it vulnerable to leaks and pests. Inefficient ventilation, evidenced by excessive heat or moisture in your attic, also points to the necessity for a new roof vent cover. When vent covers become compromised, they reduce airflow, increasing the risk of mould, rot, and insulation damage.
To assess the condition of your roof vent cover, look out for:
- Cracks or holes in the cover
- Corrosion or rust spots
- Loose or missing fasteners
- Obstructions like debris or nests
Addressing these issues promptly through roof vent cover replacement is essential. It ensures your attic remains well-ventilated, protected from weather elements, and energy-efficient. Ignoring signs of deterioration can lead to more extensive, expensive repairs later. Staying vigilant about the condition of your vent covers helps maintain the longevity of your roof and the comfort of your home.
Choosing the Right Roof Vent Cover for Your Home
Factors to Consider – Material durability, compatibility with existing roof structure, and climate considerations
Choosing the right roof vent cover for your home is akin to selecting the perfect cloak for a noble steed; it must withstand the elements yet complement the structure’s essence. Material durability is paramount—galvanised steel and aluminium stand resilient against corrosion, while high-grade plastics offer lightweight protection that endures the test of time. The compatibility with your existing roof structure is equally vital, ensuring the vent cover seamlessly integrates without compromising the roof’s integrity. A misfit can lead to leaks or airflow issues, undoing the very purpose of a well-chosen cover.
Climate considerations weave into this tapestry of decision-making. Homes in harsh, snowy climates need vent covers that resist ice buildup and withstand heavy snowfall, whereas those in humid regions require corrosion-resistant materials to combat relentless moisture. When contemplating roof vent cover replacement, reflect on these factors—think of it as tailoring a bespoke garment that endures both storm and sunshine, all while maintaining optimal ventilation and weather protection. Your roof’s health depends on making these nuanced choices, elevating it from mere function to a fortress of resilience.
Material Options – Metal, plastic, or aluminum – benefits and drawbacks of each
When it comes to roof vent cover replacement, choosing the right material is crucial for longevity and optimal performance. Metal options, such as galvanised steel and aluminium, are the stalwarts of durability. They shrug off the harshest weather conditions, making them ideal for climates prone to heavy rain, snow, or salt-laden air. However, their sturdiness can sometimes come at the cost of weight and cost, which might not suit every roof structure.
Plastic vent covers, on the other hand, are the lightweight, budget-friendly alternative. They’re easy to install and resist corrosion, but their Achilles’ heel lies in their susceptibility to cracking under extreme temperatures or prolonged UV exposure. So, if your home faces a lot of sun or fluctuating weather, plastic might not be the hero it appears to be. For a happy medium, aluminium vent covers deliver corrosion resistance and a lighter profile without sacrificing strength. They truly strike a balance between durability and ease of handling.
- Metal vent covers: tough, weather-resistant, but potentially more expensive and heavier.
- Plastic vent covers: lightweight, affordable, yet prone to UV damage and cracking.
- Aluminium vent covers: resilient against corrosion and easy to manage, making them a popular choice for many homeowners.
Ultimately, your decision for roof vent cover replacement hinges on your specific climate, budget, and structural needs. Each material has its merits and pitfalls—choosing wisely ensures your roof remains a fortress, not a leaky sieve.
Compatibility and Fit – Ensuring proper sizing and installation for maximum effectiveness
When embarking on a roof vent cover replacement, ensuring compatibility and a perfect fit is paramount. An ill-fitting vent cover can compromise the entire ventilation system, leading to energy inefficiency and potential damage. The key lies in meticulous measurement—measure the opening precisely, accounting for any variations in roof pitch or material thickness. A snug fit not only optimises airflow but also shields your home from the elements, creating a barrier against rain and snow seepage.
Remember, the best roof vent cover replacement isn’t just about size; it’s also about seamless integration. Consider the existing roof structure and choose a cover that complements its design and material. Proper installation might require specialised tools or professional expertise, but the payoff is a durable, weather-resistant shield that performs flawlessly for years to come.
- Measure the current vent opening with precision, noting any irregularities.
- Compare your measurements with manufacturer specifications to select a compatible size.
- Ensure the vent cover material matches or complements your roof’s existing materials for optimal longevity.
- Secure the cover firmly, avoiding gaps that could allow water ingress or air leaks.
In the grand dance of roof maintenance, proper sizing and installation are the silent conductors, orchestrating the harmony between protection and functionality. When it comes to roof vent cover replacement, every detail matters—because a well-fitted vent is the unsung hero of your home’s comfort and durability.
Step-by-Step Guide to Roof Vent Cover Replacement
Tools and Materials Needed – Screwdrivers, ladder, replacement vent covers, roofing sealant, etc.
Embarking on a roof vent cover replacement demands a careful assembly of tools and materials that blend precision with practicality. A sturdy ladder is essential, providing safe access to the rooftop’s intricate landscape. Handled with care, screwdrivers become your trusted allies, enabling you to loosen and tighten fasteners with finesse. Equally vital are the replacement vent covers, selected to match the specific dimensions and style of your existing system. To ensure a watertight seal and preserve the integrity of your roof, roofing sealant is indispensable—its adhesive strength guarding against the elements.
For a seamless process, consider preparing an
- extra set of fasteners
- measuring tape
- utility knife
to facilitate accurate fitting and clean removal. When replacing your roof vent cover, it’s wise to follow a rational sequence: first, removing the old cover; then, inspecting the mounting area for damage; and finally, installing the new cover with secure fastenings. This methodical approach guarantees longevity and optimal performance for your roof vent cover replacement.
Safety Precautions – Using proper safety gear and working safely on the roof
In the shadowy realm where the roof meets the sky, safety is not merely a precaution but a sacred ritual. Before embarking on a roof vent cover replacement, ensure your safety gear is in place—sturdy gloves, a non-slip harness, and a helmet to defy the perilous descent into the abyss. Working atop a roof demands vigilance; every step should be deliberate, each movement calculated to prevent catastrophe.
Harness the power of a reliable ladder—firmly positioned and checked for stability—before ascending into the unknown. Remember, the roof is a battleground of unpredictable elements; wind and rain can turn a routine task into a perilous ordeal. As you prepare to remove the old vent cover, consider the sequence carefully:
- Secure your footing on the ladder.
- Wear your safety harness and tether yourself to a stable anchor point.
- Use appropriate tools—screwdrivers and a utility knife—to detach the vent cover with precision.
- Inspect the mounting area for signs of damage or rot, which may compromise future stability.
- Proceed with the installation of the new vent cover, fastening securely to withstand the relentless march of weather.
Throughout this process, remain vigilant. The roof’s secrets are best uncovered when safety is the steadfast guardian, allowing you to perform a flawless roof vent cover replacement without succumbing to the lurking dangers of the heights.
Removing Old Vent Covers – Careful removal techniques to avoid damage
Removing an old roof vent cover requires a careful approach to prevent unnecessary damage to your roof structure. Start by inspecting the vent for any loose screws or clips holding it in place. Using the appropriate screwdriver, gently loosen and remove these fasteners, taking care not to apply excessive force that could crack or bend the surrounding roofing material. If the vent cover is stubborn, a utility knife can help cut through any caulking or sealant, easing removal.
Next, carefully lift the vent cover away from the roof surface. If it’s stuck, gently wiggle it free rather than yanking, which could cause damage. During this process, be alert for signs of deterioration—rotted wood, rusted metal, or cracked plastic—that might demand more than just replacement of the cover itself. Proper removal is essential to prepare for a seamless roof vent cover replacement, ensuring the new component will fit securely and function optimally.
Preparing the Roof Surface – Cleaning and inspecting the mounting area
Before diving into the installation of a new roof vent cover, it’s essential to prepare the roof surface meticulously. A clean, intact mounting area ensures the new vent fits snugly and functions optimally. Begin by removing any lingering debris, such as leaves, dirt, and loose shingles, which can compromise the seal and stability of the replacement vent. A thorough inspection follows, focusing on the condition of the surrounding roofing material. Look out for signs of rot, corrosion, or cracks that could undermine the longevity of your new vent cover. Addressing these issues beforehand is a crucial step in the roof vent cover replacement process, preventing future complications and safeguarding your home’s ventilation system.
In some cases, it’s helpful to create a checklist to methodically assess the area. Consider these key points:
- Verify the integrity of the roofing material around the vent opening.
- Check for any existing damage or deterioration that may need repair.
- Ensure the mounting surface is flat and free of obstructions.
Once the surface is prepped, a fresh layer of roofing sealant can be applied to the edges of the opening. This creates a waterproof barrier, ensuring the new roof vent cover replacement will be both secure and weather-resistant. Proper preparation of the mounting area not only improves the performance of the vent but also extends its lifespan, providing peace of mind for years to come. Remember, a well-prepared surface is the foundation of a successful roof vent cover replacement project—so don’t rush this critical step!
Installing the New Vent Cover – Proper placement, securing hardware, and sealing for weatherproofing
Embarking on a roof vent cover replacement is akin to unlocking a hidden gem in your home’s ventilation system. With the right approach, you can ensure your roof remains weatherproof and efficient for years to come. Once the surface is meticulously prepared, the next step is installing the new vent cover with precision and care. Proper placement is crucial — align the vent cover so it sits flush with the roofing surface, ensuring optimal airflow and protection against the elements.
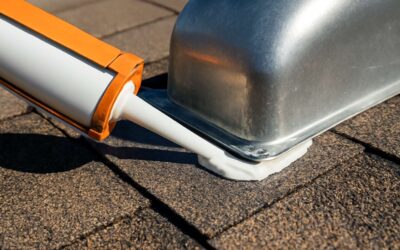
Secure the vent cover using appropriate hardware, such as screws or clips, which should be tightened firmly but not overly so, to prevent warping or damage. To enhance weather resistance, apply a high-quality roofing sealant around the edges of the vent cover. This creates a waterproof barrier that guards against rain, snow, and wind infiltration. For added peace of mind, consider sealing any gaps or joints with extra sealant, especially if your climate experiences heavy rainfall or storms.
- Position the new roof vent cover carefully over the opening, making sure it is centred and aligned properly.
- Secure the cover with corrosion-resistant fasteners, using a screwdriver for a snug fit.
- Apply a generous bead of roofing sealant along the edges to seal out moisture and boost weatherproofing.
While installing, remember safety precautions—use a sturdy ladder and wear protective gear. With each step, you’re not just replacing a vent cover; you’re fortifying your home’s defence against the elements and ensuring your ventilation system works flawlessly. The art of roof vent cover replacement lies in attention to detail, making sure every element is perfectly in place for lasting durability and optimal performance.
Final Inspection and Testing – Checking stability, fit, and functionality
As the final act in your roof vent cover replacement journey, the curtain call is a meticulous inspection—an essential step to ensure your work stands the test of time and nature’s unpredictable theatre. This phase isn’t merely about glancing at the newly installed vent cover; it’s about a thorough evaluation of stability, fit, and overall functionality. A well-executed roof vent cover replacement should leave the cover sitting flush against the roof, with no wobbling or looseness that could invite the elements to sneak inside.
Begin by examining the securement—gently test the vent cover for movement, ensuring it is firmly anchored with corrosion-resistant fasteners. Next, inspect the sealant line—an unbroken, generous bead of roofing sealant should encircle the edges, providing a resilient barrier against rain and snow. If you notice gaps, reapply sealant where necessary, sealing every crevice that could compromise your roof’s integrity.
- Check the overall alignment—make sure the vent cover sits perfectly centered and flush with the roof surface.
- Test its stability by gently pressing around the edges and observing for any movement.
- Verify the sealant’s integrity—look for cracks or gaps and reapply if needed.
Finally, a quick functionality test involves inspecting for proper airflow and ensuring no obstructions remain. This comprehensive final inspection is not just a routine check; it’s a safeguard that your roof vent cover replacement has been executed flawlessly, fortifying your home against the relentless march of weather and time.
Common Challenges and Troubleshooting During Replacement
Dealing with Rusted or Damaged Mounts – Methods for repair or replacement of mounting hardware
Rusted or damaged mounting hardware can turn a straightforward roof vent cover replacement into a real challenge. Over time, exposure to the elements accelerates corrosion, making screws and brackets brittle and difficult to remove without causing further damage. Attempting to force a stubborn, rusted mount can lead to more costly repairs or even compromise the integrity of the roof itself. Instead, patience and proper tools are essential for a safe and effective solution.
One effective method involves applying a penetrating oil, such as WD-40, to loosen rusted fasteners. Allow it to sit for several minutes, then carefully attempt removal with a screwdriver or wrench. If the hardware is too corroded or damaged to salvage, replacing the entire mounting assembly is advisable. In some cases, it may be necessary to drill out the old fasteners, especially if they are seized or fractured. When doing so, ensure the drill bit size matches the hardware to prevent unnecessary damage to the surrounding roof structure.
For severely compromised mounts, consider using a bolt extractor or specialised rust removal tools to recover broken fasteners. Alternatively, installing new mounting hardware with corrosion-resistant materials, such as stainless steel or coated aluminium, can prolong the lifespan of your roof vent cover and prevent future headaches. Remember, a secure and weatherproof mount is vital—not just for the longevity of the vent cover but for the overall health of your roof system.
Addressing Leaks or Gaps – Sealing techniques to prevent water intrusion
Leaks and gaps remain the silent enemies of a well-functioning roof vent cover replacement. Even the smallest fissure can channel water into your home, risking rot, mould, and structural damage. Addressing these issues requires not only precision but a keen understanding of sealing techniques that stand resilient against the relentless assault of weather. Properly applied sealant, whether a high-quality roofing caulk or specialised weatherproof sealant, creates a formidable barrier that prevents water intrusion. It’s not merely about filling the gap but ensuring a flexible, airtight seal that adapts to temperature fluctuations and roof movements.
When dealing with common challenges during roof vent cover replacement, inspecting the area for hidden cracks or deteriorated flashing is crucial. Sometimes, the old vent’s mounting is compromised, leaving behind gaps that threaten the integrity of your roof. In such cases, a layered approach—combining sealant with a flashing tape—can deliver a more durable solution. Remember, a perfectly fitted vent cover is useless if water can seep underneath. Vigilance in sealing protects both your investment and your peace of mind.
Handling Difficult or Hard-to-Reach Areas – Using specialized tools or professional assistance
Handling difficult or hard-to-reach areas during roof vent cover replacement can feel like navigating a maze—especially when working on aged or complex roof structures. Sometimes, the vent is tucked away in tight spots or obscured by overgrown foliage, making access a true challenge. In such moments, specialised tools like extendable screwdrivers, long-handled brushes, or even robotic cameras become invaluable allies. These tools allow for precise manoeuvring without risking damage to shingles or other roof components.
When access proves particularly stubborn, enlisting professional assistance can save time and prevent costly mishaps. Skilled roofers possess the experience and equipment needed to safely reach and securely install vent covers, even in the most awkward locations. They can also identify underlying issues—like hidden cracks or deteriorated flashing—that might not be immediately visible but could compromise the integrity of your roof vent cover replacement.
- Use specialised tools designed for tight spaces.
- Consider professional help when access becomes too difficult or risky.
- Always inspect the surrounding roof area for unseen damage before proceeding.
Remember, a well-executed roof vent cover replacement isn’t just about aesthetics; it’s about ensuring your home remains protected from the elements. Sometimes, the hardest part isn’t the installation itself but overcoming those tricky spots that challenge even the most experienced DIY enthusiasts. In these moments, patience and the right equipment truly make the difference—and knowing when to call in the pros can prevent future headaches.
Maintenance and Upkeep After Replacement
Regular Inspection Schedules – How often to check for damage or wear
Proper maintenance after a roof vent cover replacement is the unsung hero in prolonging its lifespan and ensuring optimal performance. Regular inspection schedules are vital—think of them as routine health check-ups for your roof’s ventilation system. Weather, debris, and the relentless march of time can take a toll, making frequent checks an absolute necessity.
Typically, inspecting your vent covers every six months suffices, but in harsher climates or after storms, more frequent visits are warranted. During these inspections, look for signs of damage, such as cracks, rust, or dislodgement. Addressing small issues early can prevent costly repairs down the line, preserving the integrity of your roof vent cover replacement. Remember, a vigilant eye today can save you from unwelcome surprises tomorrow.
Cleaning Tips – Keeping vent covers free of debris and obstructions
Maintaining a clean roof vent cover after replacement is essential to optimise its lifespan and performance. Debris such as leaves, twigs, and dirt can quickly accumulate, obstructing airflow and potentially causing moisture build-up. Regularly removing these obstructions ensures your ventilation system continues to operate efficiently, preventing costly repairs down the line.
To keep your vent covers in prime condition, a simple cleaning routine can make a significant difference. Start by inspecting the cover for any visible debris or buildup. Use a soft brush or cloth to gently remove dirt, and rinse with water if necessary. Avoid harsh chemicals that could damage the material, especially if your vent cover replacement is made of metal or plastic.
For optimal upkeep, consider establishing a seasonal cleaning schedule. During each inspection, check for signs of rust, cracks, or dislodgement. Addressing minor issues early not only preserves the integrity of your roof vent cover replacement but also maintains proper ventilation for your home. Remember, a vigilant approach to maintenance keeps your roof in top shape and prevents unwelcome surprises in harsh weather conditions.
When to Replace Again – Signs that future replacement may be needed
Time, like the relentless march of shadows, leaves its mark on your roof vent cover replacement. Even the sturdiest materials succumb to the wear of storms and the passage of seasons. Regular inspections reveal the subtle signs that suggest your vent cover’s reign is nearing its end. Cracks, rust patches, or dislodged fittings whisper warnings—indicators that a future roof vent cover replacement may be imminent. Ignoring these signs can invite moisture infiltration, mould, or compromised ventilation, turning a simple fix into a costly repair.
Maintaining the integrity of your vent covers is a dance with time itself. A vigilant eye for deterioration ensures your home’s breath remains untainted and free from the creeping spectre of decay. When corrosion or structural damage becomes evident, it’s prudent to consider a replacement before catastrophe strikes. The choice hinges on material durability and environmental factors—metal and aluminium often withstand the storm but may require attention sooner than plastic, which might falter under harsh weather. Remember, a well-timed roof vent cover replacement is the key to preserving your sanctuary’s sanctity against the relentless elements.
Hiring a Professional vs. DIY Roof Vent Cover Replacement
Advantages of Professional Installation – Expertise, safety, and quality assurance
When contemplating roof vent cover replacement, the decision to hire a professional or undertake the task DIY can significantly impact the longevity and performance of your roof’s ventilation system. Opting for professional installation offers an array of advantages that often outweigh the allure of a quick, self-directed fix. Experts possess an intricate understanding of the nuances involved, ensuring each vent cover is fitted precisely, which optimises airflow and minimises the risk of leaks.
Furthermore, safety considerations are paramount; working on a roof inherently involves hazards that seasoned professionals navigate with specialised equipment and techniques. Their experience guarantees that the roof vent cover replacement process adheres to industry standards, reducing the likelihood of future issues.
Choosing skilled installers also means access to high-quality materials and tools, which can be crucial for ensuring durable, weather-resistant results. In essence, entrusting your roof vent cover replacement to professionals provides peace of mind, a superior finish, and a safeguard against costly repairs down the line.
DIY Tips and Best Practices – Step-by-step guidance for homeowners undertaking the task
Replacing a roof vent cover might seem straightforward, but it’s one of those tasks where amateur attempts can backfire. According to industry surveys, improper installation accounts for nearly 40% of roof vent cover failures, leading to costly repairs down the line. That’s why many homeowners opt for professional roof vent cover replacement—ensuring the job is done right the first time. However, if you’re considering a DIY approach, it’s crucial to follow best practices to avoid common pitfalls.
Begin by gathering the necessary tools: a sturdy ladder, screwdrivers, roofing sealant, and your new vent cover. Before starting, inspect the existing vent for rust, damage, or blockages. Carefully remove the old cover, taking care not to damage the surrounding roof or flashing. Once the old vent is out, clean the mounting surface thoroughly. Proper preparation ensures a tight seal when installing the new vent cover, which helps prevent leaks and draughts.
When installing the new cover, make sure it’s correctly aligned and securely fastened. Use weather-resistant sealant around the edges to enhance durability and weatherproofing. For those tackling hard-to-reach areas, specialised tools or even a professional might be necessary to ensure safety and precision. Remember, a little extra caution during roof vent cover replacement can save you from future headaches, making the process smoother and more effective.
Cost Considerations – Pricing differences and long-term savings
Opting for professional roof vent cover replacement can sometimes feel like investing in peace of mind—yet it comes with a price tag that may make DIY enthusiasts hesitate. Typically, the cost of hiring a skilled roofer ranges from £150 to £300 per vent, depending on complexity and materials. In contrast, tackling the task yourself might only set you back around £50 to £100 for tools and new vent covers. But beware: the initial savings could be overshadowed by long-term expenses if the job isn’t executed correctly.
While DIY roof vent cover replacement offers immediate financial relief, professional installation ensures the job is done right the first time. A properly fitted vent cover reduces the risk of leaks and draughts, potentially saving you from costly repairs down the line. For many homeowners, the true value lies in the peace of mind that comes with expert craftsmanship—especially when considering factors like material compatibility and weatherproofing. Sometimes, a small investment in professional expertise can translate into significant savings in the future, safeguarding your roof from weather damage and structural deterioration.


0 Comments