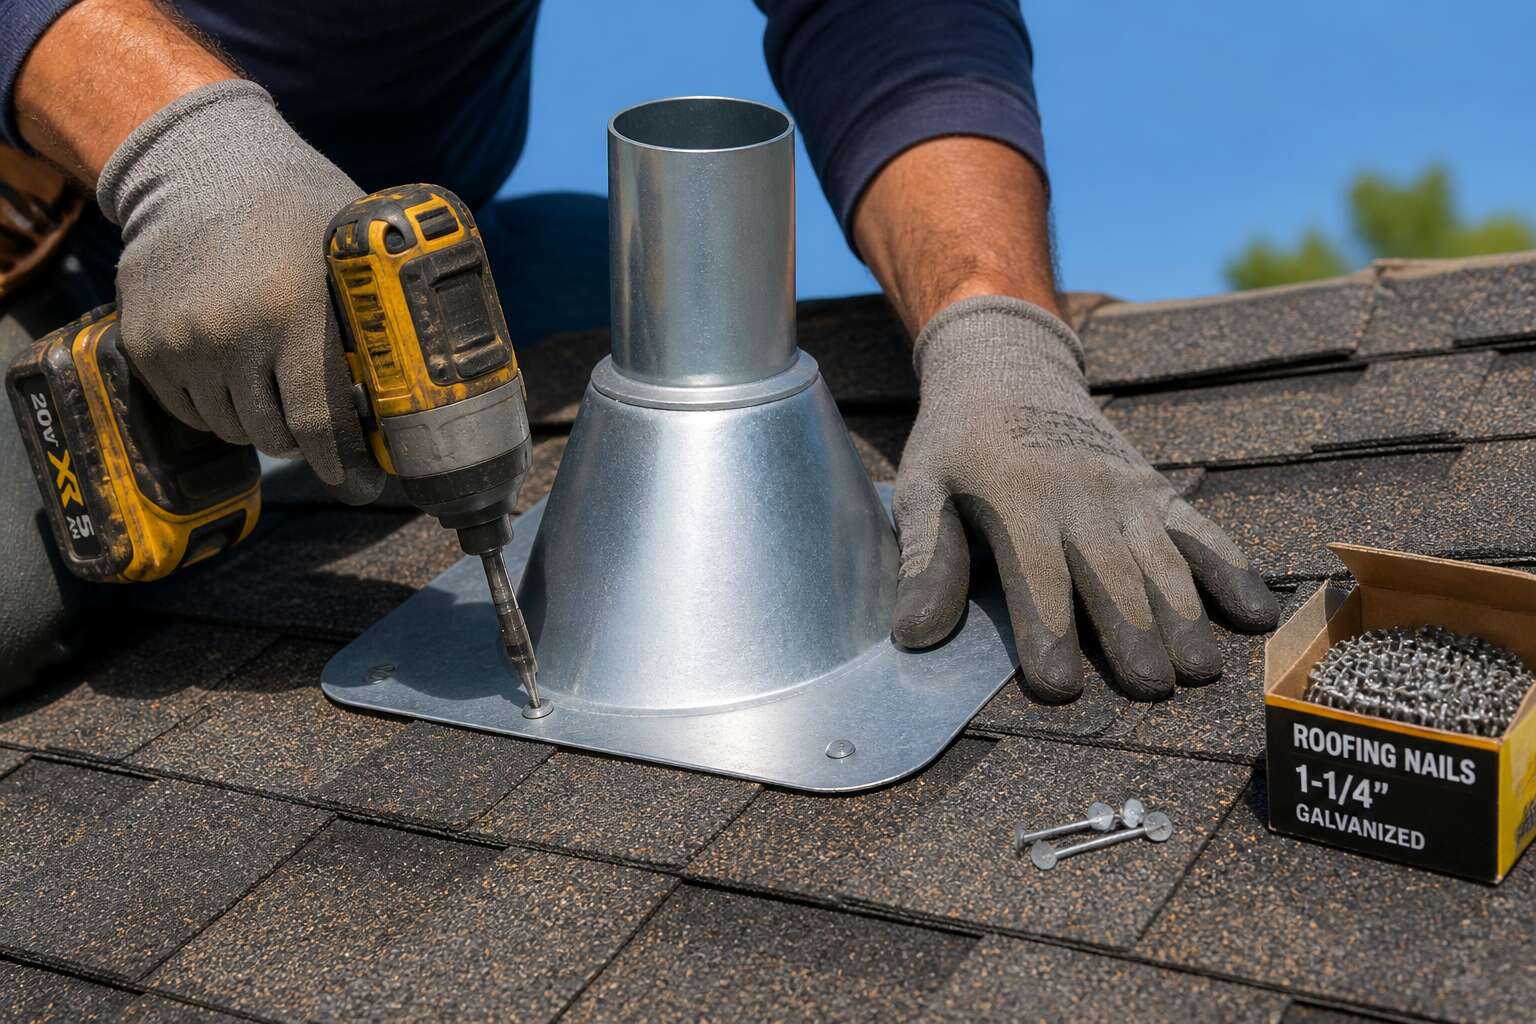
Gathering the Essential Tools and Materials
Choosing the Right Flashing Boot Type for Your Pipe Size
Most leaks trace back to a mismatched boot or a missing wrench, and I have fixed plenty of both. Before starting any roof vent jack installation, assemble everything on the ground, not on the ladder! The roof surface leaves no room for improvisation, so gather the following:
- a cordless drill with a hex driver bit
- a utility knife for trimming shingles
- a pry bar for lifting existing flashing
- high quality roofing sealant and galvanized nails
Then consider the pipe itself. Flashing boots come in standard sizes, but plastic, metal, and lead each require different cutting methods. Measure the outer diameter of your vent pipe with calipers, not a tape measure. A boot that is too large lets water pool; too small and it tears during installation. The correct boot for your pipe size determines whether the whole roof vent jack installation survives the Highveld thunderstorms.
Must-Have Tools for Working on Asphalt Shingles
A roof vent jack installation can go sideways in the time it takes to fetch a missing nail. I treat my tool bag like a preflight checklist before touching the ladder! Working on asphalt shingles demands a fixed order: cut, lift, seal, and nail. The wrong tool slows you down, and a slow worker on a hot roof is a liability.
- A cordless drill with a hex driver bit. Your wrist will thank you.
- A sharp utility knife with spare blades. Dull blades tear shingle granules.
- A pry bar for lifting old flashing without cracking the deck.
- Galvanised nails and polyurethane sealant. Keep them close.
Every item earns its place during roof vent jack installation. Skip the pry bar and you will fight the old boot for an hour. Leave the spare blades in the bakkie and you will finish with a ragged cut that no sealant can save.
Selecting Roofing Cement and Sealants for Leak-Free Seals
Fire-rated mortar dries in thirty minutes. Your sealant cures in twenty-four hours. A roof vent jack installation usually fails in the gap between those two numbers.
Most leak-free seals start with the right cement grade, not the cheapest tube. The polymer content on the label matters more than the brand name. A low-solvent butyl mastic suits damp surfaces. A polyurethane sealant manages thermal movement on metal pipes. Both belong on the roof edge while you work. A clean rag and mineral turps wipe away excess before it skins over.
- Pipe material dictates the sealant choice, not the job name.
- Working time printed on the label shifts with air temperature.
The cure clock starts when the sealant leaves the tube. A skin forms fast on a hot tin roof and changes the order of operations entirely.
Setting Up a Safe Ladder and Fall Protection System
In South Africa, falls from height are the leading cause of construction fatalities. That statistic should shape your approach to every roof vent jack installation. You gather the drill, fasteners, and sealant, but your first tool is the ladder.
Set the ladder on compacted ground, never loose soil. I always test the weight before climbing! Have a partner hold the base, or fit a stabilizer. Your body will make mistakes; the ladder should not.
- Full-body harness and lanyard
- Rated anchor point on the roof structure
- Ladder stabilizer or standoff
These are not optional. A roof vent jack installation leaves no room for improvisation above ground. A clear head matters as much as a sharp blade.
Prepping the Roof Surface Before Replacement
Clearing Debris and Inspecting the Surrounding Shingles
Before any roof vent jack installation begins, clear every leaf, twig, and pebble from around the vent pipe. A stiff broom works, but a leaf blower reaches into the crevices where shingles overlap. I have seen this quiet, dusty stage determine whether the flashing sits properly!
- Check for nails that have popped upward
- Confirm the shingle sealant is still pliable
- Note any discoloration that signals trapped moisture
Once the debris is gone, kneel and inspect each shingle within a two foot radius. Look for lifting edges, granule loss, or hairline cracks. These flaws become weak points when you cut the opening. Damaged asphalt needs replacement before the vent sits in place.
Measuring the Pipe Diameter and Roof Pitch Accurately
One degree of roof pitch error can shift your vent opening by nearly a centimeter. That is why measuring the pipe diameter and roof pitch accurately matters before any cutting begins. In my years working on Cape Town roofs, I have watched rushed measurements turn a simple swap into a full deck repair. Press your palm flat around the existing penetration. Springy or soft sections mean the plywood has started to rot. A vent cannot sit on a base that moves.
Scrape away old mastic and cracked rubber until you reach the shingle granules. The surface must be dry and bare. Use a digital calliper to record the pipe’s outer diameter at three points. For the pitch, place a pitch gauge along the rafter line and read the slope in degrees. That number determines how the new flashing boot will sit.
- Average the three calliper readings.
- Note the pitch gauge value on the plywood.
- Mark the center point of the vent opening.
Roof vent jack installation succeeds when the numbers are honest. A crooked cut leaves gaps that no sealant can ever hide.
Marking the Nailing Zones for the New Flashing
Now prep the surface. The old mastic and rubber have to go. A wire brush works, but a scraper with a sharp blade is faster. Work until you see bare shingle granules. Any residue left behind stops the new sealant from bonding.
Mark the nailing zones before lifting the flashing into place. Most boots have four corners, but nail positions vary by brand. Hold the new flashing over the hole, trace the flange with a pencil, and mark each nail slot with an X.
- Keep nail marks at least 20 mm from the pipe edge.
- Do not place nails where old holes line up; shift the boot slightly.
- Check the flashing sits flat before committing.
This careful prep prevents a frustrating roof vent jack installation where the flange lifts or the nails miss the rafter.
Planning a Dry Weather Window for the Project
The roof surface tells you everything before a roof vent jack installation begins. Scrape away the old mastic and you will see what previous installers left behind: streaks of hardened sealant, granules worn smooth by a decade of sun. These remnants stop new sealant from bonding. Scrape until you see clean shingle texture, but respect the asphalt beneath.
A dry weather window demands the same patience. In South Africa, the Highveld’s afternoon thunderstorms arrive with little warning, and a single shower during installation can compromise the seal before it cures. Three consecutive dry days are the minimum:
- The temperature should sit above 10°C for the sealant to flow.
- The wind should be calm enough that loose granules do not blow beneath the flashing.
This is where the instinct to rush collides with the work. Every hour spent waiting protects the integrity of the roof vent jack installation.
Laying Down Drop Cloths to Protect the Roof Deck
Every hour spent waiting protects the integrity of the roof vent jack installation, but so does every hour spent shielding your work surface. The Highveld sun bakes shingles brittle. A simple scrape sends granules skittering into the gutter line. Laying down drop cloths to protect the roof deck stops that mess before it reaches your sealant.
Use a heavy canvas drop cloth, not plastic. Plastic holds moisture against the shingles and gets slippery when the temperature drops. Canvas breathes, sits flat, and catches loose granules that would otherwise find their way beneath your new flashing.
The order matters:
- Clear the area of debris.
- Roll the cloth out from the ridge downward.
- Secure each corner with a brick or a spare piece of pipe.
A clean, covered surface keeps the mastic free of grit and keeps your roof vent jack installation honest. Skip this step and you will spend the afternoon picking tiny stones out of fresh sealant.
Removing the Damaged Old Vent Boot
Lifting the Overlapping Shingles With a Pry Bar
Anyone who has peeled a shingle free knows the sound of tearing granules. It means the repair has just become more expensive. Heat softens the asphalt seal, but on a cool morning, the shingles resist. Slide the pry bar under the edge of the shingle above the damaged boot and apply slow, even pressure. The old boot’s flange sits beneath several overlapping courses, so you must lift each shingle far enough to expose the nail heads without cracking the tab.
Once the nails are pulled, the boot slides free with a gentle tug. If the pipe collar has fused to the vent pipe, cut it free with a utility knife. This is the point in any roof vent jack installation where haste causes the most trouble; tearing the surrounding shingles creates a bigger repair than the one you started with.
Pulling the Nails Along the Flange Perimeter
With the shingles held clear, the nail heads along the flange perimeter come into view. They have endured years of thermal expansion and often resist the claw. Work the pry bar under each head and pull straight up. Angled pulls tear the asphalt and widen the hole.
A few nails may break off below the surface. Leave them. Digging them out damages the deck, and the new flashing covers the remnant without issue. Once every nail is out, grip the boot by its collar and rock it gently. The old sealant cracks free.
- Pull the nails in the order they were driven, from the top down
- Keep the pry bar flat against the shingle to avoid gouging
- Set the boot aside on the drop cloth, not on the shingles
This step in roof vent jack installation rewards patience. The old boot leaves a ring of dried cement and a clean opening. That is exactly what the new flashing needs to seat properly during roof vent jack installation.
Sliding the Old Flashing Up and Over the Pipe
The old boot finally surrenders. Grip its collar and twist gently, then pull straight up. The flashing slides over the pipe with a soft scrape. Do not force it. A seized boot means more sealant underneath, so work the edge loose with a putty knife and try again.
Once the flashing clears the pipe, set it aside. Inspect the pipe surface. Old cement and rubber residue can prevent a new boot from seating properly. Clean the pipe with a rag and mineral spirits. This moment in roof vent jack installation decides how well the new flashing seals.
Scraping Away Dried Cement and Old Sealant
The old boot is off, but the residue remains. Dried cement and sealant cling to the pipe and deck with genuine tenacity. Scraping them away is not glamorous work, yet it determines whether your roof vent jack installation ends in a dry attic or a dripping ceiling.
Use a stiff putty knife for the first pass. Hold it at a shallow angle to avoid gouging the shingles. Work in short, deliberate strokes. The old adhesive will flake, crumble, and sometimes resist. Warm weather softens it, so plan your approach accordingly.
- Lift every flap of remaining rubber.
- Check the pipe collar for hidden buildup.
- Run a rag with mineral spirits over the bare metal.
Once the surface is clean, run a gloved hand over the area. Any gritty patch means another scrape. A smooth, bare substrate gives the new flashing a fair chance. That quiet moment, when the pipe is naked and ready, is the real starting point for roof vent jack installation.
Inspecting the Pipe for Cracks or Corrosion
The old boot finally lets go, its rubber collar sliding free of the pipe. A small victory, but the work has only shifted. That exposed pipe now demands your full attention. Cracks and corrosion love to hide beneath the flashing, and a roof vent jack installation fails quietly when they go unnoticed.
I press a thumb against the pipe’s base. Any softness means the structure is compromised. Rust spots, especially near the deck line, deserve a second look with a flashlight. The South African sun ages everything quickly, turning rubber brittle and metal frail.
- Hairline fractures running up from the base.
- Pitting where water pooled against the collar.
- Gaps between the pipe and the roof deck.
- Discoloration that signals internal corrosion.
Each flaw is a future leak. The inspection is the moment that separates a lasting repair from a recurring one.
Checking the Underlayment for Hidden Rot or Tears
With the boot gone, the underlayment sits exposed. I run a gloved hand across the felt, feeling for softness. Rot hides in plain sight. A tear here or there might look minor, but any breach compromises the whole roof vent jack installation. Shine a light across the area and look for moisture staining that traces a slow path inward.
- Dark, water-soaked patches that spread under pressure
- Crumbling or flaking felt where the coating has failed
- Edges that lift away from the plywood deck
- Discoloration running along the nail line
Each sign points to damage below the surface. If the felt is saturated, it loses its bond to the deck. Cut the compromised section out and patch it before fitting anything new. The replacement boot stands on this layer. A sound underlayment carries the seal; a weakened one gives way within a season.
Setting the New Flashing Around the Stack
Applying a Thick Bead of Sealant to the Flange Bottom
The stack stands exposed to the weather. A successful roof vent jack installation depends on setting the new flashing around the stack with precision. Slide the boot over the pipe until the flange rests flat. Run a fingertip around the edge. Any tilt or gap signals trouble before you ever apply the sealant.
Once the flashing sits true, lift the flange and apply a thick bead of sealant to the flange bottom. Keep the bead continuous. Lower the flange, press it down evenly. The sealant will spread and create a watertight grip. That final squeeze determines whether the seal holds.
Slipping the Boot Over the Pipe Until It Sits Flat
With the old flashing removed and the stack wiped clean, the new boot becomes the centerpiece of your roof vent jack installation. Guide the collar over the pipe with both hands, letting the rubber flex naturally. Do not pull or jerk it. A steady rotation helps the boot descend without catching on ridges or leftover cement.
Once the flange makes contact with the shingles, stop and evaluate. The boot must sit flat, with even pressure across the entire base. Run your fingertips along the underside of the flange to detect any tilt or high spot. In any roof vent jack installation, this quiet check matters more than the sealant itself. Without a level seat, the whole job loses its integrity before you ever pick up the caulking gun. The thirty seconds spent confirming the boot’s position is the cheapest insurance you will buy all day.
Aligning the Flange Square With the Rafter Lines
Once the boot sits flat, square the flange to the rafter lines. The rafters run vertically, and the flange should follow their path. Hold a straightedge along the rafter and adjust the boot until the flange edges mirror that line.
Run a quick perimeter check. The flange should not twist. If one corner lifts or another digs into the shingles, rotate the boot slightly. Marking rafter locations on the shingles before lifting them makes this adjustment easier.
- Align the flange edges parallel to the rafter run
- Rotate the boot in small increments, no more than 10 degrees per turn
- Confirm the pipe stays centered in the collar as you adjust
When the flange sits square, the nail zones land on solid timber rather than open sheathing. A boot twisted off the rafter line leaves fasteners with nothing to bite into. That weakness undermines any roof vent jack installation.
Driving Galvanized Nails Into the Pre-Marked Zones
Setting the new flashing around the stack demands patience. The collar should hug the pipe without forcing it. Once the boot sits flush, drive the first galvanized nail into a pre-marked zone, then move to the opposite side to keep the flange level.
Work the perimeter systematically rather than skipping around. Each nail should bite into solid wood, not the sheathing edge. The sequence matters more than speed, and a slight rotation of the boot as you nail will undo all your earlier alignment. For a lasting roof vent jack installation, the marked zones are non-negotiable. I have seen too many rushed installs fail at this exact step. Monitor the angle after every few nails. A shift of just two millimetres creates a lift in the flange, and that lift invites leaks!
Tucking the Uphill Flange Under the Row Above
The uphill edge of the flashing must slide beneath the overlapping row of shingles before you drive any nails. This is where water tries hardest to find a way in. Use a pry bar to lift the row above, then tuck the flange so it sits under the shingle’s protective layer, not over it. Press down firmly to seat the flange into the sealant bead you applied earlier.
Work from the centre outward when seating this edge. That keeps the flange from buckling sideways.
- Check that the shingle above lies flat after tucking.
- Run a fingertip along the gap to feel for any raised corner.
- Tap the shingle back down with a flat hammer head.
A gap here invites water straight into the deck. The whole roof vent jack installation depends on this overlap shedding water cleanly, so take the extra minute to confirm the row above rests naturally on the new flashing.
Overlapping the Shingle Columns on the Sides
Setting the new flashing around the stack asks for patience and a steady hand. The side columns of shingles must overlap the flange properly. You don’t force anything.
Work down the sides, sliding each shingle column over the flashing’s wings. Press gently. The shingle should lie flat against the flange, not bulge. Check for:
– Raised corners that catch rainwater
– Gaps between the shingle edge and the flashing
– Nails driven only where the shingle covers them
The roof vent jack installation succeeds on these small negotiations. Each shingle column has its own character. You persuade, not command.
Sealing, Closing Up, and Testing Your Work
Bedding the Flange Edges in Roofing Cement
The real work in roof vent jack installation starts when the cement bucket opens. Trowel roofing cement around those flange edges with a firm, even hand. Air pockets here become leaks later.
Once the flange sits flush, close up the shingles and let the cement set. Test the seal from below with a hose, working from the base upward. Look for moisture intrusion:
- Damp spots on the underlayment
- Water tracing along the pipe
- Slow drips from the boot
A clean test means the bedding holds and the seal is ready for the next storm.
Replacing the Cut Shingles and Fastening Them Down
Replacing the cut shingles completes the physical work of roof vent jack installation. Fit each new shingle into the void left by the old flashing, then fasten it with four galvanized nails. Place the nails in the common bond line, just below the tar strip, and drive them until the heads sit flush. Overdriving creates dimples that catch water, so use a steady hand.
Once the shingles are secure, move inside for the hose test. Run water up the pipe and across the boot, then inspect from below. Look for dark spots on the plywood, streaks along the pipe, or any dampness around the nail heads. A clean pass means the cement bond holds and the repair is done.
Smoothing Out Excess Sealant With a Putty Knife
The putty knife is the last tool you will set down, but it decides how the whole job is remembered. A ragged bead of sealant can undo the strongest nail pattern.
During roof vent jack installation, the final smoothing step deserves more patience than the initial bedding. Tilt the blade at 30 degrees and pull it along the flange edge in one steady motion. Wipe the knife after each stroke. The goal is a concave fillet that sheds water instead of trapping it.
After the excess is gone, close up the area. Press the overlapping shingles down and check the nail heads sit flush. Then step back and look at the profile. Any high spots will show as shadows at sunset. Fix them before the sealant sets.
Running a Hose Test to Confirm There Are No Drips
Water finds every weakness. The roof vent jack installation is only as good as the seal it holds. After the putty knife has smoothed the fillet, wait for the cement to take its initial set. Then press the overlapping shingles down and check each nail head sits flush. Now bring the hose.
Start the water low at the downhill flange edge and work upward across the boot. Let the spray run down the pipe and over the sides. Give it five minutes, then move to the attic with a flashlight. Look for the smallest drip.
Here is what a clean test looks like:
- Water beading off the boot without penetration
- No dark streaks on the rafters
- No moisture on the underlayment
That completes the roof vent jack installation. The cement cures over twenty-four hours, so the hose stays away until then.
Inspecting Your Work From Inside the Attic Space
The final part of a roof vent jack installation is the quiet work. You seal every edge, push shingles back, and wait. Then you climb into the attic with a torch.
Check the nails first. A proud nail head can puncture the boot from below. Run your palm along the rafters. Feel for dampness. Look for water trails on the plywood. The underlayment should stay dry. Any moisture here means the seal has broken.
A proper inspection follows a simple order:
- Check the boot’s base for gaps
- Run a hand over the flashing sides
- Look for light coming through the seams
This is the last chance to fix a mistake before the cement cures. A roof vent jack installation fails slowly when small gaps go unnoticed. A torch and a patient eye are the best tools you own.
Avoiding Common Pitfalls and Code Pitfalls
Not Overtightening the Fasteners to Prevent Dimpling
One detail many DIYers overlook is fastener torque during roof vent jack installation. Crank screws down too hard and the flange dimples around each head. Those depressions channel water straight to the nail hole. Building codes specify nail spacing and size; missing them voids a warranty or fails an inspection. South African municipalities follow SANS 10400, so check your local amendment first.
- Nail heads sit flush, not countersunk.
- Spacing often falls between 150 mm and 200 mm.
- Coastal provinces demand galvanised ring shanks.
Overtightening also compresses the shingle and creates a low spot that pools water. A hand tighten can distort soft aluminium flashing. Use a manual screwdriver for the final quarter turn and stop when the washer bites. This step fails most at the fastener line, not the pipe collar. Give cap screws the respect you would a torque spec; a leak costs more than a new flange.
Matching the Flashing Material With Your Roof Type
Roof vent jack installation requires more than a snug collar. The flashing material must match the surrounding roof type, beyond the pipe profile. A copper boot on a galvanised corrugated roof sets up electrolytic corrosion, and the junction degrades from the inside. SANS 10400 Part L includes provisions on material compatibility, and local municipal amendments can tighten those rules. Failing to check them turns a straightforward job into a rejection notice.
Mismatched thermal expansion compounds the problem. A lead flange behaves differently from a profiled steel sheet under highveld heat. The flashing works loose at the seams precisely where the sealant was meant to hold. For any roof vent jack installation, code pitfalls are rarely dramatic; they surface as a quiet weep during the first storm. Matching the flashing to the roof covering, in gauge and alloy, prevents that slow separation.
Understanding Local Building Codes for Permit Needs
Permit requirements often catch homeowners off guard. A roof vent jack installation may seem like a repair, but many municipalities classify it as an alteration. That distinction changes what you can do without inspection, and it changes the paperwork trail.
I have seen perfectly executed jobs fail because the application arrived late. The local authority does not care how straight your nails are if the permit was not approved before work began.
Common code pitfalls include:
– Assuming the old flashing footprint exempts you from new setback rules
– Ignoring the council’s specific wind load requirements for exposed ridges
– Missing the deadline for the final inspection request
Understanding local building codes for permit needs is tedious. That booklet contains the difference between a clean sign-off and an expensive redo. Any roof vent jack installation that skips this step risks a stop-work order and a late fee.
Steering Clear of Caulking on Rainy or Humid Days
This is the moment when patience wins the job. You might have the entire roof vent jack installation mapped out, but if the sky spits or the air carries that sticky coastal cling, your sealant is already compromised. Water hides in the pores of the asphalt, and once you press the flange down, that moisture has nowhere to escape. It sits there, invisible, until the first heat cycle turns it into steam that lifts a bubble under the boot.
Humidity in Johannesburg after a summer downpour is the worst offender. The surface looks dry, but the board underneath is still damp. I have learned to run a hand across the shingle; if it feels even slightly cool and clammy, I stop work. The sealant gets the blame, but the water underneath was always the culprit.


0 Comments