Recognizing the Signs of a Vent Pipe Leak
Visible Water Stains on Ceilings
Few things signal roof trouble as quietly as a water stain. A pale brown ring spreading across your ceiling plaster is the first notice that a leak around roof vent pipe has breached the system. By the time the mark appears, water may have travelled along rafters for weeks, pooling in hidden cavities.
The stain reveals its own story. A bleeding edge suggests active moisture, while a hard, crusty border indicates the leak has dried and returned. Faint striations within the discolouration trace the water’s path. These stains enlarge after rainy Cape Town winters or humid Durban summers.
When inspecting the mark, check for these clues!
- A damp, dark centre
- A yellow ring expanding across several days
- Peeling or bubbling paint along the edge
Each clue points to ongoing penetration rather than a one-off event, and that distinction signals how urgently the leak around roof vent pipe must be addressed.
Musty Odors in the Attic
Attics carry a distinct air, but a persistent musty odour is anything but ordinary. That smell, often compared to damp earth or aged paper, develops when moisture settles into timber and insulation. It is frequently the first signal of a leak around roof vent pipe that has not yet reached a visible surface. Unlike ceiling stains, this scent spreads through the entire attic, making the space feel heavy and closed in.
- A smell that intensifies after warm weather
- A feeling of dampness on exposed rafters
- A metallic tang mixed with the must
The odour does not fade with ventilation. It lingers because the moisture source remains active, gradually degrading the roof structure. Recognising this sign early allows an attentive homeowner to trace the origin and plan repairs before the leak around roof vent pipe causes further deterioration.
Damaged Flashing or Collar
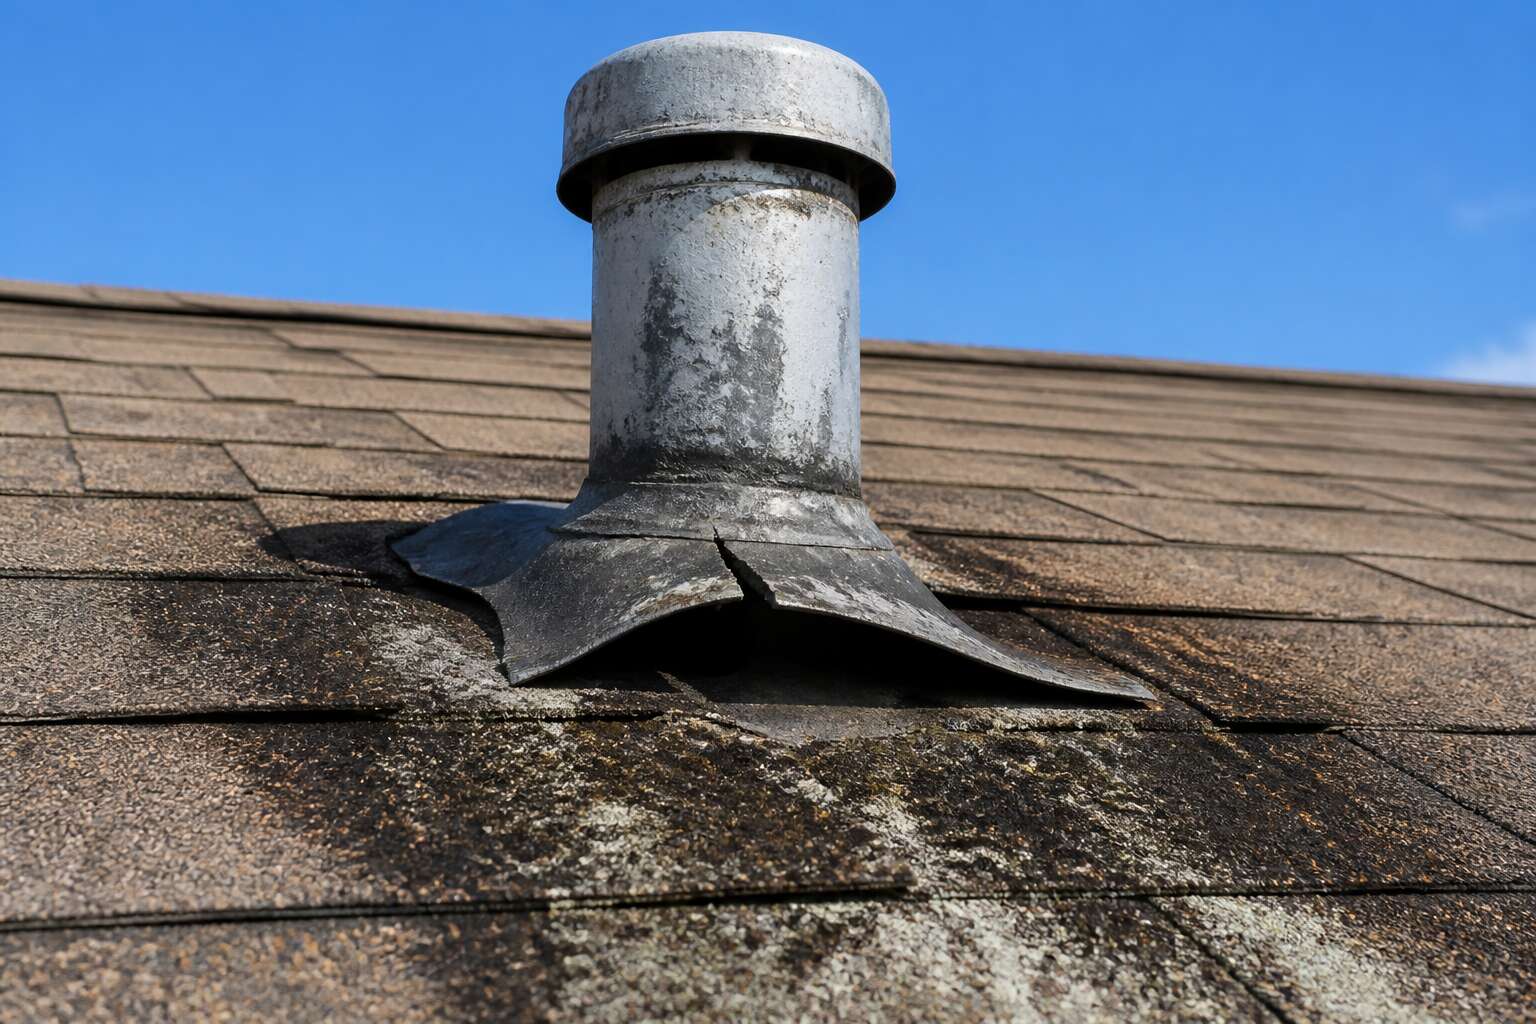
The flashing collar protects the roof vent pipe from water intrusion. When it fails, the leak around roof vent pipe follows soon after. South Africa’s highveld summers create a hostile environment for these fittings. Temperature swings cause the metal to expand and contract, cracking the sealant over time.
Signs that the collar has failed:
– Rust streaks running down from the pipe base
– A visible gap between the rubber boot and the pipe
– Flashing that lifts away from the roof tiles at the edges
A damaged collar does not always leak immediately. The first rain wets the insulation beneath, and the second softens the timber. By the third storm, the water has a clear path. The rubber boot perishes from UV exposure, while the metal base corrodes where it meets the roof surface. In my experience, homeowners notice this damage during routine gutter cleaning.
Condensation and Dripping Sounds
South African homeowners often hear the first warning before they see it. A persistent drip or a faint hiss from the ceiling cavity signals a leak around roof vent pipe, long before the plasterwork betrays the problem.
Condensation is the quieter accomplice. Warm, humid air from the bathroom meets the cold metal pipe, and moisture beads form on the surface. The water runs down, saturating insulation and leaving a damp patch. A chill on the ceiling that persists through summer is a reliable clue.
Dripping sounds are often misread as a plumbing issue, so homeowners trace the noise inside the home. The water travels along the vent pipe and drops onto the attic floor, creating a rhythmic tapping. Because sound travels through timber, it echoes far from the entry point. Listen at night, and you might just catch the signal of that leak around roof vent pipe!
Common Causes of Vent Pipe Leakage
Cracked Rubber Boot Seals
A single hairline crack in a rubber boot seal can channel rainwater into your ceiling cavity. The boot, a rubber sleeve that wraps around the vent pipe, sits exposed to South African sunlight. UV radiation breaks down the elastomer, causing it to harden, shrink, and split. These splits often begin on the underside, hidden from view until the damage reaches your interior.
A leak around roof vent pipe frequently traces back to this failed seal. The rubber loses its elasticity and no longer hugs the pipe tightly. Water runs down the vent pipe, seeps under the loosened boot, and drips into the roof structure. Attic heat accelerates the deterioration.
Improperly Installed Flashing
The flashing that surrounds a roof vent pipe is only as reliable as its installation. A leak around roof vent pipe frequently stems from a metal collar that was never aligned with the roof’s pitch. Installers sometimes leave a gap between the flashing and the shingle layer, or they drive nails straight through the top edge without sealing the holes.
Common errors include:
- Flashing set below the course of shingles, allowing capillary draw
- Missing sealant under the upper flange
- Overlapping pieces that face the wrong direction
Each mistake creates a path for rainwater to bypass the boot and enter the roof cavity. The damage stays hidden, and by then the source is often misread. A recurring leak around roof vent pipe should prompt a check of the flashing, rather than the boot alone.
Temperature-Related Seal Deterioration
Temperature swings cause seal deterioration. In South Africa, the sun beats down by day and the mercury drops at night. That cycle makes the mastic around the vent pipe expand and contract. The material becomes brittle and loses its grip. The result is a leak around roof vent pipe that shows up only after the rafters are wet.
The process is gradual. A hairline crack forms, then widens. Rain finds the gap, and the water follows a path that is rarely direct. Homeowners blame the flashing or the boot, but the seal itself is the vulnerable point. When the seal fails, no amount of patching will hold for long.
- Check the sealant for stiffness or cracks
- Look for gaps where the seal meets the pipe
The damage is not always visible from inside. By the time a leak around roof vent pipe becomes obvious, the seal has been failing for months. Temperature alone does not cause the failure, but it speeds it up.
Debris and Nesting Pests
Debris and nesting pests rank among the silent saboteurs of rooftop integrity. Leaves, pine needles, and windblown grit accumulate in the low spots where the vent pipe meets the roof. That organic matter holds water like a sponge, keeping the surrounding seal constantly damp. Over time, this trapped moisture accelerates wear on materials already stressed by the African sun.
Pests add their own mischief. Birds often pull at loose fibers for their nests. Rodents and insects crawl beneath the rubber boot, widening gaps that never should have opened. The damage is not always immediate, but it is persistent. A single determined bird can scratch through a protective layer in an afternoon.
- Birds and rodents nesting around the base
- Leaves and twigs holding moisture
- Insects burrowing under the boot
The result is a leak around roof vent pipe that makes itself known only after the water has travelled far from its entry point. By then, the nesting material has been home to more than one generation. Inspecting the vent pipe base regularly for debris and animal activity is the quiet work that keeps the inside of your home dry.
Pipe Movement and Settling
A house never truly stays still! The ground beneath it shifts, the materials breathe, and each season adds its own pressure to the structure. These subtle movements are the hidden engine of a leak around roof vent pipe.
Thermal cycling alone forces the pipe to expand and contract daily. The boot and flashing, fixed to the roof deck, cannot follow that rhythm perfectly. Over years, this differential movement creates a gap at the seam. Foundation settlement adds a second force. As the soil under your home compacts, the entire roof plane tilts by millimetres, and the rigid vent pipe resists that shift. The result is a persistent, lateral torque at the base.
- Cyclic thermal expansion of the pipe material
- Foundation settling and soil movement beneath the structure
- Localised roof deformation under heavy load
South African homes often sit on expansive clay soils that swell and contract with seasonal rain. The repeated heave and drop is relentless. So, the quiet stress on that single joint accumulates until the waterproofing tears away from the pipe wall. The resulting leak around roof vent pipe then follows a slow path through insulation and trusses, emerging far from the source. The original installation was sound, but the ground itself had other plans.
Step-by-Step Repair Methods
Inspecting the Affected Area
Water rarely follows a straight line. That makes a leak around roof vent pipe tricky to pin down. I begin by clearing the area around the pipe. Remove all loose material, including old sealant fragments and bird droppings. Then I trace the damp path using a moisture meter or a simple flashlight. The goal is to find the actual intrusion point, not the symptom.
Check the pipe itself for vertical movement. A slight wobble indicates settlement. Also inspect the underlayment where it meets the vent. A recurring leak around roof vent pipe often stems from subtle shifts. Follow this sequence for accuracy:
- Map the water entry point inside the attic.
- Transfer that location to the roof surface.
- Examine the flashing edges for gaps.
Removing Old Sealant and Flashing
Removing old sealant is messy work. Years of repairs crust into layers. I soften them with a heat gun, then scrape with a stiff putty knife. Keep the heat moving or you will blister the underlayment.
Once the sealant gives way, the old flashing lifts free. Pry it up with a flat bar. Take care not to bend the collar. A leak around roof vent pipe often hides beneath years of caulk, so I inspect the decking for rot first.
I remove the fasteners in sequence:
- The rusted screws holding the flashing flange.
- The base nails from the original installation.
- Any staples pinning the boot to the pipe.
With the metal clear, I brush away debris and check movement. I set the new flashing into fresh roofing cement. Press it level. A leak around roof vent pipe will not hold if the base is uneven. The shingles tuck over the flange.
Applying New Roofing Cement
After the old flashing is gone, the roofing cement becomes the final layer. A leak around roof vent pipe often returns when this layer is thin or uneven.
Apply the cement in a strict order:
- Spread a generous bed across the clean decking.
- Press the new boot into the cement from the centre outward.
- Add a top coat over the flange edges.
Level each layer with a trowel. The shingles tuck over the flange last. Check for gaps before the cement sets!
Installing a Replacement Pipe Boot
With the decking clean and the cement bed laid, the replacement boot becomes the critical element. A leak around roof vent pipe often traces back to a boot that was forced flat against the deck rather than seated with the rubber collar aligned to the pipe. I press the boot into the cement from the centre outward, letting the flange sink into the compound. The collar must sit snug, not stretched taut. The following sequence works reliably:
- Slide the boot over the pipe until the flange touches the cement.
- Press from the centre outward to drive out trapped air.
- Set the top edge of the rubber collar with a firm twist.
Then the shingles come back over the flange. Each tab gets pressed into the cement, and the nail heads get a dab of the same compound. The boot carries the load, and the cement secures the perimeter. A proper seat in that bed is what separates a one time repair from a recurrent leak around roof vent pipe.
Testing for Watertightness
A repair looks finished until the first storm arrives. The ceiling can be dry while the seal remains unproven. Before calling the job done, test with water and time.
Start with a garden hose. Run it over the boot and shingle area for fifteen minutes. I prefer to work from the lower edge upward so water sheets across the repair rather than pooling. While the water runs, inspect from inside the attic with a torch:
- Check the rafters for dampness.
- Run a hand along the underside of the decking.
- Look for droplets forming on the pipe or the boot collar.
A leak around roof vent pipe can hide for days before it shows on a ceiling, so what you do not see matters as much as what you do.
If the repair holds, wait for a natural rain event and inspect again within twenty four hours. This two stage test catches slow seepage that a quick soak misses!
Preventative Maintenance Strategies
Scheduling Annual Roof Inspections
A single inspection can cost less than one emergency callout. For South African homeowners, that is a bargain! Annual roof inspections are the simplest way to avoid a leak around roof vent pipe.
Book them before the rainy season hits. A professional will climb up, assess the entire roof, and flag any weak points. This proactive approach saves money and stress. I always tell clients to treat it like a car service. You do not wait for the engine to fail.
Keep a record of each inspection. Note the date, findings, and any repairs. Over time, this history reveals patterns. It shows where wear happens fastest. Then you can address those areas early. Prevention is cheaper than cure. That is true for roofs too.
Cleaning Gutters and Downspouts
When rainwater cannot drain, it collects against the roofline. Clogged gutters and downspouts force water to pool around the pipe boot, and that standing water works its way under the shingles. This is a common trigger for a leak around roof vent pipe after summer thunderstorms.
In my years inspecting roofs across South Africa, I see the same pattern every time! Leaves, twigs, and bird nests accumulate in the channels. The weight of wet debris bends the gutter, loosening the fasteners. Water then spills over the edges and travels along the fascia toward the vent pipe penetration.
- Clearing sediment and organic matter every three months prevents buildup
- Checking downspout joints stops blockages that hold water
- Keeping the gutter slope pointed away from the foundation reduces pooling
Open channels are a simple defence. They reduce the hydrostatic pressure that pries at flashing seams. When no water sits against the seal, the vent pipe boot stays dry and intact, which means you avoid that leak around roof vent pipe altogether.
Trimming Overhanging Branches
Overhanging branches are silent saboteurs in the fight against water intrusion. Their constant motion scrapes granules off shingles, while fallen leaves settle around the vent pipe boot and hold moisture against the seal. In South African gardens, acacia and eucalyptus trees drop debris unpredictably, making seasonal trimming essential.
Consider these practices to protect your roof penetration:
- Inspect tree clearance every three months, especially after high winds
- Cut branches back at least three meters from any vent pipe
- Remove dead or weakened limbs before they drop onto the roof
Branches that touch the pipe transfer vibration during storms. That movement gradually separates the rubber boot from its flashing. A humble trim keeps the assembly stable, reducing the chance of a leak around roof vent pipe long before water ever finds its way inside.
Sealing Minor Cracks Early
A hairline fracture in the roofing cement around a vent pipe is often dismissed as a cosmetic flaw. In reality, this small fissure is a direct invitation for water to begin its slow, destructive journey into your decking and insulation. The sun’s ultraviolet rays are relentless in the Highveld, and they cause these protective seals to shrink and split far sooner than most homeowners expect. Sealing minor cracks early is not a repair task; it is a strategic move to safeguard the entire roofing assembly.
When you locate a crack, the process is straightforward. You are not tearing anything out, just filling the gap and restoring the barrier.
– Clean the affected area with a wire brush to remove loose debris and oxidised sealant.
– Apply a high-grade, UV-resistant roofing sealant directly into the fissure, pressing firmly to ensure full penetration.
– Smooth the bead with a putty knife to create a uniform surface that sheds water cleanly.
I recall a client in Durban who waited six months to address a tiny split he could see from his upstairs window. The result was a soaked ceiling and a sagging gypsum board that cost ten times more to replace than a tube of sealant. A minor crack near the base of the boot is the most common precursor to a leak around roof vent pipe, yet it is the easiest to neutralise with routine observation. The act of sealing early maintains the rigidity of the flashing base. This simple intervention prevents the constant flexing that leads to larger separations and eventual structural failure.
Replacing Worn Boots Preemptively
Replacing a boot before it fails feels counterintuitive. Why disturb a pipe flashing that looks intact? Because rubber compound degrades from the inside out. Hairline cracks appear only after the internal elasticity is already gone. A stiff boot cannot absorb thermal expansion. On a Highveld afternoon, temperature swings are brutal. That rigidity transfers stress to the fasteners, decking, and the flashing base. A leak around roof vent pipe often starts here.
The swap is straightforward:
- Cut the old sealant bead cleanly with a utility knife.
- Lift the flange and slide the new boot over the pipe.
- Secure the base with stainless steel ring shank nails.
- Apply compatible sealant over the flange edge.
The dry season is the window for this work. A storm will expose weaknesses quickly enough. A new boot costs around R150. A soaked ceiling costs far more. Replacing worn boots preemptively stops a leak around roof vent pipe before it begins.
When to Hire a Professional
Assessing the Complexity of the Repair
The first attempt at a repair can feel like a victory, yet the true test of your handiwork arrives with the next heavy downpour. A persistent leak around roof vent pipe is a master of disguise, often deceiving the eye with a simple surface problem while a more sinister structural issue lurks beneath the granules.
When you peer up from the attic and see daylight through the gap, or when the plywood sheathing feels spongy beneath your palm, the repair has clearly transcended a simple DIY task. The complexity is not always in the tear-off, but in the diagnosis. Several indicators suggest the need for a professional to assess the situation:
– The vent pipe itself rocks or moves when you touch it, indicating a structural problem below the roofline.
– You notice a sunken area or a noticeable dip in the roofing material around the pipe boot.
– Water stains trace a path that diverges dramatically from the vent’s location, suggesting a hidden water migration.
– The surrounding shingles are brittle, curled, or have lost a significant amount of their mineral surface.
The truth is that a leak around roof vent pipe often reveals a cascade of interconnected failures. A professional can determine if the issue stems from a faulty flashing seal, or if the pipe’s support bracket has pulled away from the truss, creating a gap that moves with the wind. Their assessment goes beyond the visible, probing for rot in the decking that might compromise the entire integrity of that roof section. Furthermore, consider the value of your time and the safety of your ladder. Hiring an expert for a complex repair is not an admission of defeat, but a calculated investment in the longevity of your home. They possess the industrial tools and the experiential insight to handle the unforeseen, leaving you with a roof that stands resilient against the seasons to come.
Understanding Safety Risks on Steep Roofs
Standing on a corrugated iron roof in Johannesburg after a thunderstorm is not a vacation. The pitch is unforgiving, and a single misstep on wet metal ends badly. A leak around roof vent pipe often forces homeowners to climb where they have no business being.
- Slippery surfaces from moss or morning dew
- Fragile asbestos sheeting that cracks under weight
- High winds that shift your balance instantly
Professionals carry harnesses, anchor points, and safety ladders. They know which areas of the roof bear weight and which will give way. Standing on that ladder exposes you to risk. Their training removes the guesswork. When the repair requires work above a two-storey drop, call someone who does this daily. The cost of a specialist is cheaper than a hospital visit.
Evaluating Long-Term Roof Warranty Requirements
Your roof’s warranty does not cover a leak around roof vent pipe if you repair it yourself. Most policies demand specific procedures, and evaluating long-term roof warranty requirements before touching anything protects your investment. The fine print often names approved contractors and exact material types. Ignoring that detail voids coverage quickly!
Professional repairs come with verifiable documentation. A specialist signs off on the work, logs the date, and provides evidence that your installer’s obligations remain intact. That matters when a future storm causes damage!
Common warranty conditions include:
- Certified installer involvement
- Brand specific flashing components
- Photographic proof of each repair step
Hiring a professional ensures those conditions are met. It also covers your liability if the problem reappears after the repair.
Comparing DIY Costs vs. Professional Services
The DIY calculator looks appealing. A tube of sealant costs less than a cappuccino at a Johannesburg cafe. But the total includes ladders, safety gear, replacement boots, and the inevitable second trip to the building supply store. Those costs add up quickly, and the price gap narrows.
Professional services often quote a fixed price for a leak around roof vent pipe. That quote covers diagnosis, materials, labour, and disposal of old flashing. It also covers the awkward moment when you realise the crack is somewhere else entirely. Most homeowners discover that the most expensive repair is the one done twice.
- DIY cost: supplies, tools, your weekend and a sore neck
- Professional cost: one invoice, one visit, one guaranteed fix
Time is the hidden expense that nobody budgets for. A specialist finishes in two hours what might take you two weekends of trial and error. When the leak around roof vent pipe persists after your third attempt, the professional quote looks like the bargain.



0 Comments