Understanding Bathroom Ventilation Basics
Why Proper Exhaust Venting Matters
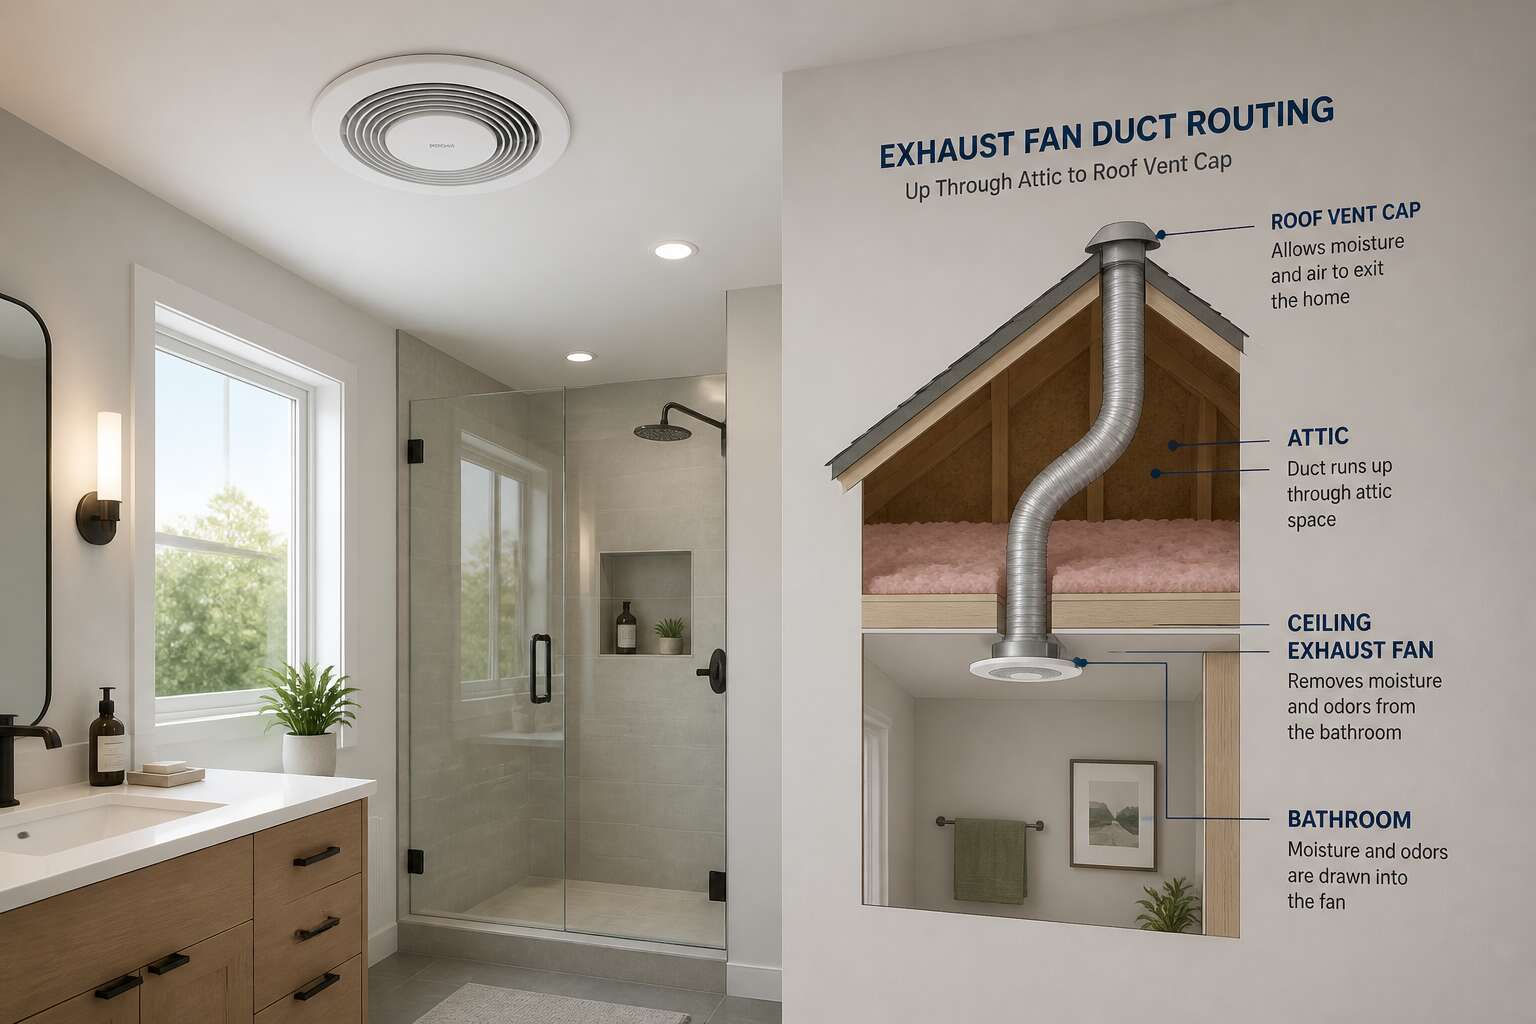
South Africa’s National Building Regulations require every bathroom to have an openable window or mechanical extraction, yet most homeowners never give it a second thought. A bathroom to roof vent does one job: it pushes humid air upward and out of the house. That matters because shower steam will inevitably find a cold surface and condense into moisture that damages paint.
Proper exhaust venting prevents this by attacking the problem at its source. Without it, you get peeling ceilings, warped door frames, and a musty smell that no air freshener can fix.
- Reduces indoor humidity
- Protects structural timber
- Keeps windows clear
The roof is the most logical exit point, since hot air naturally rises.
Components of a Typical Bathroom Exhaust System
A single ten minute shower releases roughly 1.5 litres of moisture into the air, and that humidity has to go somewhere. In South African homes, the usual answer is a bathroom to roof vent. But the components must cooperate.
The fan unit, typically mounted in the ceiling, pulls air across the room. A duct, often flexible aluminium or rigid PVC, transports that air through the roof cavity. The roof vent cap terminates the run, blocking rain and pests. A backdraft damper, fitted near the fan, prevents cold air from dropping back down when the unit is off.
- The fan: sized by cubic metres per hour, not watts
- The duct: short and straight outperforms long and bent
- The roof cap: a low profile design reduces wind noise
Any mismatch between these parts undermines the whole bathroom to roof vent system. Most residential failures, in my experience, trace back to exactly that.
Signs Your Current Ventilation Is Failing
After a hot shower, that dampness lingering beyond a minute is your first clue. Understanding bathroom ventilation basics means recognising that air movement, not noise, keeps a room healthy. A bathroom to roof vent system works only when the whole path is clear. Signs your current ventilation is failing often appear gradually:
- Condensation on windows or tiles that stays for hours
- A musty smell that intensifies after a shower
- Peeling paint or dark spots on the ceiling
If any of these sound familiar, your exhaust is not clearing humidity. The system might be intact, but airflow is compromised. I have seen fans run yet barely move air because the bathroom to roof vent duct is collapsed or disconnected. Catching these signs early prevents rot in the roof cavity.
Evaluating Your Roof and Attic Setup
Assessing Roof Pitch and Material Compatibility
The average South African roof pitch sits between 15 and 45 degrees, but that range hides significant variation. A steep pitch makes it easier to run a straight bathroom to roof vent, while flatter roofs may need additional support or extended ducting to maintain proper airflow.
Material compatibility is the other half. Corrugated iron, concrete tiles, and clay profiles each behave differently when penetrated. Iron is forgiving, but tiles can crack under load if the flashing is seated incorrectly.
- Check whether your roof uses screw-down or hidden-fastener sheeting.
- Confirm the tile profile before ordering a flashing kit.
- Inspect attic clearance above the vent location.
That last point often gets overlooked. If the trusses crowd the run, the vent path changes completely, and the whole installation shifts. The roof system dictates where the vent can go, not the other way around.
Inspecting Attic Insulation and Airflow
Attic insulation rarely gets a second glance when planning a bathroom to roof vent, yet it can quietly sabotage the whole system. Loose fill and blanket insulation settle unevenly over time, pressing against ductwork and choking the airflow that keeps your bathroom dry. If the vapour barrier sits on the wrong side, moisture can travel backward into the roof space.
A bathroom to roof vent needs a clear path from ceiling to sky, meaning you must evaluate the insulation depth and the static pressure around the run. Several things matter:
- depth of insulation directly under the vent terminal
- presence of blockages like nesting material or old piping
- position of the vapour barrier relative to the duct
These details determine whether the vent draws properly through the seasons.
Locating the Optimal Vent Position
Once the insulation is sorted, the next step is mapping the route. The optimal vent position sits high on the slope, at least 300 mm below the ridge, to avoid wind-driven rain and keep the exhaust rising naturally.
Steer clear of soffits, gables, and dormer locations. Those spots trap moisture and guarantee staining.
- measure the distance from the fan housing to the proposed exit
- check for roof members, skylights, or flues blocking the path
- confirm the vent cap clears existing roof penetrations
A solid bathroom to roof vent run uses the shortest practical route without kinks. Each bend adds resistance. A straight path keeps the system quiet and efficient.
Measuring Duct Run and Calculating CFM Requirements
A bathroom to roof vent cannot perform its job if the ceiling cavity is a chaotic tangle of wires and old timber. Before measuring anything, climb into the roof space with a torch and study the construction. The trusses, or rafters in older homes, will dictate where the duct can travel. Look for cross braces that might block a straight rise. Pests often leave nests and droppings in these quiet corners, and the smell can be mistaken for a ventilation problem later. Your roof cavity here in South Africa can heat up to sauna temperatures during summer, so choose a duct with insulation built in.
Once you have a clear visual of the route, it is time for the tape measure. The distance from the fan housing to the exit point on the roof determines how hard the motor must work. A short run is easy, but a long, winding path with multiple elbows will choke the airflow. The duct run for a typical home bathroom should not exceed 4.5 metres if possible. If the bathroom is internal and far from an exterior wall, you might need to extend the run through the ceiling cavity and out the roof. Add 0.6 metres of effective length for every bend you introduce. A fan rated for 80 cubic metres per hour will struggle against a 6 metre run with two 90 degree turns.
– Measure the horizontal distance from the fan to the roof penetration point.
– Add the vertical rise from the ceiling to the ridge cap.
– Count every bend and elbow in between.
– Note any sections where the duct will be crushed by insulation or timbers.
The right fan size hinges on the room volume. A small ensuite of 6 square metres with 2.4 metre ceilings needs a lower extraction rate than a family bathroom of 12 square metres. The formula is simple: multiply the length, width, and height of the room to get cubic metres, then multiply that by ten for the air changes per hour, which is the recommended standard for bathrooms. A 3 metre by 2.5 metre bathroom with a 2.4 metre ceiling gives you 18 cubic metres. Multiply by 10 to get 180 cubic metres per hour. This is the beauty of a well planned bathroom to roof vent installation. It moves air without straining the motor.
The duct diameter interacts with the fan output. A 100 millimetre duct can handle around 47 litres per second, while a 150 millimetre pipe carries nearly double that amount. Most residential fans match a 100 millimetre duct fine if the run is short. For longer routes that snake through the roof, upgrade to 150 millimetre flexible ducting to reduce static pressure. The noise level rises when the fan fights against a narrow pipe, so oversized ducting keeps the bedroom quiet. Your calculations should also consider the roof vent cap itself. A cowl style cap with a deflector creates less resistance than a flat flap model. Spend the extra money on a cap with a smooth throat, because the savings in fan wear will be worth it.
Measure twice and cut once applies to a bathroom to roof vent installation just as it does to carpentry. The difference lies in measuring air pressure, not wood grain. Walk through the house and feel the air movement near the bathroom door. A gap under the door of 20 millimetres is enough to supply makeup air, but a gap of 10 millimetres will starve the fan and cause a rumbling sound. Weather stripping around windows in modern South African homes can be too effective for ventilation. This is why the duct run needs a clear path, and the CFM requirement should be double checked against the fan curve in the product manual. Most installers skip this step and pay for it with moist ceilings later.
Step-by-Step Installation Process
Gathering Tools and Materials
Before the first cut, the attic holds a particular quiet. Assembling the tools is a ritual of its own, and skipping this step invites trouble later. A bathroom to roof vent install demands ducting, a vent cap, flashing, a hole saw, and a caulking gun. Do not forget aluminium tape and insulation for the joints! I prefer to lay everything on a drop sheet, because loose fittings slip into the dark spaces of the roof cavity. Measure twice. Mark clearly. Keep a torch within reach. The rafters cast long shadows, and the work becomes ceremonial. Prepare each element before you climb, because once you are up there, the house will not pause while you hunt for a missing screw.
Cutting the Roof Opening Safely
Drill a pilot hole through the sheathing from inside the attic, right at your marked centre. Then climb up and locate that bit from the outside. It gives you an exact target for the hole saw, eliminating guesswork on a sloped surface.
Fit the hole saw over the pilot bit and start cutting with steady, even pressure. Let the saw teeth do the work. Pushing hard cracks the surrounding shingles. A bathroom to roof vent opening needs a clean circular edge for the flashing to seat properly.
Once the saw breaks through, pull it out slowly and tap the slug loose. Before you install anything, check your work:
- Clear loose shingle fragments from the edge.
- Test the vent cap fit over the hole.
- Confirm the opening sits square within the vent base.
The entire bathroom to roof vent project depends on this single cut. These checks take less than a minute and prevent flashing failures later.
Flashing Installation and Leak Prevention
The cut hole sits clean, but that decking is now the weakest point in your roof. Every bathroom to roof vent depends on the flashing installation that follows. I prefer a one piece galvanized flashing. Slide the upper edge under the shingle course directly above the vent, then let gravity work. The lower shingles will naturally overlap the base and shed water away.
Run a continuous bead of polyurethane sealant along the underside of the flashing flanges before screwing down. Not blobs, a steady line. Use rubber gasketed roofing screws and drive until the washer just begins to cup. Over tightening cracks the metal.
Water will test these points:
- The top edge tucks under the shingle course.
- The side flanges lie flat against the roof deck.
- The pipe collar grips the vent riser without gaps.
Connecting the Duct to the Exhaust Fan
Of all the social graces in home improvement, few are more telling than how you treat the humble exhaust fan. It is the quiet workhorse of your home, yet the connection from its spigot to the duct collar is where many good intentions go to die. One must approach this task with the same gravity as a formal dinner party seating arrangement; everything must fit perfectly.
Start by locating the fan housing’s outlet, usually a round or rectangular spigot. Slide the flexible duct over this point, ensuring you have sufficient depth for a secure grip. You are not merely pushing it on, you are seating it. Once seated, you will secure the metal ring with a worm drive clamp. A screwdriver here is your best friend, but do not overdo the torque. The goal is a firm grip, not a strangulated pipe.
Next, you must consider the journey of the duct itself. It should travel to the bathroom to roof vent with minimal bends and no crushing. A kinked duct acts as a dam, trapping moisture and undermining the entire system.
Here is what to inspect as you secure the line:
– Each connection point uses a clamp or foil tape.
– The duct is pulled taut but not stretched.
– The insulation on the duct remains intact and unblemished.
Before you call it done, pull back the insulation at the fan connection and run a bead of duct mastic over the joint. This is the finer point of etiquette for your airflow. It prevents the subtle hiss of escaping air that you might otherwise mistake for a draft. After the mastic dries, cover the joint with foil tape for a lasting bond. This ensures the entire run from fan to the bathroom to roof vent operates as one seamless entity, respectful of both your ceiling and your energy bill.
Sealing, Insulating, and Final Roof Finishing
I have seen roof vents fail because someone decided mastic was optional. In the Cape Town summer, that mistake announces itself with a drip that syncopates with your heartbeat. Sealing the bathroom to roof vent correctly is your only defence. Begin by pressing the foil tape firmly over the duct joint, then smear a generous layer of mastic over the tape.
Inside the attic, inspect the insulation around the pipe. If it is compressed or damp, replace it before you close up. On the roof, set the vent boot over the opening and run a continuous bead of urethane sealant under the flange. Secure the boot with nails, then cover each nail head with roofing cement.
The final test is a hose soak. A bathroom to roof vent that survives that without a single drip is done. Otherwise, you get to practice your sealing technique again.
Permits, Codes, and Professional Help
Understanding Local Building Regulations
Before you cut a single tile, verify your municipal bylaws. A bathroom to roof vent typically requires a building permit, and ignoring this can lead to fines or forced removal. In South Africa, SANS 10400 regulations govern ventilation and roof work. These codes specify duct diameters, termination heights, and moisture control standards. Your local authority might have additional requirements.
Enlisting a professional is often wise. A qualified roofer or ventilation specialist will understand the nuances of your specific structure. They can also ensure compliance without guesswork. Here are typical checks they perform:
– Structural integrity of the roof after cutting
– Correct flashing for your roof pitch
– Proper clearance from ridge or other penetrations
Working with an expert saves time and prevents costly mistakes. Every bathroom to roof vent project must align with these local stipulations, so I always advise homeowners to secure certified help for this critical step.
When to Obtain a Permit
A bathroom to roof vent installation involves three common mistakes: skipping permits, ignoring codes, and refusing professional help. You can avoid all three.
Most municipalities require a permit before you modify your roof. The application process takes days, not weeks. The fee is modest compared to the cost of retroactive fines. Without a permit, your homeowner’s insurance may not cover water damage from a faulty install.
SANS 10400 sets the standard for ventilation work across South Africa. This code covers duct sizing, moisture resistance, and termination heights. Your local bylaws may add stricter rules. An inspector will check your work against these requirements.
An experienced ventilation specialist offers measurable benefits:
1. Confirms the vent location meets clearance rules before you cut
2. Verifies the duct route avoids hidden obstructions
3. Checks the final terminations against code requirements
I recommend hiring a professional for the roof penetration itself. The cutting, flashing, and sealing require precise work. A specialist completes the job faster and with fewer errors. Their invoice is cheaper than repairing a leaking roof.
Hiring a Licensed Roofer vs. DIY
The permit process involves more than paperwork. Inspectors verify your bathroom to roof vent against SANS 10400 and local bylaws. The inspection happens at key stages, not just the end. Without it, small errors go unnoticed until water stains appear on your ceiling!
Hiring a licensed roofer versus DIY changes the risk profile. An experienced specialist confirms the vent location before cutting, verifies the duct route avoids hidden obstructions, and prepares the work for inspection. DIY saves rands initially, but a leaking roof costs far more than an expert invoice.
A licensed roofer provides:
- Liability coverage for roof damage
- Correct flashing and sealing techniques
- Final inspection readiness
Maintenance, Troubleshooting, and Upgrades
Cleaning the Vent and Ductwork
The most forgettable fixtures often carry the heaviest responsibility. A bathroom to roof vent is exactly that, a silent workhorse until the day it isn’t. I have seen many homes where neglect turns a simple pathway into a source of costly decay.
Cleaning the vent and ductwork is an unglamorous chore, yet it is the true measure of a system’s lifespan. If you want to avoid a cascade of future failures, focus on this specific ritual:
- Disconnect the duct from the fan housing and inspect the interior with a torch. Look for loose debris and animal nests.
- Use a stiff brush on a flexible rod to scrub the vertical run, working from the roof opening downwards.
- Wipe the fan blades and the interior of the housing with a damp cloth to remove grime and dust buildup.
When you encounter a problem, resist the urge to repair only the surface symptom. A rattling fan often signals imbalance, but a persistent smell usually means the duct has a leak or the vent cap is stuck. Troubleshooting demands that you follow the air path from the bathroom ceiling to the roof. Check the backdraft damper, the flap that seals the duct when the fan is off; a simple blockage here can cause a cascade of ventilation issues that no amount of cleaning will fix.
Upgrades are not about adding shiny features. They are about increasing efficiency. Replacing a basic roof cap with a wind-resistant model can improve passive airflow. Adding a timer switch or a humidity sensor lets the system run when it is actually needed, protecting the ductwork from prolonged moisture exposure. These thoughtful modifications serve the same goal as that original installation: a safe, functional route from your home to the open sky, a small but essential piece of the American Dream.
Identifying and Fixing Condensation Issues
Condensation often reveals itself as water stains on the ceiling or droplets inside the fan housing. The bathroom to roof vent should push moist air outward, but a cold, uninsulated duct turns that moisture into a slow drip. I have seen this failure after a Highveld cold snap.
Inspect the duct for sagging sections, since a low point traps water and sends it back toward the fan. Check the vent cap for a damper that sticks open, allowing cold air to meet warm exhaust. My diagnostic routine follows a simple rhythm:
- Hold a tissue to the grille to confirm suction.
- Feel the duct for cold spots along the run.
- Confirm insulation covers every joint.
Persistent problems usually mean the bathroom to roof vent duct is too long or routed through a vented attic. Shorten the run where possible and seal each connection with foil tape. Keep the air warm until it exits the roof!
Upgrading to a High-Efficiency Exhaust Fan
I treat every component between your ceiling grille and the roof cap as one system. A bathroom to roof vent is only as reliable as its weakest joint. My own maintenance routine starts with inspecting the vent cap and bird guard. A blocked flap or a nest in the duct reduces airflow by half. I also listen for the damper fluttering in a stiff breeze. That noise means outside air is pushing back into your exhaust line.
Troubleshooting a weak vent requires checking the fan housing. A dusty impeller or a worn motor bearing will hum but move little air. I remove the cover and clean the blades with a damp cloth. If the fan runs slow, I check the capacitor. That small part fails often and remains cheap to replace.
Upgrades make the largest difference. A high-efficiency exhaust fan with a DC motor uses less electricity and runs quieter. It maintains a steady airflow even when the duct bends.
– Replace an old fan that vibrates.
– Choose a unit with a humidistat.
– Match fan diameter to the duct bore.
A bathroom to roof vent with a modern fan moves air at lower speed, which reduces condensation in winter. The motor draws less power, and the airflow sensor alerts you to blockages. These fans cost more upfront, but they extend the life of your roof structure. Pair the upgrade with a rigid duct. A smooth interior does not catch lint the way corrugated flex does. The result is a vent that stays dry and silent for years.
Adding a Roof Vent Cap with Damper
Maintenance of a roof vent cap with damper begins with the hinge pin. I oil it twice a year because a seized hinge leaves the damper stuck open, letting cold air pour into the attic. The screen mesh deserves equal attention. A fine layer of dust and pollen restricts airflow.
Troubleshooting a noisy damper means checking the counterweight. When the flap rattles, the balance is off! I adjust the tension screw until the flap closes with a soft click. If wind still forces it open, the cap may sit too close to the ridge.
Upgrades focus on materials. A stainless steel damper outperforms galvanised steel near the coast, where salt air corrodes quickly. Every bathroom to roof vent deserves this level of protection. Consider a cap with a built-in backdraft damper. It combines two functions in one unit. For the bathroom to roof vent, this upgrade shortens the duct run and eliminates one more joint to leak.
Smart Controls and Humidity Sensors
Smart controls for a bathroom to roof vent need little care, but the humidity sensor deserves attention. I wipe the sensor dome monthly with a dry cloth. A crust of soap residue fools it into running the fan for hours. The wiring terminals also need checking twice a year:
- Tighten any loose connections
- Inspect the insulation for signs of chewing by rodents
Troubleshooting a sensor that stays silent is usually about placement. If the sensor sits too far from the shower steam, it never registers the moisture. I relocate it closer to the source, but not directly in the spray.
Upgrades are where smart controls shine. Look for a sensor with adjustable sensitivity and a timer override. For the bathroom to roof vent, that combination saves energy without sacrificing airflow.
Winterizing Your Ventilation System
Winter is a different adversary for your ventilation system. The warm, moist air from your shower meets the cold roof deck, and the bathroom to roof vent becomes the battleground where condensation forms. Before the first frost, I inspect the duct insulation. A section where the insulation has slipped exposes the metal to freezing temperatures, and that is where moisture will pool and potentially seep back inside.
Troubleshooting a winter vent issue often involves the damper. A flap that sticks open allows a column of cold air to descend directly into your bathroom. I test the damper by holding a piece of paper beneath the vent cap. If the air moves the paper when the fan is off, the damper is not sealing properly. In cold weather, ice can also bond the rubber gasket to the frame, so I check for that on days when temperatures drop suddenly.
Upgrades for the cold season focus on preventing frost accumulation inside the duct. A short section of insulated flexible duct near the vent cap itself acts as a thermal break. This stops the warm exhaust from condensing inside the metal pipe before it exits. For units installed in regions with harsh winters, a powered damper that closes automatically ensures a positive seal when the fan is off.
Here is a simple winter checklist I follow for the bathroom to roof vent:
– Inspect the insulation on the ductwork for gaps or tears.
– Clean the vent cap and damper of debris and frost.
– Confirm the damper closes fully and seals without gaps.
– Check the vent pipe slope for any dips that trap water.
These actions keep the system operating efficiently, even when the rest of the house is shivering.

0 Comments