
Understanding Roof Vents for Enclosed Trailers
What Is a Roof Vent and Its Function
In the vast landscape of transportation, the humble roof vent for enclosed trailer often remains an unsung hero—yet its importance cannot be overstated. These unassuming fixtures are the silent guardians of airflow, ensuring that fresh air circulates while moisture and heat escape with ease. A well-designed roof vent transforms an enclosed trailer from a stagnant box into a sanctuary of ventilation, safeguarding both cargo and comfort.
Understanding the function of a roof vent for enclosed trailer is essential for anyone seeking to optimize their mobile space. By allowing heat to escape and fresh air to enter, these vents regulate temperature and prevent the buildup of hazardous fumes or dampness. Optimal airflow not only preserves the integrity of stored goods but also enhances safety during transit. Whether transporting delicate equipment or livestock, a roof vent for enclosed trailer is an investment in longevity and peace of mind.
Types of Roof Vents
Understanding the variety of roof vents for enclosed trailers is crucial when selecting the right ventilation solution. Each type serves a specific purpose, enhancing airflow while accommodating different trailer needs. From simple passive vents to complex powered systems, there’s a roof vent for enclosed trailer suited for every application. These fixtures are designed to maximize efficiency, ensuring fresh air circulates and moisture escapes effortlessly.
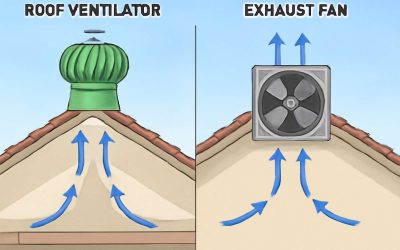
Among the most common options are the static vents, which rely on natural airflow to keep the interior well-ventilated. For more active control, powered roof vents for enclosed trailers come with fans that can be adjusted to suit different conditions. Additionally, some models feature adjustable louvers, allowing users to regulate airflow precisely. Understanding these options helps in choosing a roof vent for enclosed trailer that aligns with specific cargo requirements and environmental conditions.
For those seeking ease of installation and durability, a well-selected roof vent for enclosed trailer can make all the difference. Whether it’s a simple ridge vent or a high-tech exhaust fan, each contributes to a safer, more comfortable environment inside the trailer, especially during long hauls across South Africa’s diverse climate zones. The right choice ensures optimal airflow, protecting valuable cargo and maintaining the longevity of the trailer itself.
Benefits of Installing a Roof Vent
In the vast landscape of South Africa’s diverse climates, maintaining a stable environment inside your enclosed trailer is no small feat. Installing a roof vent for enclosed trailer isn’t just about ventilation—it’s a strategic move to safeguard your cargo from moisture buildup, mold, and the damaging effects of temperature extremes. When moisture lingers, it can lead to corrosion, spoilage, or even compromise the structural integrity of the trailer itself. A well-chosen roof vent acts as a silent guardian, continuously exchanging stale air for fresh, ensuring your goods stay dry and secure.
Beyond moisture control, a roof vent for enclosed trailer enhances airflow, reducing interior heat during scorching summer days or cold drafts in winter. This consistent airflow minimizes condensation, a common enemy that can wreak havoc over time. For those seeking precision, models with adjustable louvers or powered fans allow you to tailor ventilation to changing conditions. It’s this flexibility that transforms a simple roof vent into a vital component of your trailer’s durability and efficiency.
Key Features to Consider When Choosing a Roof Vent
Materials and Durability
Choosing the right roof vent for enclosed trailer is more than just a matter of style; it’s about ensuring resilience against South Africa’s unpredictable weather patterns. The materials used in the construction of a roof vent for enclosed trailer must withstand intense sun, heavy rain, and the occasional hailstorm. Durable materials like high-grade aluminum or UV-resistant plastic are popular choices, offering longevity and resistance to corrosion, which is especially vital in coastal or humid regions.
Durability isn’t solely about resistance to the elements. It’s also about maintaining functionality over time, even with constant exposure to dirt, dust, and temperature fluctuations. A well-crafted roof vent for enclosed trailer will feature sturdy seals and rust-proof components that prevent leaks and ensure smooth operation, season after season. When selecting a roof vent, consider factors such as the quality of materials and the craftsmanship behind it—these are the true tests of longevity in the rugged South African landscape.
Size and Compatibility
Choosing the right size and ensuring compatibility are crucial when selecting a roof vent for enclosed trailer. A poorly fitted vent can compromise the entire system, turning what should be a tool for ventilation into a liability! It’s not just about fitting a piece that looks good; it’s about understanding the specific dimensions and airflow needs of your trailer. An ill-sized roof vent can lead to inadequate ventilation or excessive noise, disrupting the delicate balance of air circulation inside.
When evaluating options, consider the overall size of your enclosed trailer. Measure carefully—height, width, and length—to determine the appropriate vent dimensions. Sometimes, a larger vent might seem appealing, but it could cause unnecessary turbulence, while a smaller one might restrict airflow. To simplify this process, keep these key considerations in mind:
- The compatibility of the roof vent with the existing roof thickness and material.
- The direction of airflow—whether you need exhaust or intake functionality.
- The ease of installation and whether the vent’s design suits your trailer’s roof profile.
Remember, the right roof vent for enclosed trailer isn’t just about matching size; it’s about ensuring seamless integration into your trailer’s structure while maintaining optimal ventilation. Compatibility and precise sizing are the silent guardians of longevity and efficiency, especially in South Africa’s unpredictable climate. When these elements align, your trailer becomes more than a transport tool—it transforms into a resilient space where durability and functionality reign supreme.
Ventilation Capacity
When selecting a roof vent for enclosed trailer, ventilation capacity becomes an essential consideration that can’t be overlooked. A well-chosen vent ensures that fresh air circulates freely, preventing moisture buildup and maintaining a comfortable environment inside. The right ventilation capacity hinges on understanding your trailer’s specific needs—too much airflow can create turbulence, while too little leaves your cargo vulnerable to dampness and odors.
To gauge the perfect ventilation capacity, consider the volume of your enclosed trailer and the typical conditions it faces. Ventilation efficiency depends on factors such as trailer size, insulation, and the type of goods transported. For instance, a larger trailer may require a more robust roof vent for enclosed trailer to achieve optimal airflow. In some cases, multiple vents work better than a single large one, distributing air more evenly throughout the space.
Key features to evaluate include the adjustable airflow setting, which offers greater control in varying weather conditions, and the ease of operation—whether manual or powered. Remember, a roof vent for enclosed trailer with the right ventilation capacity not only enhances durability but also prolongs the lifespan of your cargo, especially in South Africa’s unpredictable climate. Proper airflow is the silent guardian of your trailer’s integrity, combining functionality with resilience.
Weather Resistance
When selecting a roof vent for enclosed trailer, weather resistance emerges as a vital feature that cannot be overlooked. South Africa’s climate is famously unpredictable—ranging from scorching heat to sudden downpours—making it essential that your vent withstands the elements. A roof vent designed with durable, weatherproof materials ensures that rain, dust, and even intense sunlight do not compromise its function or longevity.
Look for features like sealed, waterproof covers and corrosion-resistant components to protect against rust and corrosion. An ideal roof vent for enclosed trailer will also incorporate adjustable louvers or vents that can be sealed shut during storms, providing control over airflow in varying weather conditions. This adaptability is particularly important when transporting sensitive cargo or when the environment outside fluctuates rapidly.
In essence, a roof vent for enclosed trailer with superior weather resistance acts as a guardian—safeguarding your cargo, maintaining optimal airflow, and ensuring your trailer remains resilient no matter what South Africa’s skies throw your way. Remember, durability isn’t just about longevity; it’s about peace of mind on every journey.
Noise Levels
In the symphony of enclosure and ventilation, the hum of a roof vent for enclosed trailer often plays the subtle yet vital note of serenity amid chaos. Noise levels, though seemingly innocuous, wield profound influence over the efficacy and comfort of your cargo environment. A roof vent designed with sound-dampening features transforms a potentially intrusive element into an unobtrusive guardian of airflow, allowing you to focus on what truly matters—peace of mind.
When selecting a roof vent for enclosed trailer, consider models with noise reduction technology. These vents employ insulated covers or sound-absorbing materials that minimize operational hum, even during continuous ventilation. The difference can be startling—what once sounded like a constant drone becomes a whisper, allowing your attention to drift away from mechanical distractions and toward the journey itself.
To navigate this delicate balance, evaluate the following features:
- Built-in silencers or insulating components that dampen noise
- Smooth, aerodynamic designs that reduce rattling and turbulence
- Quiet operation motors that prioritize low decibel output
In the end, the ideal roof vent for enclosed trailer seamlessly marries function with tranquility. It ensures that airflow sustains your cargo without turning your travels into a chorus of unwanted noise, especially under South Africa’s often unpredictable skies. A well-chosen roof vent doesn’t just ventilate—it preserves the quiet dignity of every journey, quieting the chaos and echoing the resilience of your cargo’s safeguard.
Ease of Installation
Ease of installation often plays a surprisingly pivotal role in the decision-making process when choosing a roof vent for enclosed trailer. An elegant, high-quality model is rendered useless if it requires a complicated, time-consuming setup that tests patience and sanity alike. Fortunately, many modern roof vents are designed with the end-user in mind, featuring intuitive mounting systems and straightforward instructions that make installation a breeze—even for those who prefer to avoid the precision of a Swiss watchmaker.
In South Africa’s rugged terrain and unpredictable weather, a roof vent for enclosed trailer must also be adaptable. Look for models that come with pre-drilled holes and versatile mounting brackets, ensuring a snug fit regardless of your trailer’s make or model. To streamline the process further, some vents include all necessary hardware in the package—no frantic scavenging for screws or brackets required! When evaluating options, consider the following:
- Compatibility with your trailer’s roof thickness and material
- Availability of detailed, user-friendly installation guides
- Design features that facilitate quick sealing and secure fitting
Ultimately, a roof vent for enclosed trailer that’s easy to install can save time and frustration, transforming what might seem a mundane chore into a satisfying upgrade. After all, a well-installed vent not only optimizes airflow but also preserves the tranquility of your journey—something South African adventurers and professionals alike will appreciate under the vast, often capricious skies.
Installation Tips and Best Practices
Preparing Your Enclosed Trailer for Installation
Embarking on the installation of a roof vent for enclosed trailer demands both precision and patience—qualities that transform a mundane task into a moment of craftsmanship. Preparing your trailer meticulously ensures that the ventilation system will function seamlessly, offering both durability and efficiency. This stage is often overlooked, yet it’s the cornerstone of a successful setup that withstands South Africa’s unpredictable weather patterns.
Start by thoroughly cleaning the roof surface, removing any debris, rust, or old sealant that could compromise the sealant’s adhesion. A clean, dry surface is essential for an airtight installation, especially when dealing with the harsh sun or sudden downpours. Before drilling, double-check the placement of the roof vent for enclosed trailer, considering both airflow needs and structural integrity. Marking the exact location ensures that the vent aligns with the trailer’s internal layout, promoting optimal ventilation.
For a flawless installation, consider using a sealed sealer or weatherproof gasket around the vent’s perimeter. This not only enhances weather resistance but also prolongs the lifespan of your roof vent for enclosed trailer. Remember, a well-prepared surface paired with precise placement transforms a simple upgrade into a durable, effective solution that keeps your cargo dry and well-ventilated for years to come!
Step-by-Step Installation Guide
Installing a roof vent for enclosed trailer is an act of silent rebellion against the chaos of weather and the chaos within. It’s a decision rooted in understanding—an acknowledgment that proper ventilation isn’t just a convenience; it’s a necessity for preserving your cargo’s integrity and your peace of mind. The process demands more than mechanical precision; it requires a deliberate mindfulness that transforms routine installation into a mindful act of craftsmanship.
Once you’ve prepared the surface adequately, the next step involves careful positioning. Double-check the placement of your roof vent for enclosed trailer, ensuring it aligns with the internal airflow and structural strength. This isn’t just about fitting a part—it’s about creating a symphony of function and resilience. When drilling, proceed with unwavering focus, and consider using weatherproof gasket or sealer to seal the edges. This ensures enduring weather resistance, especially vital in South Africa’s fluctuating climate.
To streamline the process, follow these steps:
- Mark the exact location for the roof vent for enclosed trailer, considering airflow and structural support.
- Carefully drill holes, avoiding damage to the trailer’s integrity.
- Apply weatherproof gasket or sealant around the vent’s perimeter for maximum weather resistance.
- Secure the vent tightly, ensuring a flush fit that prevents leaks and wind noise.
The key to a durable installation lies in patience and attention to detail—qualities that elevate a simple upgrade into a lasting safeguard for your cargo and your peace of mind. The choice of a roof vent for enclosed trailer isn’t merely about ventilation; it’s about asserting control over the environment within, transforming the trailer into a sanctuary amid the unpredictable South African weather.
Tools and Materials Needed
Installing a roof vent for enclosed trailer demands more than just the right tools; it requires an intuitive sense of timing and precision. The tools needed are straightforward but essential—drill with a variety of bits, a screwdriver, weatherproof gasket, and sealant. Having these at hand ensures a smooth process and a durable fit that withstands South Africa’s unpredictable weather patterns.
Best practices include marking the exact location carefully—considering airflow flow and structural support—before making any cuts. Patience is critical; rushing can lead to leaks or compromised structural integrity. When drilling, proceed slowly, keeping the drill perpendicular to the surface to prevent damage, and always double-check measurements before proceeding to cut.
For a seamless installation, apply a high-quality weatherproof gasket or sealant around the roof vent for enclosed trailer. This extra layer of protection is vital against rain, dust, and wind—common adversaries in South Africa’s climate. Proper sealing not only extends the lifespan of your roof vent but also preserves the integrity of your cargo.
- Ensure all tools and materials are ready before starting.
- Accurately mark the vent placement for optimal airflow and structural support.
- Drill with care, avoiding damage to the trailer’s exterior and interior.
- Seal edges thoroughly with weatherproof gasket and sealant for maximum weather resistance.
Choosing the right tools and following best practices isn’t just about installation—it’s about creating a fortress of ventilation that stands resilient against South Africa’s atmospheric whims. Every detail, from measurement to sealing, impacts the longevity and performance of your roof vent for enclosed trailer.
Safety Precautions
Installing a roof vent for enclosed trailer isn’t just about drilling holes and sealing; it’s about creating an environment that fosters airflow while maintaining structural integrity. Precision and patience are paramount—rushing the process can lead to leaks or damage, especially in South Africa’s unpredictable weather. Safety precautions should never be overlooked. Always wear protective gear, including goggles and gloves, to avoid injury during drilling or sealing.
Before starting, double-check your measurements and mark the exact placement of the roof vent for enclosed trailer. Consider airflow patterns and structural support to ensure optimal ventilation. During installation, proceed slowly with the drill, keeping it perpendicular to the surface to prevent cracking or unnecessary stress. Using a level can help maintain accuracy, especially on curved or uneven surfaces.
For added durability, apply a weatherproof gasket around the vent edges before sealing with high-quality sealant. This extra step guards against rain, dust, and wind—common foes in South Africa’s climate. When sealing, ensure complete coverage to prevent water ingress, which could undermine your trailer’s longevity. Remember, every detail matters; a well-executed installation maximizes the performance of your roof vent for enclosed trailer and guards your cargo against the elements.
Maintenance and Troubleshooting of Roof Vents
Regular Cleaning and Inspection
Maintaining a roof vent for enclosed trailer isn’t just about keeping things running smoothly; it’s about preventing costly repairs down the line. Regular cleaning and inspection ensure that debris, dust, and even small pests don’t clog the vent, which can compromise ventilation efficiency. Over time, buildup can cause the vent to malfunction or become less effective, leading to poor airflow and potential moisture issues inside the trailer.
To keep your roof vent functioning optimally, schedule inspections at least twice a year. Look for cracks, rust, or signs of damage that could allow water ingress or reduce airflow. If you notice any issues, addressing them promptly—whether through cleaning or replacing damaged parts—can extend the lifespan of your roof vent for enclosed trailer and maintain its performance. Remember, a well-maintained vent is key to preventing mold, rust, and other weather-related problems that could threaten your cargo or equipment.
Here’s a quick checklist to keep your roof vent in top shape:
- Remove leaves, dirt, and debris from the vent opening
- Check for rust or corrosion and treat any affected areas
- Ensure that the vent’s moving parts open and close smoothly
- Seal any gaps or cracks with weatherproof sealant
Consistent upkeep is simple but essential—your trailer’s longevity depends on it! Neglecting maintenance on your roof vent for enclosed trailer can reduce ventilation effectiveness and increase the risk of damage, especially in unpredictable weather conditions common in South Africa. So, stay vigilant, and your trailer will reward you with reliable service for years to come!
Common Issues and Fixes
Roof vents for enclosed trailers are vital to keeping your cargo dry and well-ventilated. But even the best roof vent can face issues without proper maintenance. Common problems include blocked airflow, rust, or malfunctioning moving parts. These issues can lead to moisture buildup, mold, or even structural damage over time. Fortunately, troubleshooting is straightforward.
If your roof vent for enclosed trailer isn’t opening or closing smoothly, dirt or debris may be clogging the mechanism. Applying a lubricant to moving parts often restores functionality. Rust spots should be treated immediately with rust remover and sealed with weatherproof paint or sealant. For persistent airflow issues, check for cracks or gaps in the seal that could allow water ingress or reduce ventilation efficiency.
- Inspect the vent for debris and clear obstructions.
- Lubricate hinges and moving components regularly.
- Replace damaged or rusted parts promptly.
- Seal cracks with weatherproof sealant to prevent leaks.
Addressing these common issues swiftly can extend the lifespan of your roof vent for enclosed trailer and ensure optimal ventilation year-round. Regular troubleshooting keeps your trailer protected from weather-related damage and maintains a safe environment inside.
Increasing Vent Efficiency and Performance
Adding Exhaust Fans
Maximizing the efficiency of your roof vent for enclosed trailer doesn’t just mean choosing the right model—it involves enhancing its performance through strategic additions like exhaust fans. These fans act as the heartbeat of your ventilation system, actively pulling out stale air and drawing in fresh, cool breezes. When properly integrated, they can significantly reduce heat buildup and condensation, extending the lifespan of your trailer’s interior and contents.
Adding exhaust fans transforms your roof vent into a powerhouse of airflow, creating a dynamic exchange of air that keeps everything inside fresh and dry. For optimal results, consider installing a high-quality exhaust fan that matches your trailer’s size and ventilation needs. To boost efficiency, some operators opt for fans with adjustable speed settings, allowing precise control over airflow depending on weather conditions or load requirements. This combination of roof vent for enclosed trailer and exhaust fans ensures a seamless, continuous cycle of air movement—turning your enclosed trailer into a haven of comfort and durability.
Using Vents in Conjunction with Other Airflow Solutions
In the dim corridors of utility and necessity, the synergy between vents and airflow solutions becomes a silent symphony, orchestrating a sanctuary from the oppressive grip of stagnation. When harnessed with precision, the roof vent for enclosed trailer transforms from a mere opening into a conduit of life, whispering away the shadows of heat and humidity. But to truly elevate its performance, one must dare to intertwine it with other airflow solutions—like exhaust fans or passive vents—that amplify the breath of fresh air through every corner of your trailer.
By pairing a roof vent for enclosed trailer with strategically placed passive vents or powered exhaust fans, you create a dynamic dance of air currents. This dance prevents the suffocating buildup of heat and condensation, which can threaten both the integrity of your cargo and the longevity of your trailer. To maximize efficiency, consider an airflow system that encourages a natural draft—hot air rises, cool air flows in—yet remains adaptable to shifting weather patterns. This holistic approach ensures your trailer breathes as if alive, resilient against the harsh elements that lurk beyond.
- Install adjustable exhaust fans to regulate airflow dynamically, matching ventilation needs with changing conditions.
- Integrate passive vents with a roof vent for enclosed trailer to promote continuous, natural circulation.
- Use weather-resistant materials that withstand South Africa’s capricious climate, ensuring your airflow solutions endure the test of time.
In the end, the secret lies in unifying these elements—vent, fan, and passive intake—to forge an environment untainted by the specter of moisture or heat. The gothic allure of a well-ventilated trailer is not just in its functionality, but in its silent promise: a refuge where durability and comfort intertwine with the shadows of efficiency.
Optimizing Vent Placement
Maximizing the efficiency of your roof vent for enclosed trailer requires a keen eye for placement and an understanding of airflow dynamics. When positioned correctly, the vent can become a silent guardian, channeling stale air out and inviting fresh currents in. Strategic placement—preferably at the highest point of the trailer—allows hot, humid air to escape naturally, leveraging the principle that warm air rises. Conversely, passive vents or intake louvers should be situated lower, to draw in cooler, revitalizing breezes from outside.
To truly unlock peak performance, consider the following approach:
- Identify the warmest zones inside your trailer, often near the ceiling or around heat-producing cargo.
- Position the roof vent for enclosed trailer directly above these areas, ensuring an unobstructed path for heat and moisture to escape.
- Complement this with lower passive vents to create a continuous draft—hot air rises, cool air enters, maintaining a relentless flow of renewal.
In this dance of air currents, the harmony between vent placement and airflow design becomes a conduit of resilience—protecting your cargo and forging a sanctuary from the oppressive shadows of stagnation. When every element aligns, the trailer breathes with a life of its own, resilient against the capricious South African climate and the darkness that lurks beyond.
Cost and Where to Buy Roof Vents
Price Range Overview
When considering the cost of a roof vent for enclosed trailer, the spectrum can be surprisingly vast, reflecting the diversity of options available. Basic models, crafted from durable plastic, often start at an accessible price point—roughly R200 to R400—making them ideal for budget-conscious projects. As the features and materials become more sophisticated, so too does the price, with premium metal or weather-resistant models reaching R800 or more. The investment is well worth it, as a high-quality roof vent not only enhances airflow but also extends the lifespan of your trailer’s interior.
Where to buy roof vents for enclosed trailers is equally important; trusted online retailers, specialty trailer supply stores, and local hardware outlets across South Africa are prime sources. Many vendors offer comprehensive selections, allowing you to compare prices effortlessly. To streamline your search, consider these key points:
- Availability of different sizes and styles
- Options for weatherproofing and durability
- Variety of installation accessories and support
Choosing the right roof vent for enclosed trailer depends on your budget, needs, and the climatic conditions of your region, ensuring your investment delivers optimal airflow and protection for years to come.
Top Brands and Models
In the shadowed corridors of trailer maintenance, the allure of a well-chosen roof vent for enclosed trailer becomes undeniable. Cost-wise, the spectrum is as broad as the night sky, with basic plastic models whispering affordability at R200 to R400. These humble vents serve as the first line of defense against stagnation and musty interiors. Yet, for those seeking resilience against South Africa’s capricious climate, premium metal or weatherproof variants beckon at R800 or more, offering unwavering durability and enhanced airflow.
Where to buy roof vents for enclosed trailers? Trusted online retailers, specialized trailer supply outlets, and local hardware stores form a web of dependable sources. It’s wise to compare options that range from simple, weather-resistant designs to elaborate models with multiple installation accessories. The selection process is crucial, as the right vent can transform the interior environment from oppressive to invigorating.
- Explore a variety of sizes and styles tailored to your trailer’s dimensions.
- Prioritize weatherproofing features that withstand the Cape’s relentless rains and scorching sun.
- Seek out comprehensive support with installation accessories for a seamless fit.
Choosing the ideal roof vent for enclosed trailer hinges on understanding your unique needs—whether it’s navigating South Africa’s climatic extremes or ensuring long-lasting performance. The right model becomes an integral part of your trailer’s story, whispering tales of airflow and protection through the ages.
Recommended Retailers and Online Stores
When it comes to the cost of a roof vent for enclosed trailer, there’s a surprisingly wide range to suit every budget. Basic plastic models, perfect for those seeking an affordable solution, typically range from R200 to R400. These simple vents are easy on the pocket and do a good job of preventing stale, musty interiors—crucial for maintaining the longevity of your trailer’s contents. For more demanding conditions, especially in South Africa’s unpredictable climate, premium metal or weatherproof variants are worth considering. These sturdy models, starting at R800, promise not only durability but also superior airflow, ensuring your enclosed trailer remains well-ventilated in all seasons.
Finding the right roof vent for enclosed trailer is easier than ever, thanks to a variety of trusted sources. Recommended retailers and online stores offer an extensive selection, making comparison shopping straightforward. For those who prefer a tactile experience, local hardware stores and specialized trailer supply outlets are dependable options. To streamline your purchase, consider these tips:
- Evaluate your trailer’s size and choose a vent compatible with its dimensions.
- Prioritize weatherproof features to withstand South Africa’s relentless rains and scorching sun.
- Look for comprehensive support, including installation accessories, to ensure a seamless fit.
Whether you’re a rural entrepreneur or a weekend warrior, the right roof vent for enclosed trailer can be the unsung hero of your journey. It’s not just about airflow; it’s about safeguarding your investment against the harshest elements while keeping your cargo fresh and protected.


0 Comments