
Understanding Ventilation Needs in Vans
Importance of Proper Airflow in Van conversions
Understanding Ventilation Needs in Vans
In the confined canvas of a van, proper airflow isn’t just a luxury—it’s a necessity that speaks to the very essence of human comfort and survival. Without adequate ventilation, the air becomes stale, humid, and oppressive, transforming what should be an adventure into an endurance test. A well-designed roof vent for van becomes the silent guardian, facilitating a natural exchange that keeps the environment fresh and breathable.
The importance of ventilation extends beyond mere comfort; it directly impacts health, preventing mold and mildew buildup that flourish in damp, enclosed spaces. When considering a roof vent for van, it’s crucial to evaluate factors such as the size of the van, typical climate conditions, and the frequency of use. An effective ventilation system acknowledges that airflow is not just about removing bad air but also about bringing in the vitality of fresh air—a vital component that sustains both the body and the soul during long journeys.
- Humidity control
- Temperature regulation
- Reduction of condensation
Common Challenges Without Adequate Ventilation
In the labyrinth of van life, the absence of proper ventilation can transform a scenic escape into an oppressive suffocation. Without a roof vent for van, heat and humidity accumulate, creating an environment where mold and mildew thrive quietly, threatening both health and the integrity of your precious space. The air, once fresh and invigorating, turns stale, weighed down by the detritus of daily life and the moisture of countless adventures.
Navigating these challenges demands a keen understanding of the subtle dance between airflow and comfort. Common issues include uneven temperature regulation, condensation buildup, and an unwelcome scent of dampness that lingers like a ghost in the machine. These obstacles often stem from insufficient ventilation, leaving interior spaces vulnerable to the relentless march of moisture and heat. A well-chosen roof vent for van acts as a silent sentinel, ushering in fresh air while expelling the old, transforming the confined vessel into a sanctuary of breathable serenity.
Benefits of Installing a Roof Vent
Understanding ventilation needs in your van isn’t just about avoiding a sweaty, mold-ridden nightmare; it’s about creating a livable, breathing space that can handle the wild unpredictability of South Africa’s climate. A roof vent for van becomes your silent hero, balancing the delicate act of bringing in fresh air while pushing out the stale, humid air that loves to hang around like an unwanted guest. The right roof vent allows for continuous airflow, which is crucial when temperatures soar or when the humidity turns your cozy van into a sauna.
When selecting a roof vent for van, consider factors such as size, durability, and whether it includes a fan or is passive. An effective setup not only keeps things comfortable but also helps manage condensation, preventing mold and mildew from setting up shop in your tiny home on wheels. To optimize airflow, some van owners opt for multiple vents, creating a natural cross-breeze that transforms their space into a breezy sanctuary rather than a stuffy box. After all, a well-ventilated van isn’t just a luxury; it’s a necessity that directly impacts your health, comfort, and the longevity of your vehicle’s interior.
Types of Roof Vents Suitable for Vans
Manual vs. Powered Roof Vents
When selecting a roof vent for van, one quickly realizes that not all vents are created equal; the choice hinges on the balance between manual control and powered convenience. Manual roof vents for van conversions evoke a sense of timeless simplicity—operated by hand, they require no power source and are often favored for their reliability and ease of installation. These vents are perfect for those who appreciate a quiet, energy-efficient airflow, especially in remote locations where power may be scarce.
On the other hand, powered roof vents for van are a marvel of modern engineering—equipped with electric fans that can be operated at the push of a button. They deliver superior airflow and can be integrated with thermostats and sensors to automate ventilation, making them ideal for maintaining optimal climate control inside your vehicle. For those seeking convenience and a touch of technological luxury, powered options are often the preferred choice. Whether manual or powered, the key is understanding how each type can seamlessly fit into the unique lifestyle of a van dweller, enhancing comfort and ensuring fresh air flows freely through every adventure.
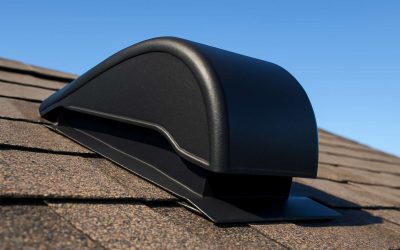
Sky Light Roof Vents
Sky light roof vents are a popular choice for van conversions, blending natural light with effective ventilation. These vents are designed to sit flush with the roof, providing a sleek look while allowing fresh air to circulate freely. They are especially valued in South Africa’s warm climate, where maintaining a cool, well-ventilated interior is essential for comfort.
There are different types of roof vent for van, each suited to specific needs. Fixed sky light roof vents are simple and durable, offering constant daylight without moving parts. They are perfect for those who prioritize energy efficiency and minimal maintenance. Conversely, opening sky light roof vents feature a manual or powered mechanism to allow for adjustable airflow, making them versatile for changing weather conditions.
In some cases, a combined design offers both light and ventilation in one unit. This allows van dwellers to enjoy natural illumination during the day and fresh air when needed, all without sacrificing style or functionality. Whether manual or powered, choosing the right roof vent for van hinges on your lifestyle and climate considerations.
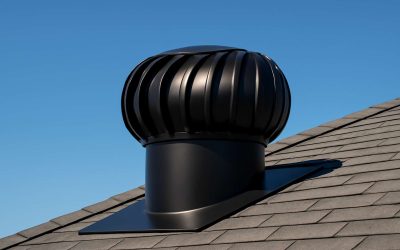
MaxxFan and Exhaust Fan Models
Choosing the right roof vent for van can be a game-changer, especially in South Africa’s scorching climate where heat can turn a cozy space into an oven in minutes. The variety of roof vent for van models available today offers unparalleled flexibility for every adventurer’s needs. From high-powered exhaust fans to sleek, low-profile units, the options are almost endless.
For those seeking maximum airflow, MaxxFan models stand out as a top-tier choice. These powered roof vents for van are engineered for efficiency and durability, allowing you to control airflow at the push of a button. They integrate seamlessly with exhaust fans, creating a powerful ventilation system that keeps interiors cool even on the hottest days. The combination of a MaxxFan with a dedicated exhaust fan ensures the air inside your van remains fresh and odor-free, regardless of external conditions.
Whether you prefer a simple, fixed roof vent for van or a more advanced powered model, understanding the specific requirements of your van’s climate and your lifestyle is crucial. The versatility of these roof vent for van options makes it possible to customize your space for comfort and energy efficiency, no matter where your journey takes you.
Passive Venting Options
Passive venting options for vans offer a simple yet effective way to enhance airflow without the complexity of powered systems. These roof vent for van designs rely on natural convection, creating a gentle pull of fresh air and the escape of stale, warm air. During the scorching South African summers, a well-placed passive roof vent can significantly reduce interior heat buildup, making your van a cooler and more comfortable space.
Choosing the right type of passive roof vent for van depends on your specific needs and how much ventilation you require. Some models feature adjustable louvered panels that open to allow better airflow or close tightly to protect against dust and rain. Others are fixed and provide a constant venting point, which can be ideal for those seeking minimal maintenance and simplicity.
For optimal performance, consider the placement of your roof vent for van in relation to other openings and the prevailing wind directions. Proper positioning ensures maximum natural airflow, reducing reliance on electrical systems and conserving energy. When combined with other passive strategies, like side vents or windows, these roof vents create a balanced ventilation system that keeps the interior fresh and odor-free, even in the sweltering South African heat.
Material and Build Considerations
When it comes to choosing a roof vent for van, the material and build quality are just as crucial as the design itself. A sturdy, weather-resistant material ensures your vent can withstand South Africa’s unpredictable climate—think scorching sun, heavy rain, and gusty winds. Most roof vents for van are crafted from durable plastics like ABS or high-grade aluminum, offering a sweet spot between lightweight convenience and rugged resilience.
Opting for a well-constructed roof vent for van means fewer worries about leaks or cracking over time. Some models feature UV-resistant coatings that prolong their lifespan under relentless sun exposure. Whether you prefer a sleek, low-profile design or something more robust, the build quality should match your van’s adventure spirit. Remember, the best roof vent for van is one that balances functionality with durability—so your ventilation system stays as reliable as your road trip stories.
For those seeking versatility, consider models with adjustable louvered panels—these let you control airflow without sacrificing protection from dust or rain. Installing the right roof vent for van isn’t just about airflow; it’s about investing in a long-term solution that keeps your living space fresh, no matter how tough the South African weather gets.
Factors to Consider When Choosing a Roof Vent
Size and Dimensions for Van Compatibility
Choosing the right size and dimensions for a roof vent for van is a decision that balances practicality with the aesthetic harmony of your vehicle. An ill-fitting vent can compromise both airflow and the sleek exterior look you desire. When selecting the size, consider the overall dimensions of your van—too large, and it might look out of place; too small, and it won’t provide adequate ventilation. The goal is to find a vent that offers a generous airflow capacity without overwhelming the roof’s profile.
To ensure compatibility, examine the roof’s structure meticulously. Measure the available space, accounting for any roof racks or other accessories that might interfere with installation. A well-chosen roof vent for van should align seamlessly with your vehicle’s contours, providing efficient airflow while maintaining structural integrity. Think of it as fitting a piece of a puzzle; precision in measurement guarantees a snug, secure fit that stands up to South African weather conditions—hot sun, heavy rain, and everything in between.
- Assess the dimensions of your van’s roof, including width, length, and clearance.
- Identify how the vent’s size will impact the interior airflow and overall vehicle aesthetics.
- Check compatibility with existing roof structures, such as solar panels or racks.
Ventilation Capacity and Airflow Rate
Choosing a roof vent for van isn’t just about size; it’s about ensuring your vehicle breathes freely while maintaining its rugged charm. Ventilation capacity and airflow rate are crucial factors that directly influence comfort and air quality inside your van. A roof vent with optimal airflow can make the difference between a stuffy, uncomfortable space and a well-ventilated haven, especially under the blazing South African sun.
When assessing your options, consider the vent’s airflow rate—measured in cubic feet per minute (CFM)—which indicates how efficiently it exchanges stale air for fresh. A higher CFM generally means better ventilation, but it must be balanced with the vent’s size and your van’s specific dimensions.
- Ensure the vent’s capacity matches your needs, particularly if you’re using your van for long trips or living in it full-time.
Compatibility with existing roof structures, like solar panels or racks, also plays a role. Your goal is a seamless fit that maximizes airflow without cluttering the roof’s aesthetic. Remember, a well-chosen roof vent for van not only enhances airflow but also withstands South Africa’s diverse weather conditions—be it searing heat or heavy rain—making durability just as vital as airflow capacity.
Installation Compatibility and Ease
Choosing the right roof vent for van installation requires careful consideration of compatibility and ease of installation. A roof vent that seamlessly integrates with your van’s existing roof structure can save you time and frustration, especially when working in remote South African landscapes. It’s essential to measure your van’s roof dimensions accurately to ensure a snug fit, avoiding leaks or rattles that can compromise durability.
Compatibility extends beyond size—consider whether the vent can work with your van’s existing fixtures, such as solar panels or racks. Some models are designed with adaptable mounting brackets, making installation straightforward even for DIY enthusiasts.
Ease of installation is equally vital. Opt for a roof vent for van that features clear instructions, minimal components, and lightweight design. This approach simplifies the process and ensures your van’s roof remains intact and weatherproof. Ultimately, selecting a roof vent that balances compatibility and ease of installation guarantees your vehicle stays comfortable and functional, no matter where your adventures take you across South Africa’s diverse terrains.
Weather Resistance and Durability
Weather resistance and durability are the bedrock upon which the longevity of your roof vent for van depends. South Africa’s climate, with its blistering sun, sporadic rain, and fierce winds, demands nothing less than a vent built to withstand the elements. A roof vent that falters under harsh conditions risks compromising the entire ventilation system, leading to leaks or mold that can silently erode your vehicle’s integrity.
Choosing a roof vent for van necessitates scrutinizing the materials—opt for models crafted from UV-resistant, corrosion-proof plastics or stainless steel. This ensures resilience against relentless sun exposure and moisture. Additionally, look for vents with sealed, weatherproof housings and robust gaskets that create an impenetrable barrier against water ingress.
- High-quality UV protection
- Corrosion-resistant components
- Sealed weatherproof design
These features are not mere luxuries—they are essentials for enduring South Africa’s diverse climate zones.
Ultimately, a durable, weather-resistant roof vent for van transforms your mobile sanctuary into a fortress of comfort, no matter what the weather throws your way. It’s a crucial investment in both safety and peace of mind, ensuring your adventures remain unhampered by the elements.
Noise Levels and Energy Consumption
When selecting a roof vent for van, considering noise levels and energy consumption is crucial. A noisy vent can quickly turn a peaceful drive into an ongoing annoyance, especially on long trips. Look for models with sound-dampening features or adjustable airflow settings to minimize disruptive noise while maintaining good ventilation.
Energy efficiency also plays a significant role. Powered roof vents for van often come with fans that consume varying amounts of power. Opt for models with low wattage ratings to reduce battery drain, ensuring your van’s electrical system remains reliable during extended adventures. In some cases, passive venting options may suffice, eliminating energy concerns altogether.
To make your decision easier, consider this:
- Check decibel ratings—less than 40 dB is generally quiet enough for most users.
- Compare power consumption—look for energy-efficient options to save on battery life.
- Assess whether a manual or powered roof vent for van best suits your needs, balancing convenience and energy use.
Ultimately, balancing noise levels and energy consumption ensures your roof vent for van enhances comfort without becoming a source of frustration. It’s all about creating a mobile space that’s functional, peaceful, and energy-smart—ready for whatever the South African climate throws your way!
Installation Tips for Roof Vents in Vans
Preparation and Measurement
Installing a roof vent for van is less like rocket science and more like a well-choreographed dance—precision, patience, and a dash of flair. Before you even crack open that drill, it’s crucial to do some prep work. Accurate measurement is your secret weapon here; a roof vent for van that’s too big or too small is like trying to fit a giraffe in a shoebox—completely pointless. Grab a tape measure, a pencil, and a level (yes, even in the world of vans, levels are a game-changer). Mark the exact spot where your roof vent for van will sit—preferably away from existing vents, antennas, or any other rooftop drama. Remember, the goal is to maximize airflow without turning your van into a Swiss cheese. Once marked, double-check those measurements—better safe than ending up with a vent in the wrong place, making your van look like a pepper shaker. Carefully plan your cut line, ensuring it’s neat and precise, because sloppy cuts are the enemy of a good seal and lasting durability. With these tips, your installation will be smooth sailing—well, as smooth as a roof vent for van installation can be!
Tools and Materials Needed
Installing a roof vent for van isn’t just about drilling holes—it’s a delicate operation that requires the right tools and materials to ensure a seamless fit and long-lasting durability. The stakes are high; a poorly installed vent can compromise weather resistance and airflow efficiency. To avoid this, gather a few essential items: a high-quality drill, a jigsaw or hole saw, sealant designed for roofing, and weatherproof screws. Having these on hand transforms a daunting task into a straightforward process.
Next, double-check that your tools are in tip-top shape—sharp blades and a steady drill speed make all the difference. For a professional finish, consider using a template for your cut, ensuring the precise dimensions that match your roof vent for van. This attention to detail is what separates a good installation from a great one, ensuring your rooftop upgrade not only looks sharp but performs flawlessly in the unpredictable South African climate.
Step-by-Step Installation Process
Installing a roof vent for van is an exercise in precision—each step a puzzle piece that, when correctly placed, transforms your vehicle’s airflow from stagnant to invigorating. Once you’ve gathered your tools and materials, the real journey begins. The key is to approach the process methodically, ensuring every cut and seal is executed flawlessly. A misstep can lead to leaks or reduced ventilation, turning a simple upgrade into a costly repair.
Start by measuring and marking the exact location for your roof vent for van. Double-check your measurements; accuracy here is paramount. Using a template can help ensure your cut matches the vent’s dimensions, preventing gaps or misalignments that compromise weather resistance. Carefully cut the opening with your jigsaw or hole saw, then clear away any debris to prepare for installation.
Next, apply a generous layer of roofing sealant around the opening’s perimeter—this creates a waterproof barrier. Place the roof vent for van into position, then secure it with weatherproof screws, tightening them in a crisscross pattern to evenly distribute pressure. For added security, consider using a sealant-compatible gasket to further prevent water ingress. The result? A seamless integration that ensures optimal airflow and weather resistance, even in the unpredictable South African climate.
Remember, proper installation isn’t just about fitting a part—it’s an art form that influences durability and performance. Take your time, follow each step meticulously, and your van’s ventilation system will serve reliably for years to come. After all, the goal is to enjoy fresh air and peace of mind, no matter the weather outside.
Sealing and Waterproofing Tips
Sealing and waterproofing are the backbone of a durable roof vent for van installation. Even a small lapse in this step can lead to leaks and costly repairs down the line. Use a high-quality roofing sealant that remains flexible in South Africa’s variable climate, ensuring a tight barrier against water ingress. Pay close attention to the edges of your opening; a generous, even layer of sealant will create a weatherproof seal that lasts.
Once the vent is in place, securing it properly is crucial. Tighten weatherproof screws in a crisscross pattern to evenly distribute pressure and prevent warping. For extra protection, consider installing a gasket compatible with your sealant—this acts as a secondary line of defense against moisture. Remember, a well-sealed roof vent for van doesn’t just improve airflow; it guards your vehicle’s interior from rain and dust intrusion, giving you peace of mind in unpredictable weather.
To ensure optimal waterproofing, some installers recommend applying a bead of sealant around the flange before mounting the vent. This extra step adds an additional layer of protection, especially useful in regions prone to heavy rains. Don’t forget to check your work from inside and outside to confirm the seal is complete and free of gaps. Proper sealing and waterproofing are what turn a simple roof vent into a long-lasting upgrade that stands the test of time and weather.
Safety Precautions
Embarking on the journey to install a roof vent for van is akin to opening a portal to a realm of fresh air and breathable freedom. Safety during this process is paramount, for a single lapse can turn a serene upgrade into a perilous ordeal. Before beginning, ensure your workspace is clear, and always wear protective gear such as gloves and safety glasses. The roof of your van is a delicate yet sturdy canvas—handle it with care, and never underestimate the power of a secure ladder or scaffolding to reach those lofty heights safely.
When it comes to securing the roof vent for van, meticulous attention to detail is your best ally. Use a reliable power drill with appropriate bits to avoid slips that could compromise the integrity of your installation. For added peace of mind, double-check your measurements—an error here might mean the difference between a perfect fit and costly rework. Remember, the strength of your safety precautions directly influences the longevity and performance of your roof vent for van, so proceed with patience and precision.
Incorporate a step-by-step approach, such as:
- Ensuring the van’s surface is clean and free from debris.
- Marking the precise location for your vent, considering optimal airflow and interior space.
- Using protective tape around the marked area to prevent accidental scratches or damage.
Above all, never rush through the installation. The safety of the process is as vital as the effectiveness of the roof vent for van—protect yourself, your vehicle, and your investment by adhering to these safety precautions. When done correctly, your new vent will serve as a beacon of fresh air and comfort for countless adventures to come.
Maintaining and Troubleshooting Your Roof Vent
Cleaning and Servicing Tips
Maintaining your roof vent for van is essential to ensure it continues to function optimally and keeps your living space comfortable. Over time, dust, debris, and even moisture can accumulate, impairing airflow and increasing the risk of mold or corrosion. Regular cleaning not only prolongs the lifespan of your roof vent but also guarantees proper ventilation, which is crucial for your health and the integrity of your vehicle’s interior.
Servicing your roof vent for van doesn’t have to be complicated. A simple inspection of the seals for cracks or leaks is a good starting point. If you notice any damage, replacing worn-out components promptly can prevent water ingress and costly repairs later on. For effective cleaning, remove the vent cover and use a gentle brush or compressed air to clear away dirt and insects. Applying a silicone sealant around the edges can enhance weather resistance, especially during South Africa’s unpredictable weather patterns. Remember, a well-maintained roof vent for van is your best ally in maintaining fresh air and avoiding unnecessary headaches on your adventures!
Common Issues and Fixes
When to Replace Your Roof Vent
Maintaining your roof vent for van isn’t just about avoiding a soggy sock situation; it’s about ensuring your mobile sanctuary remains a haven of fresh air and good vibes. Regular inspections can reveal if your roof vent for van has succumbed to the relentless march of time or pesky weather. If you notice persistent leaks, strange noises, or a decline in airflow, it’s time to get proactive. Sometimes, a simple cleaning or replacement of worn-out parts can breathe new life into your ventilation system. But beware—ignoring the telltale signs might lead to more costly repairs or even a complete roof vent for van overhaul. When troubleshooting, check for cracks, corrosion, or debris blocking the vents. If repairs no longer suffice, it’s wise to consider when to replace your roof vent for van—because a faulty vent isn’t just an inconvenience; it’s a potential health hazard. Ultimately, a well-maintained roof vent for van ensures you breathe easy, no matter where the road takes you.
Additional Ventilation Solutions for Vans
Window Vents and Side Openings
While a roof vent for van is often the star of the show when it comes to creating optimal airflow, additional ventilation solutions can significantly enhance comfort and air quality inside your mobile sanctuary. Window vents and side openings provide strategic points for fresh air to enter, especially in areas where installing a roof vent might be challenging due to structural constraints or weather considerations. These openings not only promote cross-ventilation but also help in reducing humidity and preventing condensation—a common enemy in compact van living spaces.
For those seeking a more tailored approach, consider installing adjustable window vents that can be opened or closed depending on the weather or your comfort needs. Combining these with a roof vent for van creates a synergy that maximizes airflow and minimizes stale air pockets. To optimize this setup, you might focus on:
- Positioning side openings at different heights to facilitate natural convection
- Using insect screens to keep pests out while maintaining airflow
- Ensuring that vents are weather-sealed for durability in South Africa’s diverse climate
By integrating window vents and side openings into your van’s ventilation system, you craft a resilient, breathable environment that complements your roof vent for van—making every journey more comfortable and healthier for all aboard.
Vent Fans with Remote Control
Enhancing airflow in your van isn’t just about installing a roof vent for van; it’s about creating a symphony of ventilation solutions that work harmoniously. Remote-controlled vent fans, for instance, add a layer of convenience and efficiency, allowing you to adjust airflow without leaving your seat. These fans can be programmed to operate on timers or sensors—perfect for maintaining a fresh interior environment during long trips or overnight stays.
To maximize ventilation, consider integrating these features with other passive or active systems. For example, a combination of a roof vent for van and strategically placed side openings can promote natural convection, reducing reliance on power sources. You might also want to install insect screens on side vents to keep pests out, ensuring that your airflow remains pure and uncontaminated.
When selecting ventilation options, focus on durability and weather resistance, especially in South Africa’s diverse climate zones. Heavy-duty materials and weather-sealed designs will keep your van ventilating efficiently, no matter the weather. With the right blend of roof vent for van and supplementary ventilation, your mobile space becomes a sanctuary of fresh air—ready to face any adventure with comfort and clarity.
Hybrid Ventilation Systems
Enhancing your van’s ventilation doesn’t have to rely solely on a roof vent for van. Hybrid ventilation systems combine passive and active elements to craft an environment of constant freshness. These systems often incorporate strategically placed side vents and operable windows, creating a natural airflow that keeps your space airy without consuming power. The synergy between passive and active solutions means you can enjoy optimal ventilation even in low-energy scenarios, perfect for South Africa’s diverse climate zones.
For a seamless experience, consider installing automatic vent fans that work in tandem with passive openings. These can be programmed to activate during specific temperature thresholds or humidity levels, ensuring your van breathes freely without manual intervention. Such integrated systems are especially valuable during long road trips or overnight stays, where maintaining a fresh interior is crucial.
- Passive side vents for natural convection
- Automated vent fans with sensors
- Weather-resistant materials to withstand South African climates
Choosing the right combination of ventilation options transforms your van into a sanctuary of fresh air, ready to face any adventure. The right blend of a roof vent for van and supplementary solutions ensures longevity, efficiency, and comfort—no matter the weather outside.


0 Comments