
Understanding Whirlybird Roof Vents
Overview of Whirlybird Roof Vents – Introduction to what a whirlybird roof vent is and how it functions
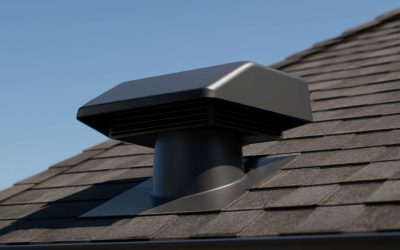
Imagine a tiny, spinning sentinel perched atop your roof, tirelessly working to keep your home fresh and ventilated. That’s the essence of a whirlybird roof vent—an ingenious device that harnesses wind energy to promote airflow without the need for electricity. Its sleek, turbine-like design spins effortlessly with every gust, drawing stale air out and inviting in the cool breeze. Understanding how a whirlybird roof vent functions is crucial before diving into the installation process.
In essence, it operates as a passive ventilation system, creating a natural draft that reduces heat buildup and moisture accumulation inside your roof space. Properly installed, it can dramatically improve airflow, extending the lifespan of roofing materials and enhancing indoor comfort. When considering whirlybird roof vent installation instructions, it’s vital to grasp the mechanics behind this spinning marvel. You might find it helpful to know that:
- The turbine spins freely on a bearing, activated by wind.
- It creates a vacuum effect that pulls warm, humid air out of the attic or roof space.
- Installation involves securing the vent to a prepared opening, ensuring a weatherproof seal.
Getting this right is essential for optimal performance, making the understanding of how a whirlybird roof vent functions a critical step in the installation journey.
Benefits of Installing a Whirlybird Vent – Advantages for attic ventilation, energy savings, and moisture control
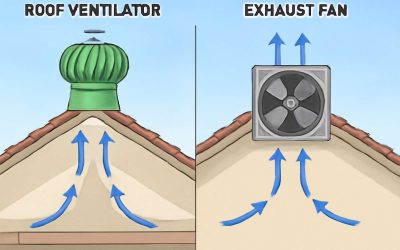
Installing a whirlybird roof vent is more than just a practical upgrade; it’s a poetic gesture towards harmony within your home. These turbines transform gusts of wind into silent guardians, tirelessly working to regulate temperature and moisture. The benefits of installing a whirlybird vent extend beyond mere ventilation; they embody a commitment to energy efficiency and environmental stewardship. As the sun beats down, a well-placed whirlybird acts as an invisible hand, drawing warm, humid air out of your attic and inviting in the refreshing breeze.
Proper attic ventilation is essential to prevent heat buildup and the detrimental effects of excess moisture—issues that can compromise the integrity of your roofing materials. The advantage of a whirlybird roof vent lies in its passive operation, which harnesses natural wind currents to maintain a balanced indoor climate. When considering the whirlybird roof vent installation instructions, attention to detail ensures that this balance is achieved seamlessly, allowing your home to breathe easier and live longer.
Incorporating a whirlybird into your roof’s architecture offers tangible advantages:
- Enhanced attic ventilation, reducing heat stress on roofing materials
- Significant energy savings by decreasing reliance on air conditioning systems
- Effective moisture control, preventing mould and structural decay
Each component of the installation process, from securing the turbine to sealing the opening, must be executed with precision. When done correctly, a whirlybird roof vent becomes an elegant solution, quietly harmonizing with the natural elements to protect your home and preserve its beauty for generations to come. Navigating the whirlybird roof vent installation instructions with care ensures your investment is both functional and enduring, echoing the timeless pursuit of a home that is as resilient as it is inviting.
Types of Whirlybird Roof Vents – Different designs and materials
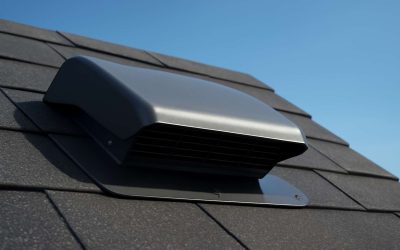
Understanding the different types of whirlybird roof vents is essential to ensuring a seamless installation process. These turbines come in a variety of designs and materials, each tailored to meet specific needs and environmental conditions. Some are constructed from durable aluminum, offering longevity and resistance to the South African climate, while others feature galvanized steel for added sturdiness. The design variations can influence both the efficiency and aesthetic appeal of your attic ventilation system.
Among the most common types are traditional spinning turbines, which rely solely on wind to operate, and hybrid models that incorporate additional features like solar power or enhanced aerodynamic blades. When reviewing whirlybird roof vent installation instructions, it’s crucial to consider these differences to select the right model for your roof. For example, a high-quality aluminum turbine might be ideal in coastal regions, where corrosion resistance is paramount. Conversely, steel variants are better suited for areas with less exposure to harsh elements.
To better understand your options, here’s a quick overview:
- Aluminum whirlybirds – lightweight, corrosion-resistant, and long-lasting
- Galvanized steel turbines – robust, cost-effective, with added strength
- Solar-powered models – environmentally friendly, requiring minimal maintenance
- Hybrid turbines – combining wind and solar energy for maximum efficiency
Each type has unique advantages, and selecting the right one can significantly impact the effectiveness of your attic ventilation. Carefully following whirlybird roof vent installation instructions will ensure that your chosen model functions optimally, blending seamlessly with your roof’s architecture and environmental demands.
Preparations Before Installation
Tools and Materials Needed – List of necessary tools and materials for the installation process
Embarking on the journey of whirlybird roof vent installation requires meticulous preparation—an act that transforms an ordinary roof into a dynamic system of airflow. Before diving into the task, gathering the right tools and materials becomes paramount; it’s the foundation of a seamless process. In South Africa’s scorching summers and humid winters, a properly installed whirlybird roof vent can dramatically improve attic ventilation, reducing energy costs and moisture buildup.
Essential tools for this venture include a power drill, a jigsaw or reciprocating saw, a tape measure, a chalk line, and a screwdriver. Safety gear such as gloves, goggles, and a sturdy ladder ensure both protection and stability during installation. As for materials, apart from the whirlybird roof vent itself, you’ll need roofing sealant, screws, and possibly flashing components to ensure a weather-tight fit. Clear, concise whirlybird roof vent installation instructions will guide you through each step, but thorough preparation remains the key to achieving a professional finish that endures South Africa’s diverse climate.
Safety Precautions – Essential safety gear and precautions to consider before starting
Before embarking on the task of whirlybird roof vent installation instructions, safety should always take precedence—like a well-tailored suit, it’s the foundation of a successful endeavor. South Africa’s sweltering summers and humid winters demand careful precautions to protect both the installer and the integrity of the roof. Wearing sturdy gloves and goggles safeguards against sharp edges and debris, while a reliable, sturdy ladder ensures stability when reaching those lofty heights. Remember, a fall from a roof can turn a simple project into a tragic tale, so securing the ladder on a level surface is non-negotiable.
Additionally, it’s wise to clear the vicinity of any hazards—loose tools, slippery patches, or overhanging branches—so that nothing interrupts the installation process. With safety gear in place and precautions observed, the path is paved for a seamless execution of whirlybird roof vent installation instructions, ensuring your roof remains both ventilated and accident-free.
Assessing Your Roof – Inspecting roof structure and feasibility for installation
Before diving headfirst into the world of whirlybird roof vent installation instructions, a thorough assessment of your roof’s structure is essential—think of it as laying the groundwork for a masterpiece. South Africa’s notoriously unpredictable weather can turn a simple project into a soggy disaster or a gusty fiasco if your roof isn’t up to scratch. Inspecting the roof’s integrity and feasibility ensures that your vent won’t become a casualty of weak shingles or fragile rafters.
Start by examining the current roof condition, looking for signs of wear, loose tiles, or structural weaknesses. It’s also wise to consider the location where the whirlybird will be installed—preferably a spot with maximum airflow and minimal obstructions. Remember, a poorly planned installation can render your efforts useless, so take your time to gauge whether your roof can accommodate the vent without risking leaks or instability.
- Check for existing ventilation or potential blockages that could hinder airflow.
- Assess the roof pitch and material to ensure compatibility with the whirlybird roof vent installation instructions.
- Measure the space carefully—accuracy is your best friend in avoiding costly mistakes later.
By conducting this meticulous evaluation, you set the stage for a seamless installation process—because nothing kills the mood faster than discovering halfway through that your roof isn’t quite ready for a whirlybird vent. Proper assessment ensures your roof remains resilient and your ventilation system functions flawlessly, all while adhering to the essential whirlybird roof vent installation instructions.
Step-by-Step Installation Instructions
Marking the Installation Spot – Choosing and marking the correct location on the roof
Pinpointing the ideal spot for your new whirlybird roof vent is a crucial step that can’t be rushed. A well-chosen location ensures optimal airflow and prevents potential leaks or structural issues. Before marking, consider the prevailing wind direction and the layout of your roof—areas where hot air tends to pool are prime candidates. Remember, the goal is to maximize ventilation without compromising the integrity of the roof.
For accurate marking, use a chalk line or a marker to delineate the vent’s position. It’s advisable to select a spot that’s centrally located but also accessible for future maintenance. When marking the installation spot, keep in mind the following:
- Maintain at least 30 cm distance from ridge caps or other vents to avoid airflow interference.
- Ensure the spot is free from protrusions or obstructions that could hinder installation.
- Verify the underlying roof structure can support the weight and mounting of the whirlybird roof vent.
By carefully selecting and marking the installation spot, you lay a solid foundation for smooth execution of the whirlybird roof vent installation instructions, ultimately ensuring durable and efficient attic ventilation.
Preparing the Roof Surface – Cleaning and measuring the area for installation
Preparing the roof surface is a pivotal phase in the journey towards effective attic ventilation with a whirlybird roof vent. Once you’ve marked the optimal spot, the next step involves ensuring the area is impeccably clean and measured. A debris-free surface not only facilitates a snug fit but also prolongs the lifespan of the vent, safeguarding your roof’s integrity for years to come.
Start by removing any loose shingles, moss, or dirt around the marked area. This creates a smooth canvas for installation, reducing the risk of leaks or structural stress. Carefully measure the vent’s dimensions against the prepared space—accuracy here is crucial, and a simple measuring tape will serve as your trusted ally. Double-check the alignment, ensuring the vent will sit flush and unobstructed.
In some cases, it might be advantageous to create a small, reinforced opening using a saw or drill. This step requires precision; follow the whirlybird roof vent installation instructions meticulously to avoid compromising the roof’s waterproofing. Remember, a well-prepared surface is the foundation upon which a durable and efficient ventilation system is built, making your roof not just a shelter but a sanctuary for optimal airflow and energy efficiency.
Cutting the Roof Opening – How to safely cut an opening in the roof for the vent
Cutting the roof opening is a crucial step that demands precision and care. A clean, accurate cut ensures the whirlybird roof vent fits snugly and functions optimally. Before you start, double-check your measurements against the vent’s dimensions, and mark the outline clearly on the roof surface. This careful planning minimizes errors and preserves the roof’s waterproofing integrity.
Using a suitable saw or drill, follow the marked lines meticulously. For larger openings, a jigsaw can provide the control needed for a smooth cut. Remember, safety comes first—wear protective gear like gloves, goggles, and a dust mask. Keep the workspace clear of debris, and proceed slowly to avoid slipping or damaging surrounding shingles. Once the opening is cut, remove any loose shingle fragments, and inspect the edges for a clean, even finish. This diligence will set the stage for a seamless installation of your whirlybird roof vent, ensuring it performs reliably and extends the lifespan of your roof.
Attaching the Base Plate – Securing the base plate to the roof surface
Securing the base plate is the critical next step in your whirlybird roof vent installation instructions. Once the roof opening is clean and prepared, position the base plate precisely over the opening, ensuring it aligns perfectly with your marked measurements. This foundational step guarantees a seamless fit, which is essential for optimal ventilation and waterproofing.
Using suitable fasteners—typically rust-resistant screws—attach the base plate firmly to the roof surface. It’s vital to drill through the pre-drilled holes in the base plate, applying consistent pressure and avoiding over-tightening that could warp the metal or crack shingles. For added stability, consider applying a bead of waterproof sealant around the perimeter of the base plate before fastening; this acts as a barrier against moisture ingress and wind-driven rain.
To make the process more straightforward, follow this sequence:
- Place the base plate over the roof opening, aligning it carefully with your marked outline.
- Secure the plate with the appropriate screws, spacing them evenly around the perimeter for a balanced hold.
- Double-check the fit, making adjustments if necessary before fully tightening.
Remember, a secure attachment not only ensures the long-term effectiveness of your whirlybird roof vent but also preserves the integrity of your roof’s waterproof barrier—an essential consideration in South Africa’s diverse climate conditions.
Installing the Whirlybird Fan – Mounting the turbine onto the base plate
Mounting the turbine onto the base plate is a pivotal moment in your whirlybird roof vent installation instructions. As you lift the sleek, spinning turbine, imagine it transforming your attic into a haven of fresh air and moisture control! Carefully align the turbine’s mounting holes with those in the base plate—precision here ensures smooth rotation and optimal ventilation.
Once aligned, secure the turbine using the provided fasteners. For a sturdy, weatherproof fit, tighten each screw gradually in a crisscross pattern, ensuring even pressure distribution. If your whirlybird roof vent installation instructions recommend, consider applying a touch of waterproof sealant around the turbine’s base before fastening. This small step creates a formidable barrier against South Africa’s diverse weather conditions, protecting your roof from moisture ingress.
Here’s a quick sequence to streamline your process:
- Place the turbine onto the base plate, aligning bolt holes precisely.
- Insert and hand-tighten the screws to hold the turbine in position.
- Check the rotation freely, then tighten screws firmly but carefully to avoid warping the metal.
With the turbine securely mounted, your whirlybird roof vent is ready to spring into action, harnessing wind energy to keep your home cool and dry. This step, though seemingly straightforward, is the heartbeat of your installation—bringing life to the entire ventilation system!
Sealing and Waterproofing – Applying sealant to prevent leaks and ensure weather resistance
Sealing and waterproofing your whirlybird roof vent is an essential step that often gets overlooked. Without proper application of sealant, even the most expertly installed vent can become a gateway for water ingress, especially during South Africa’s unpredictable weather. Ensuring a weatherproof seal preserves the integrity of your roof and prolongs the life of your ventilation system.
Start by applying a high-quality, flexible waterproof sealant around the base of the turbine before tightening the fasteners. This creates a robust barrier that prevents moisture from seeping in during heavy rains or storms. As you work through the whirlybird roof vent installation instructions, remember that even the smallest gaps can compromise your roof’s defense system.
If your installation process involves multiple components, consider a layered approach to sealing. For example, seal around the base plate first, then add a bead of sealant around the turbine’s edges after mounting.
- Ensure the sealant is compatible with roofing materials.
- Use a caulking gun for even application.
- Allow sufficient curing time before exposure to rain or wind.
By meticulously sealing your whirlybird roof vent, you protect your home from leaks and weather damage, reinforcing the importance of thoroughness in every step of the installation instructions. After all, a well-sealed vent isn’t just about ventilation—it’s about safeguarding your sanctuary from South Africa’s diverse climate challenges.
Post-Installation Tips
Checking the Vent Operation – Testing to ensure proper spinning and ventilation
Once the installation is complete, the real test begins. Checking the operation of your whirlybird roof vent is crucial to ensure it functions flawlessly, providing optimal attic ventilation. A properly spinning turbine indicates that the vent is working as intended, helping to expel hot air and moisture effectively. If your whirlybird doesn’t spin freely, it could be due to misalignment or obstructions. In such cases, you might need to revisit the installation instructions to troubleshoot the issue.
To verify the ventilation efficiency, observe the turbine during a breezy day. The blades should turn smoothly and consistently. If you notice sluggish movement or complete stillness, consider these post-installation steps:
- Ensure the vent is free of debris or obstructions.
- Check that the turbine is securely mounted and balanced.
- Verify that there are no loose fittings or parts that could hinder rotation.
Testing the whirlybird roof vent operation not only confirms proper installation but also guarantees long-term performance, helping you maintain a cooler, drier attic environment year-round. Remember, a well-functioning vent is the heartbeat of your roof’s ventilation system!
Routine Maintenance – Cleaning and inspecting the vent for optimal performance
Maintaining your whirlybird roof vent is essential to keep your attic ventilated and prevent moisture buildup. Regular cleaning and inspection are simple steps that can significantly extend the lifespan of your vent. Over time, debris such as leaves, dust, or bird nests can obstruct the turbine, reducing its efficiency. A quick visual check will reveal whether the blades spin freely or if anything is blocking them. If needed, remove obstructions carefully to restore optimal operation.
In addition to cleaning, inspecting the mounting and sealant is vital. Loose fittings or cracked sealant can compromise weatherproofing and lead to leaks. During routine maintenance, ensure the turbine remains balanced and securely attached to prevent unnecessary wear. If you notice the whirlybird isn’t spinning as smoothly as before, revisit the whirlybird roof vent installation instructions. Properly aligned and well-maintained vents guarantee consistent airflow, reducing energy costs and humidity issues in the long run.
For best results, schedule periodic inspections, especially after storms or heavy winds. Keeping your whirlybird roof vent in top shape is a straightforward way to sustain attic ventilation and safeguard your home’s structural integrity. Remember, a little upkeep now can save you costly repairs later!
Troubleshooting Common Issues – Addressing spins slowly or noise problems
In the shadowed corners of attic spaces, where silence often reigns, a whisper of trouble can emerge—an unsteady spin or a mournful creak in your whirlybird roof vent. If the turbine spins slowly or emits unsettling noises, it’s a sign that the ghostly balance has been disturbed, perhaps by debris or a misalignment. Troubleshooting these common issues begins with a keen inspection—listen closely to the hum of the blades and observe their dance in the wind.
Often, debris such as leaves or bird nests cling stubbornly to the blades, choking their movement. Carefully remove these obstructions, ensuring not to damage the delicate turbine. If the spin remains sluggish, revisit the whirlybird roof vent installation instructions to verify the attachment and balance. Sometimes, a simple tightening of fittings or realignment restores harmony.
Should noise persist, it might indicate loose components or worn bearings—both signs that the vent’s integrity has been compromised. In such cases, replacing worn parts or re-sealing the base with weatherproof sealant may be necessary. Remember, a well-maintained whirlybird roof vent not only ensures efficient attic ventilation but also wards off the spectral spectres of moisture and decay—keeping your home safe from the unseen perils that lurk in neglect.
Additional Considerations
Local Building Codes and Permits – Ensuring compliance with regulations
When embarking on a project as vital as installing a whirlybird roof vent, understanding the nuances of local building codes and permits is essential. In South Africa, regulations can vary significantly between municipalities, reflecting the diverse climate and architectural styles across the country. Overlooking these rules not only jeopardizes the integrity of your installation but can also lead to costly fines or the need for future modifications.
Before beginning, consult your local authority or a qualified professional to ensure compliance. Many regions require a building permit for roof modifications, especially when cutting into the roof structure. This step safeguards your home’s safety and ensures your project aligns with national standards.
For a seamless process, consider the following:
- Review the building regulations specific to your area.
- Obtain necessary permits before starting any work.
- Ensure your installation adheres to fire safety and ventilation codes.
By meticulously following these guidelines, your whirlybird roof vent installation instructions will not only enhance your home’s ventilation but also uphold the safety standards that protect your family and property for years to come.
Choosing the Right Size and Model – Selecting vents appropriate for your roof and attic size
Choosing the right size and model of a whirlybird roof vent is crucial for effective attic ventilation. An improperly sized vent won’t move enough air, while an oversized one can be noisy and inefficient. To avoid these issues, measure your roof and attic space carefully. The goal is to select a model that matches the volume of air needing exchange in your home.
When considering the options, keep in mind that different roof types and attic sizes demand specific vent dimensions. For larger roofs, opt for multiple vents or larger models to ensure proper airflow. Conversely, small or medium-sized roofs typically require a single, appropriately sized whirlybird. Here’s a quick guide to help:
- Calculate attic volume in cubic meters.
- Determine the airflow capacity of available whirlybird models.
- Match the vent’s capacity with your attic’s ventilation needs.
This careful selection process is vital to follow the correct whirlybird roof vent installation instructions. Proper sizing guarantees optimal performance, efficient energy savings, and long-term durability, making it a worthwhile step in your project.
Professional Installation vs. DIY – When to consider hiring a professional
While the allure of DIY projects beckons to many homeowners in South Africa, the installation of a whirlybird roof vent demands more than just enthusiasm—it requires precision, experience, and an understanding of your roof’s unique architecture. Professional installation ensures that every component functions seamlessly, avoiding costly mistakes that could compromise your attic’s ventilation system. When considering whether to hire a specialist, reflect on your comfort level with roofing tasks and the complexity of your roof structure. Whirlybird roof vent installation instructions might seem straightforward, but the nuances of sealing, waterproofing, and securing the turbine often benefit from expert hands.
For those inclined to embrace the challenge, be aware that improper installation can lead to persistent noise, inefficient airflow, or leaks—issues that diminish the vent’s value over time. Conversely, a seasoned professional’s touch guarantees adherence to local building codes and optimal performance. It’s worth weighing the benefits of professional expertise against the satisfaction of a DIY endeavor, especially when the goal is long-lasting, energy-efficient ventilation for your home.

0 Comments