
Understanding Roof Vent Kits
What Is a Roof Vent Kit?
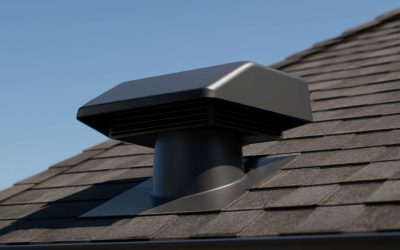
A roof vent kit might not be the most glamorous part of home improvement, but it plays a crucial role in maintaining a healthy, energy-efficient roof. In fact, proper ventilation can extend the lifespan of your roof by preventing heat and moisture build-up. So, what exactly is a roof vent kit? Simply put, it’s a carefully designed assembly of components that allows air to circulate freely within your roof space.
The core function of a roof vent kit is to facilitate natural airflow, which helps to regulate temperature and reduce condensation. This is especially important in attics or lofts where poor ventilation can lead to mould growth and structural damage. A typical roof vent kit includes various vent types, such as ridge vents, soffit vents, or turbine vents, each serving specific purposes. Installing the right kit ensures your roof remains dry and durable, ultimately saving you money on repairs in the long run.
Understanding the different types of roof vent kits available can help homeowners and contractors make informed decisions. For example, some kits feature a combination of intake and exhaust vents, which work together to create a continuous airflow cycle. Here’s a quick overview:
- Ridge vents—installed along the roof ridge for maximum exhaust efficiency
- Soffit vents—located under eaves to allow cool air to enter
- Turbine vents—mechanical vents that spin with the wind to increase airflow
Choosing the appropriate roof vent kit hinges on your specific roof design and climate conditions. When properly installed, a roof vent kit becomes a silent guardian, ensuring your home remains comfortable and protected against the elements.
Types of Roof Vent Kits – Array
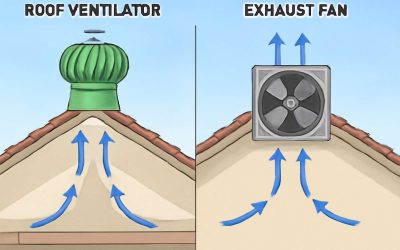
Understanding the array of roof vent kit options can feel like navigating a maze—each type promising to optimise your attic’s airflow in its own unique way. The choice hinges on factors like roof design, climate, and the specific needs of your home’s ventilation system. Some kits blend multiple vent types, creating a symphony of airflow that keeps your roof healthy and moisture-free.
One standout is the ridge vent, installed along the peak of your roof, providing a continuous exhaust pathway that works tirelessly to release hot air. Meanwhile, soffit vents, tucked beneath the eaves, draw in cool, fresh air to create a balanced cycle. Then there are turbine vents—mechanical marvels that harness the wind’s power, spinning to increase airflow even when the breeze is gentle.
To truly grasp the power of a roof vent kit, consider this: a properly selected and installed system can significantly extend your roof’s lifespan, saving thousands in future repairs. The secret lies in understanding the different types and how they can work in harmony to protect your home beneath the shingles.
Benefits of Installing a Roof Vent Kit – Array
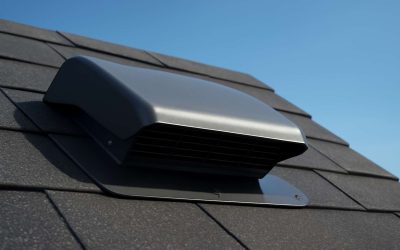
A well-designed roof vent kit does more than just circulate air — it safeguards your home’s structural integrity and boosts energy efficiency. Proper ventilation helps prevent heat build-up in summer, which can damage roofing materials over time, and reduces moisture accumulation in winter that leads to mould and rot. Installing a roof vent kit creates a balanced airflow system, ensuring hot air escapes and cool air enters seamlessly. This harmony not only enhances comfort but also can lower heating and cooling costs significantly.
One of the most compelling benefits of a roof vent kit is its role in prolonging the lifespan of your roof. By maintaining optimal attic ventilation, you diminish the risk of ice dams, mould growth, and premature shingle deterioration. These issues, if left unchecked, can lead to costly repairs — and nobody wants that! A properly selected and installed roof vent kit acts as a silent guardian, working tirelessly to protect your home’s most vital asset.
- Improved attic airflow reduces the strain on your cooling and heating systems.
- Enhanced moisture control prevents mould, rot, and insulation damage.
- Correct ventilation extends the roof’s lifespan, saving money long-term.
Key Features to Consider When Choosing a Roof Vent Kit
Compatibility with Roof Type
Choosing the right roof vent kit isn’t just about aesthetics; it’s about compatibility with your roof type, which is crucial for optimal performance and longevity. Not every roof vent kit fits every roof, and selecting an incompatible option can lead to leaks, inefficient ventilation, or even structural damage. For instance, a tile roof requires a different type of vent compared to a flat or metal roof. Understanding these distinctions can save time, money, and headaches down the line.
When evaluating a roof vent kit, consider its compatibility with your roof’s material and pitch. Some kits are designed specifically for shingle roofs, while others are better suited for metal or flat roofs. Here’s a quick overview of what to look for:
- Material compatibility: Ensure the vent kit suits your roofing material for a secure fit.
- Pitch accommodation: Some kits are adjustable or specifically designed for steep or low-slope roofs.
- Attachment method: Verify that the kit’s mounting system is compatible with your roof’s structure to prevent damage or leaks.
Matching a roof vent kit with your roof type isn’t just practical — it’s a necessity to maintain the integrity and efficiency of your ventilation system. After all, a poorly chosen vent can turn into a costly mistake, something no homeowner or contractor wants to face.
Material Quality and Durability
In the realm of roofing excellence, material quality and durability are the silent architects of a lasting and effective roof vent kit. A vent that withstands the relentless assault of weather conditions—be it the corrosive salt air, freezing frost, or scorching sun—ensures your home’s breath remains unobstructed for years to come. The choice of premium materials like stainless steel, aluminium, or high-grade polymer can transform a simple installation into a fortress of resilience.
When selecting a roof vent kit, pay close attention to the craftsmanship behind its components. An inferior product may promise quick fixes but often falters under the weight of time and elements. To aid in your decision, consider the following:
- Corrosion resistance: Vital for longevity, especially in coastal or humid environments.
- UV stability: Ensures the vent’s exterior remains unfaded and intact after prolonged sun exposure.
- Structural integrity: Robust mounting systems prevent leaks and damage, maintaining your roof’s aesthetic and functional integrity.
Ultimately, the enduring beauty of a roof vent kit lies in its capacity to marry function with resilience. It’s not just about venting; it’s about safeguarding your sanctuary with materials that promise both performance and grace, standing as a testament to craftsmanship and care in every detail.
Ease of Installation
In the pursuit of a seamless installation, the ease of fitting a roof vent kit can transform how your home breathes. A thoughtfully designed vent kit should feel like an extension of your roof, not an obstacle to be overcome. When selecting your roof vent kit, pay close attention to how straightforward the installation process is—this can save time, reduce frustration, and ensure a secure fit. Features such as pre-drilled holes, clear instructions, and adaptable mounting options make all the difference in achieving a professional finish.
Imagine a vent that effortlessly integrates with your roof’s contours, requiring minimal tools and effort to secure in place. To gauge this, consider whether the roof vent kit includes comprehensive hardware and versatile components that accommodate various roof pitches and materials. This adaptability not only simplifies the process but also guarantees a snug, weather-tight seal that lasts for years. Ultimately, choosing a roof vent kit with ease of installation in mind ensures that your home’s ventilation system is both efficient and enduring—crafted with care and precision from the very first step.
Airflow Capacity and Venting Area
When selecting a roof vent kit, one of the most pivotal considerations is its airflow capacity and venting area. A well-matched vent ensures your home breathes freely, preventing moisture build-up and reducing the risk of mould—issues that can quietly erode the integrity of your roof over time.
The size of the venting area directly influences how effectively air circulates within your attic space, impacting everything from energy efficiency to the longevity of your roofing materials. To truly optimise this, pay attention to the manufacturer’s specifications on airflow capacity, typically measured in CFM (cubic feet per minute). A larger airflow capacity signifies a more robust ventilation system, able to cope with the demands of a larger or more active household.
For ease of decision-making, consider this simplified guide:
- Assess your roof’s size and pitch to determine the necessary venting area.
- Match the airflow capacity with the climate — areas with higher humidity demand greater ventilation.
- Ensure the roof vent kit you choose offers versatile options to accommodate different roof configurations.
In the intricate dance of architecture and environment, a roof vent kit with the right airflow and venting area becomes the silent guardian, orchestrating a harmonious balance between shelter and breathability—truly the heart of a resilient home.
Weather Resistance
Weather resistance is a critical feature to consider when choosing a roof vent kit, especially in the unpredictable climate of the UK. A venting system that can withstand heavy rain, snow, and high winds not only prolongs its lifespan but also ensures your attic remains properly ventilated regardless of the elements. Durability against the weather prevents leaks and corrosion, safeguarding your home’s structural integrity over time.
Look for roof vent kits that are constructed from high-quality, weatherproof materials such as aluminium or UV-resistant plastics. These materials provide a robust barrier against the elements, maintaining performance across seasons. Additionally, some vent kits come with protective coatings or seals that enhance their resilience and prevent water ingress.
To further ensure optimal performance, consider the design features of the roof vent kit, such as rain guards or hoods, which act as extra shields against moisture and debris. A well-designed vent kit doesn’t just breathe; it also defends, turning your roof into a resilient shield that balances ventilation with weatherproofing. Whether you’re dealing with gale-force winds or heavy downpours, a weather-resistant roof vent kit is an essential component for a durable, breathable roof system.
Noise Levels
In the quiet moments of dusk, the hum of a roof vent kit can become surprisingly intrusive, reminding us that even the most seemingly benign components of our homes have a voice. Noise levels are an often-overlooked key feature when selecting a roof vent kit, yet they wield silent influence over our daily comfort. A vent that operates with a gentle whisper rather than a disruptive roar can make all the difference, especially in residential settings where peace is sacred.
When evaluating a roof vent kit, consider models designed with noise reduction in mind. Some vent kits incorporate soundproofing features or utilise quieter fans, providing an almost imperceptible presence on the roof. The goal is to ensure that ventilation doesn’t come at the expense of tranquillity.
To achieve this, look out for vent kits with advanced sound-dampening technology, which can significantly diminish operational noise. Balancing performance with serenity isn’t just about comfort — it’s about respecting the subtle harmony that keeps a home’s environment peaceful and inviting. After all, a truly effective roof vent kit is one that breathes life into your attic without disturbing the quiet rhythm of your home’s sanctuary.
How to Install a Roof Vent Kit
Tools and Materials Needed
Installing a roof vent kit might seem straightforward, but proper preparation ensures optimal airflow and longevity. Before starting, gather the necessary tools and materials—skilled installation depends on quality, after all! A typical roof vent kit installation requires basic tools such as a power drill, a saw, a measuring tape, and a screwdriver. You’ll also need safety gear, including gloves and a harness, especially if working on steep roofs.
Once equipped, measure and mark the spot where the vent will be installed. Cutting into the roof requires precision; a saw or reciprocating tool will do the job efficiently. To secure the vent, use appropriate fasteners and sealants to ensure weather resistance—this prevents leaks and prolongs the lifespan of the roof vent kit.
Here is a quick overview of the materials needed:
- Roof vent kit (model appropriate for your roof type)
- Power drill and bits
- Saw or reciprocating tool
- Measuring tape and marker
- Sealant suitable for roofing materials
- Fasteners (nails or screws)
With the right tools and careful attention to detail, you can successfully install a roof vent kit that enhances airflow and protects your home from weather damage.
Step-by-Step Installation Process
Installing a roof vent kit isn’t just about drilling holes and securing parts; it’s a delicate dance between craftsmanship and understanding how airflow influences the health of your home. Proper installation ensures that moist air escapes efficiently, reducing the risk of mould and structural damage over time. The process begins with precise measurements—marking the exact location where the vent will sit—because even a small miscalculation can compromise performance or cause leaks.
Next, carefully cut into the roof using a saw or reciprocating tool, following your markings. It’s essential to work slowly and deliberately, maintaining a steady hand to prevent damaging surrounding materials. Once the opening is prepared, insert the roof vent kit, making sure it fits snugly. Using the right fasteners and weatherproof sealants seals the edges, creating a barrier against rain and wind. This step is crucial as it preserves the integrity of the roof, extending the lifespan of your installation.
To ensure a seamless fit and optimal function, it’s helpful to follow a step-by-step approach:
- Measure and mark the installation point carefully.
- Cut the opening precisely, avoiding any damage to the surrounding roof structure.
- Insert the roof vent kit, aligning it correctly with the markings.
- Secure the vent using appropriate fasteners, ensuring it is firmly attached.
- Apply weatherproof sealant along the edges to prevent leaks.
Throughout this process, attention to detail makes all the difference. A well-executed installation of your roof vent kit not only enhances airflow but also safeguards your home against the elements, proving that a blend of technical skill and thoughtful planning results in a truly effective venting system.
Safety Precautions
Installing a roof vent kit requires more than just technical precision; it demands a respect for safety and a keen awareness of potential hazards. The process involves working at heights and manipulating sharp tools, which can pose risks if precautions aren’t taken seriously. Ensuring safety isn’t just a matter of personal protection but a vital step in safeguarding your home’s integrity during installation.
Before beginning, always wear appropriate safety gear—sturdy gloves, protective eyewear, and a fall harness if necessary. Secure your ladder on a stable surface and double-check its placement to prevent slips or falls. Working methodically and taking your time will help avoid accidents caused by haste or inattention.
It’s recommended to:
- Clear the area of debris or obstacles that could cause tripping.
- Use a sturdy, reliable ladder that extends beyond the roof edge for safe access.
- Ensure power tools are in good working order to prevent accidental injury.
- Work with a partner if possible, so help is readily available in case of emergency.
Remember, the installation of a roof vent kit isn’t merely about efficiency; it’s about respecting the craftsmanship and safeguarding the home’s future. Every step taken with care contributes to a seamless, weather-resistant venting system that performs beautifully for years to come.
Professional Installation vs DIY
Installing a roof vent kit is an endeavour that demands both precision and a nuanced understanding of the architecture beneath your roof’s surface. While the promise of a well-ventilated attic may seem straightforward, the journey from concept to completion is riddled with variables that can either elevate or undermine the system’s long-term efficacy.
Professional installation offers an unmatched depth of expertise—an intricate dance of measuring, cutting, and sealing that seasoned craftsmen have refined over countless projects. They possess an instinctive grasp of the subtle interplay between roof type, material durability, and weather resistance, ensuring the roof vent kit functions optimally across seasons.
Conversely, a DIY approach, if undertaken with meticulous preparation and the right tools, can be equally rewarding. It’s essential to follow a detailed step-by-step process, which might include marking the precise vent location, cutting cleanly through the roofing material, and sealing joints to prevent leaks. For those considering a DIY route, assembling a list of necessary tools—such as a power drill, utility knife, and safety harness—can streamline the process and reduce errors.
Ultimately, whether opting for professional expertise or a dedicated DIY effort, the choice hinges on comfort with the task and the specific demands of your home.
Maintenance and Troubleshooting
Regular Inspection Tips
A roof vent kit, when properly maintained, remains a silent guardian of your home’s integrity—preventing moisture buildup and prolonging the life of your roof. Regular inspection is the heartbeat of effective ventilation; neglect can turn a trusted ally into a source of trouble. I’ve seen countless instances where debris, such as leaves and twigs, clog the vents, choking airflow and inviting mould or rot.
To keep your roof vent kit performing at its peak, schedule routine checks—at least twice a year, and after any severe storm. During these inspections, look for signs of damage like cracks, rust, or dislodgement. Clear away obstructions gently, ensuring the vents are unobstructed and freely allowing air to flow.
For those seeking a systematic approach, follow this simple checklist:
- Examine the exterior vents for debris or damage.
- Check the interior for signs of water ingress or mould.
- Ensure the vents are securely attached and free from corrosion.
Troubleshooting common issues often involves a keen eye and a gentle touch, but recognising when professional intervention is needed can save you from costly repairs. A well-maintained roof vent kit breathes life into your home’s ventilation—an invisible yet vital sentinel standing watch against the relentless march of weather and time.
Cleaning Methods
Maintaining a roof vent kit isn’t just about keeping your roof looking pristine; it’s about safeguarding your entire home’s health. Regular cleaning ensures the vital airflow remains unobstructed, preventing moisture accumulation that can lead to mould and rot. Over time, debris like leaves, twigs, and dirt can settle into the vents, choking the system’s efficiency. Fortunately, cleaning methods are straightforward but require a gentle approach to avoid damage.
Start by removing loose debris with a soft brush or a broom. For stubborn grime, a mixture of mild soap and water applied with a sponge can work wonders. For metal components, a rust-inhibitor spray can extend the lifespan of your roof vent kit. If you notice persistent blockages or corrosion, it might be time to consider a professional inspection.
Here’s a simple guide to keep your roof vent kit in peak condition:
- Gently clear away debris from exterior vents.
- Inspect for signs of rust or damage, addressing any issues promptly.
- Use a garden hose to flush out stubborn dirt, avoiding high-pressure sprays that could dislodge parts.
- Apply corrosion-resistant coatings periodically to prolong durability.
Remember, a well-maintained roof vent kit not only enhances ventilation but also extends the life of your roof, providing peace of mind through every season. When in doubt, consulting a professional can help troubleshoot persistent issues without risking unnecessary damage.
Common Issues and Solutions – Array
Maintaining a roof vent kit is essential for preserving the integrity of your roofing system, yet even the most robust installations can face common issues over time. Recognising these problems early can save costly repairs and prolong the life of your ventilation system. One frequent predicament involves obstructed vents, often caused by debris accumulation or nesting animals, which impede airflow and promote moisture retention. Such blockages are deceptively subtle but have a profound impact on your home’s climate control.
Addressing these issues requires a methodical approach. Regular inspections should become part of your maintenance routine, focusing on signs of corrosion or damage. For persistent blockages, a simple yet effective solution involves using a garden hose to flush out debris, avoiding high-pressure sprays that might dislodge components. If corrosion is evident, applying a quality rust-inhibitor spray can bolster your roof vent kit’s resilience to the elements. When problems persist despite these measures, consulting a professional becomes indispensable — experts can diagnose underlying issues, ensuring your roof vent kit functions optimally for seasons to come.
Sometimes, troubleshooting reveals specific culprits. For example, a poorly sealed vent may cause leaks, while loose fittings can rattle and compromise weather resistance. In such cases, a systematic inspection — perhaps following an ordered list — can help identify and resolve each concern efficiently:
- Check for loose or missing fasteners.
- Inspect for signs of rust or corrosion.
- Test the vent’s airflow capacity.
- Examine seals and flashing for integrity.
Understanding and addressing these issues not only ensures your roof vent kit performs seamlessly but also safeguards your home against the insidious threats of moisture and decay. Vigilant maintenance and swift troubleshooting are the keystones to a durable, efficient ventilation system that withstands the test of time and weather.
Cost Factors and Budgeting for Roof Vent Kits
Average Price Range
Cost considerations inevitably influence every decision when selecting a roof vent kit, as the balance between quality and budget can significantly impact long-term satisfaction. While the initial investment varies, understanding the factors that drive cost helps homeowners make informed choices.
Typically, the average price range for a roof vent kit falls between £50 and £300, depending on material quality, vent type, and installation complexity. Premium options, such as solar-powered or turbine vents, tend to push the budget higher but offer superior durability and efficiency. Conversely, basic box vents or static vents are more affordable but may require more frequent maintenance over time.
Budgeting should also account for additional costs, including professional installation, tools, and potential modifications to existing roofing structures. For those seeking a cost-effective solution, it’s worth considering a step-by-step comparison of options, including:
- Material durability and weather resistance
- Venting capacity and airflow efficiency
- Ease of installation and compatibility with roof type
Understanding these elements ensures your investment in a roof vent kit aligns with your needs and long-term home health.
Installation Costs
Cost factors play a crucial role in choosing the right roof vent kit for your home. While the initial price can vary significantly, understanding what influences these costs helps you make smarter decisions. Material quality, vent type, and installation complexity are the primary drivers behind price differences. A high-quality, weather-resistant roof vent kit may cost more upfront but offers superior durability and efficiency over time.
Budgeting wisely involves considering both upfront expenses and ongoing maintenance. For example, solar-powered roof vent kits tend to be pricier but can reduce energy bills in the long run. Conversely, basic static vents are more affordable but might require more frequent upkeep. When planning your budget, consider the following:
- Installation costs, which can include professional fees or DIY expenses
- Tools and materials needed for installation
- Potential modifications to existing roofing structures
By factoring in these elements, you ensure your investment in a roof vent kit enhances your home’s venting capacity while aligning with your budget. Cost considerations are essential to balancing quality, longevity, and performance for your roof ventilation needs.
Factors Affecting Cost – Array
The cost of a roof vent kit can cast a long shadow over your home improvement plans, demanding a careful reckoning of what truly matters. In the shadowed corridors of pricing, material quality and vent type wield considerable influence—weather-resistant models, crafted from premium materials, may demand a higher toll but promise longevity and resilience against the brutal elements.
Budgeting wisely requires a keen eye on both initial expenditure and the silent toll of ongoing maintenance. Solar-powered roof vent kits, for instance, may seem costly at first glance, yet they whisper promises of reduced energy bills over time. Conversely, static vents beckon with their modest price tag but may require more frequent attention, draining resources slowly like a dark, unseen leak.
Consider this: installation costs—whether borne by skilled artisans or borne by your own hands—are a vital piece of the puzzle.
- Tools and materials needed for installation
and potential modifications to the roofing structure can turn a simple upgrade into an elaborate ritual. Embracing these factors ensures that your investment in a roof vent kit does not merely vent but transforms your home into a sanctuary of breath and life amidst the shadows.
Choosing the Right Supplier or Brand
Reputation and Reviews
Choosing the right supplier for your roof vent kit can often feel like navigating a labyrinth of options, each promising unparalleled quality and performance. A reputable brand not only guarantees the durability of your roof vent kit but also ensures that every component aligns seamlessly with your specific roof type, preventing future complications. When evaluating suppliers, it’s crucial to delve into customer reviews and testimonials, as they offer an unfiltered glimpse into the real-world performance and reliability of the products.
A trusted supplier’s reputation is often built on transparent practices and consistent quality, which translate into longer-lasting, weather-resistant roof vent kits that withstand the relentless march of time and elements. Consider prioritising brands with established history in the industry, as they tend to offer superior materials and innovative venting solutions that optimise airflow and energy efficiency. Remember, investing in a high-quality roof vent kit from a reputable supplier isn’t just about immediate function—it’s about securing peace of mind for years to come.
Warranty and Support
Choosing the right supplier or brand for your roof vent kit can be a game-changer in ensuring long-term satisfaction and performance. A reputable provider not only offers peace of mind but also often backs their products with comprehensive warranties and reliable support services. When investing in a roof vent kit, it’s essential to consider how the supplier handles after-sales care, as this can significantly impact your experience if issues arise down the line.
Look for brands that stand behind their products with clear warranty policies and accessible customer support. This ensures that if your roof vent kit encounters problems—whether due to manufacturing defects or installation concerns—you’re covered. Some suppliers even include extended warranties or satisfaction guarantees, adding an extra layer of security. Remember, a trusted supplier will be transparent about their warranty coverage and support options, making it easier to resolve potential problems swiftly and effectively.
In the world of roof vent kits, the choice of supplier can influence everything from product longevity to overall efficiency. Prioritising brands known for their customer service and support can turn a simple upgrade into a hassle-free investment that endures the elements and time. Ultimately, the right supplier doesn’t just sell you a roof vent kit—they stand behind it, ensuring your roof remains well-ventilated and protected for years to come.
Availability and Delivery
In the realm of roof vent kits, the availability of your chosen product can make all the difference between a seamless upgrade and a frustrating ordeal. A reputable supplier ensures that your roof vent kit is in stock when you need it, avoiding delays that could compromise your project timeline. Additionally, the ease of access to the product—whether through local stores or reliable online outlets—can streamline the buying process and save valuable time.
Delivery options are equally crucial. Fast, secure shipping means your roof vent kit arrives in pristine condition, ready for installation. Look for suppliers who offer detailed tracking and flexible delivery schedules, especially if you’re working within a tight window. Some providers even include free delivery for orders over a certain amount, adding extra value. When selecting a brand, consider their distribution network and customer service reputation to ensure that your purchase is both convenient and dependable.
Choosing the right supplier isn’t just about product quality; it’s about trust and service. Prioritising brands that guarantee prompt availability and reliable delivery transforms what could be a complex process into a smooth experience, leaving you confident that your roof vent kit will arrive on time, intact, and ready to deliver optimal ventilation for your property.
Popular Brands to Consider
Choosing the right supplier for your roof vent kit can make all the difference between a hassle-free upgrade and ongoing frustrations. Trustworthy brands offer not only quality products but also reliable service that ensures prompt delivery. When considering options, it’s wise to explore brands with a strong reputation for durability and performance. A well-established supplier often provides better customer support and warranties, giving you peace of mind throughout the installation process.
Popular brands to consider include Ridge Vent Solutions, VentingPro, and AirFlow Systems. These companies are known for their innovative designs and robust materials, which maximise airflow and withstand harsh weather conditions. Opting for recognised brands with positive reviews can save you from future issues and ensure your roof vent kit performs optimally over time. Remember, a reliable supplier not only guarantees product quality but also offers flexible delivery options, making your project smoother and more predictable.

0 Comments