
Understanding Roof Vents for Microwaves
Types of Roof Ventilations Suitable for Microwaves – Exploring different roof vent options for microwave installation
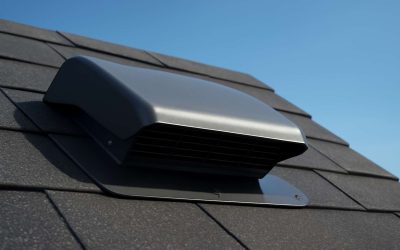
Understanding roof vents for microwaves is essential to ensure proper ventilation and safety. A well-chosen roof vent can prevent heat buildup and reduce the risk of fire hazards, especially in rural settings where homes often rely on efficient airflow. When installing a roof vent for microwave, it’s crucial to recognize the different types of roof ventilation suitable for this purpose. These options are designed to handle the specific needs of kitchen appliances, ensuring that stale air and moisture are expelled effectively.
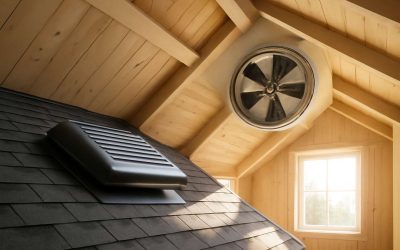
For microwave installation, the most common roof vent options include static vents, turbine vents, and powered exhaust vents. Static vents are simple, cost-effective, and work well in less humid environments. Turbine vents, with their spinning mechanism, utilize wind power to draw air upward, making them suitable for windy South African climates. Powered exhaust vents, though more energy-dependent, offer precise control and robust airflow, ideal for modern homes. Each type plays a vital role in maintaining a healthy indoor environment when installing roof vent for microwave, ensuring your kitchen remains free of unwanted odors and excess heat.
Benefits of Installing a Roof Vent for Your Microwave – How a roof vent improves kitchen safety, air quality, and appliance efficiency
In bustling rural kitchens where every appliance plays a vital role, installing roof vent for microwave can be the difference between a comfortable cooking space and a stifling, heat-saturated room. When hot steam and lingering odors escape efficiently, it creates an environment that feels fresher, safer, and more inviting. A well-designed roof vent acts as the silent guardian of your kitchen, reducing the risk of heat buildup that could compromise your microwave’s performance and longevity.
By installing roof vent for microwave, you significantly improve indoor air quality, ensuring stale air and excess moisture are expelled swiftly. This not only keeps your kitchen smelling clean but also minimizes potential mold growth, which is crucial in humid climates. In addition, proper ventilation enhances the safety of your home by reducing fire hazards associated with heat accumulation. A thoughtful vent system ensures that your microwave and other appliances operate efficiently while maintaining a healthy, comfortable environment for your family.
Key Considerations Before Installation – Assessing roof type, local building codes, and ventilation requirements
When considering installing roof vent for microwave, understanding the nuances of your roof’s structure is paramount. South African homes boast a diverse array of roofing materials—ranging from corrugated iron to tiled surfaces—and each demands a tailored approach. The integrity of your roof type influences not only the feasibility but also the longevity of the vent system you choose. It’s essential to assess whether your roof can support the installation without compromising its waterproofing or structural stability.
Local building codes add another layer of complexity. Regulations surrounding ventilation and safety standards vary across municipalities, and compliance isn’t just about avoiding fines; it’s about safeguarding your home. Before proceeding, verifying these codes ensures your installation aligns with legal requirements, providing peace of mind and avoiding costly modifications later.
Ventilation requirements are equally crucial. Proper airflow isn’t achieved by chance—it demands careful planning. When installing roof vent for microwave, consider factors like the size of your kitchen, the typical volume of steam and odors produced, and the positioning of your microwave relative to existing vents. An effective system often involves a combination of:
- Correct vent size to match your kitchen’s needs
- Strategic placement for optimal airflow
- Ensuring the roof’s pitch and material support the vent’s installation
By thoroughly evaluating these considerations, you lay a solid foundation for a safe, efficient, and compliant installation. Remember, a well-planned roof vent isn’t just about convenience; it’s about enhancing your home’s safety and air quality for years to come. Installing roof vent for microwave is a task that deserves meticulous attention to detail—because your comfort and safety depend on it.
Preparation for Installing a Roof Vent for Microwave
Tools and Materials Needed – List of essential tools and materials, including vent fans, ductwork, fasteners
Preparing for installing roof vent for microwave installation begins with gathering the right tools and materials. This process demands precision and quality to ensure safety and efficiency. A well-chosen vent fan, compatible ductwork, and sturdy fasteners are essential. Without these, the entire project could falter or pose safety risks down the line.
Common tools include a drill, screwdriver, measuring tape, and a jigsaw. For materials, you’ll need a roof vent kit designed for microwave exhaust, flexible or rigid ducting, and weatherproof fasteners. Make sure to select ductwork with a smooth interior to minimize airflow resistance. Proper sealing tape and flashing are also critical to prevent leaks and water intrusion.
- Measure the microwave’s vent outlet to select the correct vent size.
- Check the roof’s pitch and material to determine the appropriate mounting hardware.
- Gather all necessary safety gear—gloves, goggles, and a sturdy ladder—before starting.
Having all these tools and materials prepared before beginning the installing roof vent for microwave process ensures a seamless installation, saving time and avoiding costly mistakes. Attention to detail here makes all the difference in creating a safe, durable venting system that works efficiently for years to come.
Safety Precautions – Guidelines for safe installation, working on rooftops, and handling power tools
Embarking on the journey of installing a roof vent for microwave requires more than just technical know-how; it demands respect for safety and a keen awareness of your environment. Working on rooftops can be treacherous, especially under South Africa’s unpredictable weather. Ensuring that your ladder is sturdy, your footing secure, and safety gear like gloves and goggles are in place is paramount. Remember, a moment’s lapse can turn a routine project into a serious hazard.
Handling power tools such as drills and jigsaws calls for precision and caution. Always double-check that your tools are in good working order and that you follow manufacturer instructions meticulously. When installing roof vent for microwave, it’s crucial to avoid rushing—measure twice, cut once. If working on a pitched roof, use appropriate mounting hardware designed for your roof type to prevent leaks and structural issues.
- Wear slip-resistant footwear
- Use harnesses or safety lines if necessary
Taking these safety precautions not only protects your well-being but also guarantees a professional, durable installation. A careful, safety-first approach ensures that your microwave’s roof vent functions flawlessly for years—delivering peace of mind and efficient kitchen ventilation in South Africa’s demanding climate.
Measuring and Planning the Vent Placement – How to accurately measure and plan the vent location for optimal airflow
Embarking on the task of installing roof vent for microwave is akin to orchestrating a symphony—precision, planning, and a bit of flair are essential. In South Africa’s capricious climate, a well-placed roof vent can be the difference between a fragrant, fresh kitchen and a stifling, smoky chaos. The first step? Accurate measurement and meticulous planning of the vent placement. This ensures optimal airflow, preventing microwave fumes from lingering and compromising your culinary sanctuary.
Proper planning begins with understanding your roof’s architecture and the ideal location that aligns with your kitchen’s ventilation needs. To avoid the pitfalls of guesswork, use a tape measure to determine the exact spot where the vent will be most effective. Consider the following:
- Distance from the microwave’s exhaust point to the roof surface
- Clearance from neighboring structures or obstructions
- Potential pathways for ductwork that won’t compromise roof integrity
Once you’ve mapped out the perfect coordinates, sketch a simple diagram. This visual aid becomes your roadmap, guiding precise measurements and ensuring that installing roof vent for microwave results in seamless performance and airflow efficiency. Remember, a little effort now saves headaches later—after all, a well-measured vent is the cornerstone of a successful installation.
Step-by-Step Guide to Installing the Roof Vent
Creating an Opening in the Roof – Step-by-step process for cutting the roof opening safely
Embarking on the process of installing a roof vent for microwave demands meticulous precision, as each cut in the roof serves as a gateway to improved ventilation and safety. The act of creating an opening in the roof is not merely a task of measurement and cutting, but a deliberate step that influences the overall efficiency of the ventilation system. Imagine the importance of aligning the vent perfectly—an inch off can compromise airflow, leading to lingering odors and heat buildup. It’s a delicate balance—one that requires patience and unwavering focus.
Before wielding any tools, ensure the area beneath the roof is free of wiring or structural components that could be compromised during the cut. Use a chalk line to mark the precise outline of the vent, taking into account the manufacturer’s specifications. For a clean and safe cut, employ a reciprocating saw or jigsaw fitted with a fine-tooth blade. Carefully follow the marked lines, applying steady pressure to avoid jagged edges or accidental damage. Remember, the goal is a seamless integration of the vent into your roof’s surface, fostering optimal airflow and durability.
To streamline the process, consider this sequence:
- Mark the vent opening accurately based on measurements and planned placement.
- Double-check for obstructions within the roof cavity.
- Begin cutting with controlled, deliberate strokes, ensuring the blade remains aligned with your markings.
By approaching each step with calculated intent, you pave the way for a successful installation—one that ensures your microwave’s roof vent functions flawlessly, enhancing your kitchen’s safety, air quality, and overall efficiency.
Installing the Vent Flange – Securing the vent flange to prevent leaks and ensure stability
Securing the vent flange is the critical final act in the drama of installing roof vent for microwave. This step ensures that your hard-earned ventilation doesn’t turn into a leaky nightmare, and that your microwave’s exhaust system remains as steadfast as a lighthouse in a storm. The key here is to fasten the flange securely, sealing out water, debris, and any unwelcome critters that might fancy a stay in your roof cavity.
Begin by positioning the flange over the opening, aligning it precisely with your marked measurements. Use a drill with the appropriate bit to create pilot holes for the fasteners—this prevents the flange from wandering off-center during installation. Then, screw the flange into place, working in a crisscross pattern to ensure even pressure and a snug fit. Remember, the goal is a leak-proof seal that can withstand South Africa’s unpredictable weather patterns.
To guarantee stability and prevent future headaches, apply a generous bead of high-quality roofing sealant around the flange’s perimeter before tightening the last fastener. This not only boosts waterproofing but also prolongs the lifespan of your installation. When done right, this step transforms your roof vent for microwave from a simple opening into a fortress of functionality, ensuring safe, efficient ventilation for years to come.
Connecting Ductwork to the Microwave – Routing ductwork from the microwave to the roof vent
Routing the ductwork from your microwave to the roof vent is a delicate dance of precision and patience—think of it as threading a needle through a haystack, but with higher stakes. Properly connecting ductwork ensures your microwave exhaust doesn’t become a conduit for kitchen chaos or a hideout for pests. The challenge lies in creating a seamless pathway that maximizes airflow while minimizing potential leaks and obstructions.
Start by measuring the distance from your microwave’s exhaust outlet to the newly installed roof vent. Use a flexible ducting material that can navigate tight corners and awkward angles—no one wants a duct that’s more kink than a pretzel. Secure the duct to the microwave’s exhaust port with foil tape or clamps, ensuring an airtight connection. Then, route the duct along the most straightforward path, avoiding sharp bends that could restrict airflow and reduce efficiency.
For optimal performance, consider the following steps:
- Attach the duct to the roof vent using appropriate connectors or clamps.
- Seal all joints with high-quality, weatherproof duct tape to prevent leaks and drafts.
- Ensure the duct is supported adequately along its length to prevent sagging or dislodgement over time.
While installing roof vent for microwave might seem straightforward, neglecting proper duct routing can turn your ventilation system into a nightmare of inefficiency and potential water ingress. So, take your time, measure twice, and secure every connection—your microwave and your roof will thank you for it!
Sealing and Weatherproofing – Applying sealants and waterproof membranes to prevent leaks
In the realm of creating a kitchen sanctuary where efficiency meets safety, installing roof vent for microwave is no mere task—it’s a symphony of craftsmanship and precision. Ensuring the seal and weatherproofing are impeccable transforms a simple installation into an enduring fortress against leaks and the vagaries of weather. When sealing the roof vent, every layer of protection becomes a guardian, defending your home from water ingress, drafts, and unwelcome pests.
Begin with a high-quality waterproof membrane, carefully applied over the vent flange and surrounding roof opening. This acts as an invisible shield, repelling moisture and sealing the edges with a flexible, weather-resistant sealant. For added resilience, consider wrapping the joint with durable sealant tape—think of it as the armor of your installation. To maintain longevity, support the duct along its length with sturdy brackets or straps, preventing sagging and ensuring the airflow remains unimpeded.
In the grand tapestry of installing roof vent for microwave, every detail counts. Proper sealing and weatherproofing are the final strokes that turn a functional installation into an enduring masterpiece, standing resilient against South Africa’s unpredictable climate. When done with care, this process safeguards your microwave’s exhaust system, preserving its efficiency and your peace of mind.
Securing the Roof Vent – Final fastening and ensuring proper alignment and seal
Securing the roof vent for microwave installation is where craftsmanship truly shines. Once the vent flange is meticulously aligned, the final fastening transforms a simple fixture into a resilient guardian of your kitchen sanctuary. Ensure the vent sits perfectly in place; a misaligned vent can compromise both efficiency and weatherproofing. Using high-quality fasteners, anchor the vent securely to the roof, paying attention to the manufacturer’s torque specifications to prevent any loosening over time.
For an impeccable seal, apply weather-resistant sealant around the flange, pressing it into every crevice to block out moisture and drafts. To elevate the protection, wrap the joint with durable, waterproof sealant tape—think of it as the armor shielding your home against South Africa’s unpredictable climate. Double-check the positioning of the ductwork, making sure it’s free of kinks or obstructions that could hinder airflow. Proper alignment isn’t just about aesthetics; it’s about preserving the longevity and efficiency of your microwave’s exhaust system.
When finalizing the installation, ensure the vent is firmly anchored and that the sealant has cured completely. This dedication to detail guarantees your installation withstands the test of time, weather, and wear. Remember, every bolt tightened and every seal applied is a step closer to a seamless, leak-proof installation—an artful balance of function and durability that transforms a mundane task into a masterpiece of craftsmanship.
Electrical and Safety Considerations
Electrical Wiring and Power Supply – Ensuring safe and compliant electrical connections for the vent fan
Electrical and safety considerations are paramount when installing a roof vent for microwave systems. The process demands meticulous attention to electrical wiring and power supply integrity—skilled installation ensures compliance with local regulations and prevents potential hazards. A poorly wired vent fan can lead to electrical faults, short circuits, or even fires, which underscores the importance of adhering to safety standards. Proper grounding, circuit protection, and the use of certified materials are non-negotiable elements in this undertaking.
When installing roof vent for microwave, it is crucial to evaluate the existing electrical infrastructure. This often involves installing dedicated circuits to handle the vent’s power load without overtaxing the household wiring. For added safety, consider incorporating a residual current device (RCD) or circuit breaker, providing an extra layer of protection against electrical faults. An unordered list below highlights key safety precautions to follow during installation:
- Always turn off the main power before beginning any electrical work.
- Use insulated tools designed for electrical installations.
- Ensure all wiring connections are secure and properly insulated.
- Verify that the power supply matches the vent fan’s voltage and current requirements.
By meticulously planning the electrical wiring and adhering to safety protocols, installing roof vent for microwave becomes a straightforward yet critical task. This approach not only guarantees optimal operation but also safeguards your home and loved ones from electrical mishaps. Remember, a compliant and well-executed electrical setup is the backbone of a successful ventilation installation, especially in the diverse climates and building standards found across South Africa.
Checking for Proper Ventilation Flow – Testing airflow and ensuring unobstructed ventilation
Proper airflow is critical when installing roof vent for microwave systems. Without adequate testing, you risk poor ventilation, which can lead to heat buildup, odours, and reduced appliance lifespan. Once the vent is installed, it’s essential to verify that airflow flows freely and unobstructed. A simple airflow test involves turning on the microwave and observing the vent’s performance—air should move briskly through the ductwork without resistance. Any signs of sluggish airflow or blockages suggest adjustments are needed.
Ensuring optimal ventilation flow is more than just a quick check. It requires inspecting the entire duct route for kinks, debris, or obstructions.
- Clear any debris from the ductwork
- Check for tight seals at joints
- Ensure the vent cap is free from leaves or bird nests
These steps help maintain unobstructed airflow, which is vital for safety and efficiency. Remember, a well-ventilated microwave not only prolongs the life of the appliance but also keeps your kitchen environment safe and fresh. Proper ventilation flow is a cornerstone of a successful installation when installing roof vent for microwave systems in South African homes and businesses.
Compliance with Building Codes – Verifying installation adheres to local regulations
Ensuring compliance with building codes is the unsung hero of any successful installing roof vent for microwave project. In South Africa, local regulations are the gatekeepers of safety, making it imperative to verify that your installation adheres to these standards. Skipping this step is like trying to tame a lion with a toothpick—dangerous and destined for disaster.
Before diving into the installation, consult the South African National Building Regulations (NBR) or your local municipal bylaws. These documents specify requirements for ventilation systems, electrical wiring, and roof modifications. An overlooked detail can lead to hefty fines or, worse, unsafe conditions that threaten your home or business.
- Check that your planned roof vent location complies with height and setback regulations.
- Ensure electrical wiring for the vent fan meets South African electrical standards.
- Confirm that the installation plan includes proper weatherproofing measures to withstand Cape storms or Johannesburg heatwaves.
Failure to follow these guidelines not only jeopardizes your safety but can also invalidate warranties or insurance claims. When installing roof vent for microwave, meticulous adherence to local building codes ensures a seamless blend of safety, efficiency, and legal peace of mind. After all, no one wants a roof vent fiasco turning into a costly saga—except perhaps reality TV producers.
Maintaining Your Roof Vent for Microwave
Routine Inspection and Cleaning – Keeping the vent and ductwork free of debris and obstructions
Maintaining your roof vent for microwave is an ongoing journey, one that ensures your kitchen remains a sanctuary of fresh air and safety. Routine inspection is vital—think of it as giving your vent a health check-up, catching debris or obstructions before they turn into bigger problems. Over time, dust, grease, and leaves can accumulate, choking the airflow and reducing efficiency. Regularly clearing these blockages keeps the vent working at its peak, preventing overheating and potential fire hazards.
Cleaning the ductwork is equally essential. A simple yet effective method involves disconnecting the duct, then using a long brush or vacuum to remove built-up grime. Remember, a well-maintained vent not only prolongs the life of your appliance but also enhances your home’s air quality. For those embarking on installing roof vent for microwave, incorporating a scheduled inspection routine will safeguard your investment and ensure seamless operation—because when airflow is unobstructed, your microwave performs its best, with safety and efficiency as the true winners.
Troubleshooting Common Issues – Identifying and fixing problems like poor airflow or leaks
Maintaining your roof vent for microwave isn’t just about keeping things tidy; it’s about preventing a small problem from turning into a kitchen catastrophe. When airflow is compromised, it can lead to overheating, unpleasant odors, and even moisture buildup—each a potential recipe for disaster. A common culprit behind poor ventilation? Obstructed ducts or a vent that’s lost its seal.
Troubleshooting these issues is straightforward but requires vigilance. Listen for strange noises or notice lingering smells after cooking? These are telltale signs that airflow isn’t up to snuff. Check for leaks around the vent flange or visible blockages in the ductwork. Sometimes, debris like leaves, dust, or grease can choke the system, reducing efficiency and risking fire hazards.
In situations where airflow is sluggish, consider the following steps:
- Inspect the duct for obstructions
- Ensure the vent flap opens freely
- Verify the seal around the roof vent for leaks
Whether you’re troubleshooting or embarking on installing roof vent for microwave, a keen eye and proactive maintenance keep your kitchen safe, functional, and free of preventable mishaps.
When to Call a Professional – Signs indicating the need for expert assistance
Maintaining your roof vent for microwave isn’t a task to be taken lightly. Sometimes, despite careful installation, issues can arise that compromise airflow or cause leaks. Recognizing when to call a professional is essential to avoid costly damage down the line. Persistent strange noises, lingering odors after cooking, or visible signs of water around the vent flange are clear indicators that expert intervention may be needed.
A licensed technician can thoroughly inspect the ductwork, seals, and electrical connections, ensuring everything complies with local building codes.
- If you notice recurring blockages in the duct, or if the vent flap refuses to open properly, professional help becomes crucial.
Regular inspections and maintenance keep your kitchen safe and functioning efficiently. When in doubt, trusting a professional to handle the installing roof vent for microwave ensures optimal performance and peace of mind—after all, some issues are best left to the experts.


0 Comments